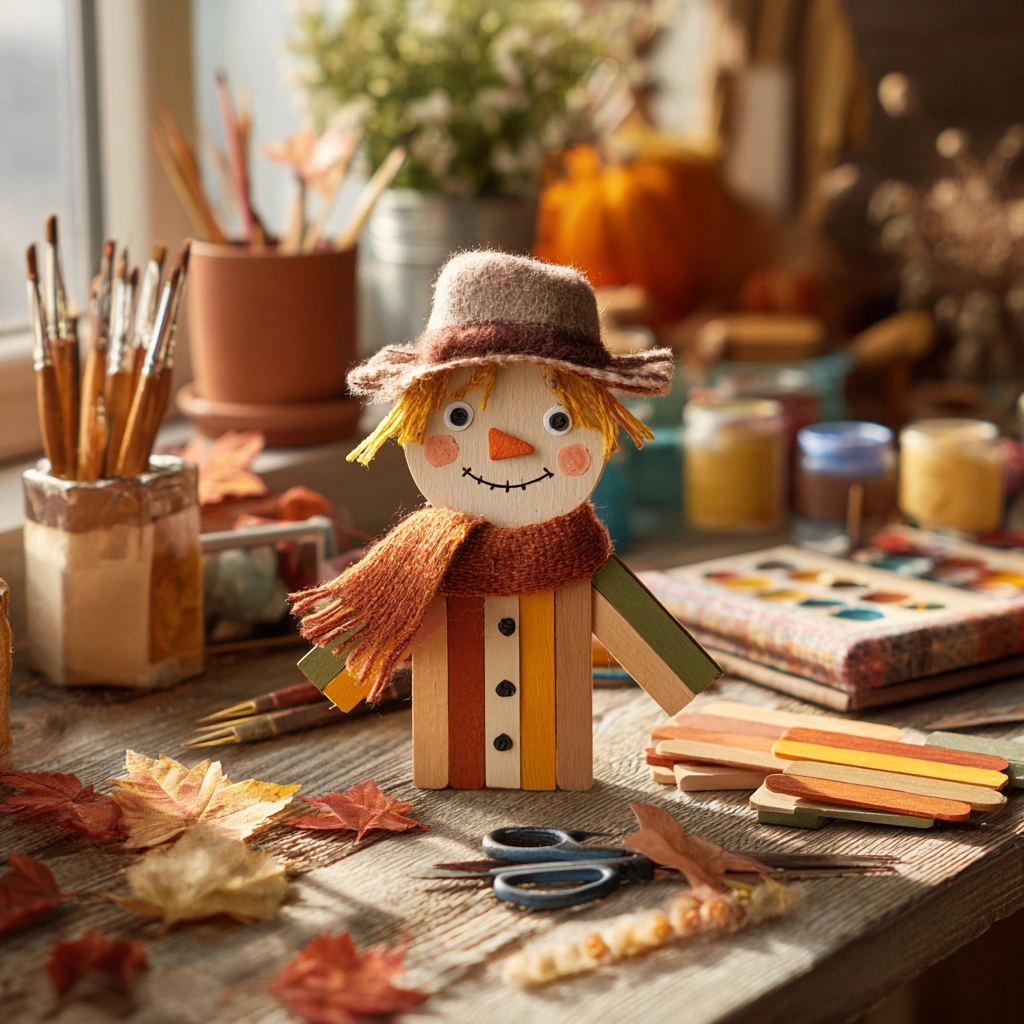
Introduction to Fall Popsicle Stick Scarecrow Craft
Welcome to the whimsical world of crafting with our Fall Popsicle Stick Scarecrow Craft! As the leaves turn golden and the air gets crisp, there’s no better way to celebrate autumn than by creating your very own scarecrow. This DIY project is not only simple and fun, but it also brings a sense of joy and creativity to your home. I love how crafting together can spark laughter and imagination, making it a perfect activity for moms, teachers, and creative hobbyists alike. So, grab your supplies, and let’s make some charming fall decor that will brighten up any space!
Why You’ll Love This Fall Popsicle Stick Scarecrow Craft
This Fall Popsicle Stick Scarecrow Craft is a delightful way to unleash your creativity while enjoying quality time with your kids. It’s easy on the wallet, making it a budget-friendly option for family fun. Plus, the joy of seeing your little ones’ faces light up as they create their own unique scarecrows is priceless. Crafting together not only fosters creativity but also strengthens those precious family bonds during the cozy autumn season!
Materials and Tools Needed for Fall Popsicle Stick Scarecrow Craft
To create your adorable Fall Popsicle Stick Scarecrow Craft, you’ll need a few simple materials that are easy to find and budget-friendly. Here’s what you’ll need:
- Popsicle sticks: These are the backbone of your scarecrow, providing structure and a fun crafting experience.
- Paint (brown, yellow, orange, and green): Choose vibrant colors to bring your scarecrow to life! Non-toxic paints are a safe option for kids.
- Glue: A good craft glue will hold everything together. Consider using a glue stick for less mess!
- Googly eyes: These add personality and charm, making your scarecrow come alive.
- Felt or fabric scraps: Perfect for creating a whimsical hat and scarf, adding a personal touch to your creation.
- Scissors: Essential for cutting fabric and felt, so make sure to supervise little hands!
- Marker: Use this to draw facial features, giving your scarecrow its unique expression.
These materials are not only easy to gather but also allow for creativity and personalization. You can even repurpose old fabric or use leftover paint from previous projects, making this a fantastic eco-friendly craft!
How to Make Fall Popsicle Stick Scarecrow Craft
Creating your very own Fall Popsicle Stick Scarecrow Craft is not only a delightful way to welcome autumn but also a fantastic opportunity to bond with your kids or students. I remember the first time I made a scarecrow with my little ones; the laughter and creativity that filled the room were simply magical! So, let’s dive into the steps to bring your scarecrow to life!
Step 1: Paint the Popsicle Sticks
Start by gathering your popsicle sticks and paints. I love using warm autumn colors like brown, yellow, orange, and green to give our scarecrow that cozy fall vibe. Grab a paintbrush and let your creativity flow! You can paint the sticks in different colors for the body and face. The soft shimmer of the glow paint under the lamp felt magical as we painted together, and the kids loved mixing colors to create their unique designs. Remember, there’s no right or wrong way to do this—just have fun!
Step 2: Assemble the Scarecrow
Once the paint is dry, it’s time to assemble your scarecrow! Lay out the painted popsicle sticks in the shape of a scarecrow. I usually start with a vertical stick for the body and add horizontal sticks for arms and legs. Use glue to secure the sticks together. This part can get a little messy, so I recommend laying down some newspaper or an old tablecloth to catch any drips. Watching the scarecrow take shape is so rewarding!
Step 3: Add the Eyes
Now for the fun part—adding the googly eyes! These little eyes bring your scarecrow to life. Simply apply a dab of glue to the back of each googly eye and stick them onto the face of your scarecrow. I love how the eyes seem to twinkle, giving the scarecrow a friendly personality. It’s a great moment to encourage kids to express their creativity—maybe they want to give their scarecrow a silly expression!
Step 4: Create the Hat and Scarf
Next, let’s make a hat and scarf for your scarecrow! Using felt or fabric scraps, cut out a simple hat shape and a long strip for the scarf. I often let my kids choose their favorite colors, which adds a personal touch. Once you have your pieces, glue them onto the scarecrow. The hat can be as tall or as floppy as you like! This is a perfect opportunity to talk about different styles of hats and scarves, making it an educational moment too.
Step 5: Draw the Face
With the hat and scarf in place, it’s time to give your scarecrow a face! Grab a marker and draw a big smile, a nose, and any other features you’d like. I always encourage my kids to get creative here—some like to add rosy cheeks or even funny eyebrows! This step is where each scarecrow truly becomes unique, reflecting the personality of its creator.
Step 6: Let it Dry
Finally, let your scarecrow dry completely before displaying it. This is the perfect time to clean up your crafting area and admire your handiwork. I always find it exciting to see how our creations come together, and the anticipation of showing off our scarecrow makes the wait worthwhile. Once it’s dry, you can proudly display your Fall Popsicle Stick Scarecrow Craft in your home or classroom!
Tips for Best Results
- For a smoother finish, apply a second coat of paint once the first coat is dry.
- If glue spills happen, use a damp cloth to wipe it away before it dries.
- Encourage kids to experiment with different facial expressions for their scarecrows!
- Always supervise young children when using scissors and glue to ensure safety.
- Consider adding natural elements like twigs or leaves for a rustic touch.
Theme and Design Variations
- Classic Fall Colors: Stick to traditional autumn hues like deep reds, burnt oranges, and golden yellows for a timeless look.
- Whimsical Patterns: Use patterned fabric scraps for the hat and scarf, like polka dots or stripes, to add a playful twist.
- Seasonal Themes: Create a winter version by using white and blue colors, and add a snowman hat instead!
- Kid-Friendly Versions: Let kids use stickers or stamps for facial features instead of drawing, making it easier and more fun!
- Mini Scarecrows: Make smaller versions for table centerpieces or as gifts for friends and family!
Display and Use Ideas
Once your Fall Popsicle Stick Scarecrow Craft is complete, it’s time to show it off! Here are some fun ways to display or use your charming creation:
- Home Decor: Place your scarecrow on a mantel or dining table as a festive centerpiece.
- Classroom Crafts: Use it as a fun project for students to enhance their autumn-themed decorations.
- Gift Ideas: Wrap it up as a thoughtful gift for friends or family who love fall!
- Outdoor Display: Set it in your garden or porch to welcome guests with a friendly autumn vibe.
FAQs about Fall Popsicle Stick Scarecrow Craft
1. What age is this craft suitable for?
This Fall Popsicle Stick Scarecrow Craft is perfect for kids aged 5 and up, especially with adult supervision. Younger children can help with painting and gluing, while older kids can take the lead on design!
2. Can I use other materials instead of popsicle sticks?
Absolutely! If you don’t have popsicle sticks, you can use cardboard strips or even cut-up old wooden dowels. Just make sure whatever you use is sturdy enough to hold the scarecrow together.
3. How can I make this craft more educational?
Incorporate lessons on colors, shapes, and even storytelling! Ask kids to describe their scarecrow’s personality or create a backstory for it. This adds an educational twist to your crafting fun!
4. What if I don’t have googly eyes?
No worries! You can draw eyes with a marker or cut out circles from paper or felt. This is a great way to encourage creativity and make each scarecrow unique!
5. How do I store my scarecrow after the season?
To keep your Fall Popsicle Stick Scarecrow Craft safe, store it in a cool, dry place. You can wrap it in tissue paper or place it in a box to prevent any damage until next autumn!
Final Thoughts
Creating your Fall Popsicle Stick Scarecrow Craft is not just about making a cute decoration; it’s about the laughter, creativity, and memories you build along the way. I hope you feel inspired to gather your materials and dive into this fun project with your family or students. The joy of seeing your unique scarecrow come to life is truly rewarding! Don’t forget to share your results and any creative twists you add. Let’s spread the autumn cheer together and celebrate the beauty of crafting!
Print
Fall Popsicle Stick Scarecrow Craft: Create Fun Decor for Autumn!
Description
Create a charming fall-themed scarecrow using popsicle sticks, perfect for decorating your home during the autumn season.
Instructions
- Paint the popsicle sticks in various colors to create the scarecrow’s body and face.
- Once the paint is dry, glue the sticks together to form the scarecrow’s shape.
- Attach googly eyes to the face using glue.
- Cut out a hat and scarf from felt or fabric scraps and glue them onto the scarecrow.
- Use a marker to draw a smile and other facial features.
- Let everything dry completely before displaying your scarecrow.
- Category: Home Decor
Keywords: Fall, Scarecrow, DIY, Craft, Popsicle Sticks, Autumn Decor


