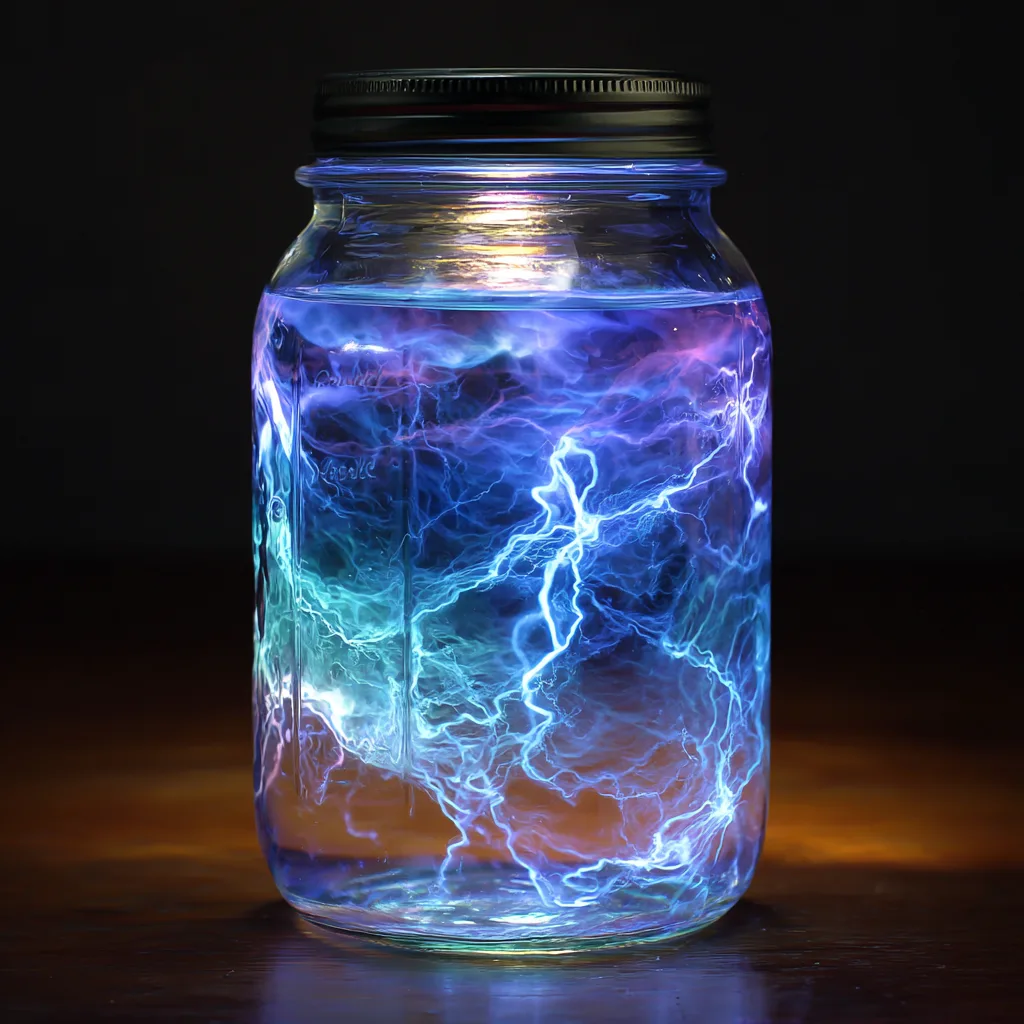
There is a primal fascination with the power of a thunderstorm—the ominous roll of thunder, the sudden, brilliant flash of lightning, and the dramatic dance of clouds in a darkened sky. While we cannot bottle the weather itself, we can capture its essence in a safe, mesmerizing, and beautiful form. This project will guide you through creating your own Thunder Glow Jar, a dazzling DIY craft that combines the science of fluid dynamics with the art of light to create a miniature, handheld tempest. It is an immersive sensory experience, bringing the drama and beauty of a storm indoors for you to hold and display.
This activity is perfect for educators teaching meteorology or physics, parents seeking a memorable STEM project, or anyone who finds beauty in the power of nature. It transforms simple household materials into a dynamic display of swirling “lightning” and fluffy “thunderclouds,” all glowing with an otherworldly light. By the end of this article, you will possess not only the knowledge to build your own jar but also a deeper understanding of the scientific principles that make its magic possible.
The Science of the Storm: Understanding Laminar Flow and Luminescence
To fully appreciate the swirling “lightning” inside your jar, it helps to understand the basic physics at play. The key is the interaction between the liquids you use. When you mix water with clear glue or liquid starch, you create a solution with a higher viscosity than water alone. Viscosity is a fluid’s resistance to flow; honey, for example, has a high viscosity, while water has a low one.
This thicker solution is crucial for the stormy effect. When you add the paint or food coloring, it does not immediately dissolve. Instead, because of the viscous environment, it sinks and swirls in slow, elegant patterns reminiscent of lightning forks or turbulent storm clouds. This slow-motion movement is a visual demonstration of fluid dynamics, allowing you to observe the beautiful, chaotic interplay of densities and viscosities that would happen in an instant with plain water.
Furthermore, the glow-in-the-dark paint operates on a principle called photoluminescence. The pigments in the paint contain phosphors that absorb energy from a light source (like the sun or a lamp) and store it. When placed in darkness, they slowly release this stored energy as visible light, creating the iconic, eerie glow that mimics distant lightning illuminating the clouds from within.
Gathering Your Meteorological Materials
A successful craft begins with the right ingredients. Each component in this list plays a specific role in replicating the elements of a thunderstorm.
The Foundation and Vessel
-
1 Clear Mason Jar with Lid (16 oz): The jar is your containment field, your miniature atmosphere. A standard 16-ounce jar provides ample space for the storm to develop. The clarity of the glass is essential for unobstructed viewing.
The Atmospheric Medium
-
1/2 Cup Water: This forms the base of your storm cell, the air through which the lightning will travel.
-
1/2 Cup Clear Glue or Liquid Starch: This is the critical ingredient for creating the storm’s structure. Clear glue will create a thicker, more persistent suspension, causing the colors to swirl in slow, defined tendrils. Liquid starch (often used for slime) can create a slightly different, more gelatinous viscosity that allows for fascinating, web-like patterns. The choice between them will slightly alter the behavior of your storm.
The Visual Elements of the Storm
-
Glow-in-the-Dark Paint or Neon Food Coloring (Blue, Purple, White): This is your lightning. Glow-in-the-dark paint provides the dual benefit of color and self-illumination, creating a lasting eerie effect. Neon food coloring offers more vibrant, immediate colors but will not glow on its own. A combination of both can be highly effective.
-
Fine Silver and Holographic Glitter: This represents the spark and sizzle of the lightning bolt itself. The fine particles catch the light from the LED, creating thousands of tiny, sudden flashes that mimic the explosive energy of a lightning strike.
-
Cotton Balls or Polyester Fiberfill: This is your cumulonimbus cloud. Pulled apart and pressed against the glass, this material creates the textured, opaque form of a thundercloud, providing a dramatic backdrop for the glowing lightning within.
The Energy Source
-
1–2 Small LED Tea Lights or LED String Lights (White or Blue): Safety is paramount. You must use battery-operated LED lights. Traditional candles are a severe fire hazard. A white LED tea light at the bottom provides a steady, diffused glow that illuminates the entire jar like heat lightning. A small, blue-toned LED string light woven through the cotton can create the effect of multiple, distinct lightning flashes within the clouds.
-
Hot Glue Gun or Strong Tape: This is for securing the lid, ensuring your atmospheric experiment remains safely contained.
Crafting Your Personal Thunderstorm: A Step-by-Step Guide
Follow these steps with care to build a thunder jar that is both visually stunning and structurally sound.
Step 1: Create the Storm Base
Begin with your clean, dry mason jar. Pour in the 1/2 cup of water. Next, add the 1/2 cup of clear glue or liquid starch. Do not stir yet. At this stage, you will observe the two liquids sitting in separate layers due to their different densities. This is a perfect first glimpse of the fluid dynamics you are about to harness.
Step 2: Introduce the Lightning
Now, take your chosen “lightning” colors. Using a dropper or by carefully pouring, add several drops of your blue, purple, and white glow-in-the-dark paint or food coloring onto the surface of the glue-water layer. The key here is to not over-stir. Use a long, thin utensil like a chopstick or a skewer. Gently stir just two or three times in a slow, figure-eight pattern. The goal is not to mix the colors uniformly, but to encourage them to stretch and swirl into organic, lightning-like tendrils as they sink through the viscous liquid. Over-stirring will result in a murky, uniform color.
Step 3: Add the Sparkle
Immediately after creating your lightning swirls, sprinkle a generous amount of fine silver and holographic glitter into the jar. The glitter will settle slowly through the medium, catching the light and looking like the brilliant, sparkling aftermath of a lightning strike. The holographic glitter will add multi-colored flashes, enhancing the electrified feel.
Step 4: Form the Thunderclouds
Take several cotton balls and pull them apart, stretching and fluffing them to break up their uniform shape. Using a clean chopstick or the end of a paintbrush, gently press these fluffy masses onto the inner walls of the jar, near the top and sides. You are aiming to create a layered, textured effect that resembles the billowing, chaotic form of a thunderhead. These clouds will obscure parts of the view, creating depth and mystery, and will perfectly diffuse the light from your LED string lights if you choose to use them.
Step 5: Add the Glow
This step has two approaches, each with a different effect.
-
The Steady Glow (Heat Lightning): Simply place a single, white LED tea light at the bottom of the jar, nestled inside the cloud base. This will provide a soft, overall illumination that makes the entire jar glow, similar to the diffuse light of heat lightning on the horizon.
-
The Flash Effect (Cloud-to-Cloud Lightning): For a more dynamic display, carefully weave a small, battery-powered LED string light (white or blue is best) through the cotton clouds you have created before sealing the jar. When activated, this will create bright, localized points of light that look like lightning flashes trapped within the cloud itself.
Step 6: Seal and Observe the Tempest
Once your internal storm is arranged, carefully wipe the rim of the jar clean and screw the lid on tightly. For a permanent and child-proof seal, run a bead of hot glue around the inner edge of the lid before screwing it on. Now, gently turn your jar onto its side and back. Observe as the viscous liquid slowly moves, causing the colors to shift and the glitter to sparkle anew with each movement. Take your sealed jar into a dark room, activate the LEDs, and witness your personal thunderstorm come to life.
Troubleshooting and Advanced Storm Chasing
-
Clouds Sinking: If your cotton balls slowly absorb liquid and sink over time, you can hot-glue them to the inside of the jar lid before assembly. When you screw the lid on, they will be permanently fixed in place at the top.
-
Murky Lightning: This is almost always caused by over-stirring. Remember, less is more. A few gentle swirls create the best effect.
-
Creating a Tornado Jar: For a different weather phenomenon, leave out the clouds and colors. Fill a jar 3/4 full with water, add a teaspoon of glitter, and top it off with clear glue. Seal it tightly. When you swirl the jar in a circular motion, the viscosity of the glue will sustain a miniature tornado.
Conclusion: A Bottled Spectacle of Nature’s Power
The Thunder Glow Jar is more than a craft; it is a convergence of art and science, a tangible piece of meteorological drama that fits in the palm of your hand. It teaches principles of physics and chemistry while yielding a stunning decorative object that captivates all who see it. It is a safe, creative, and endlessly fascinating way to bring the awesome power and beauty of a storm indoors, providing a glowing, swirling, sparkling spectacle that never fails to amaze. So gather your materials, channel your inner storm chaser, and create your very own electrified masterpiece.