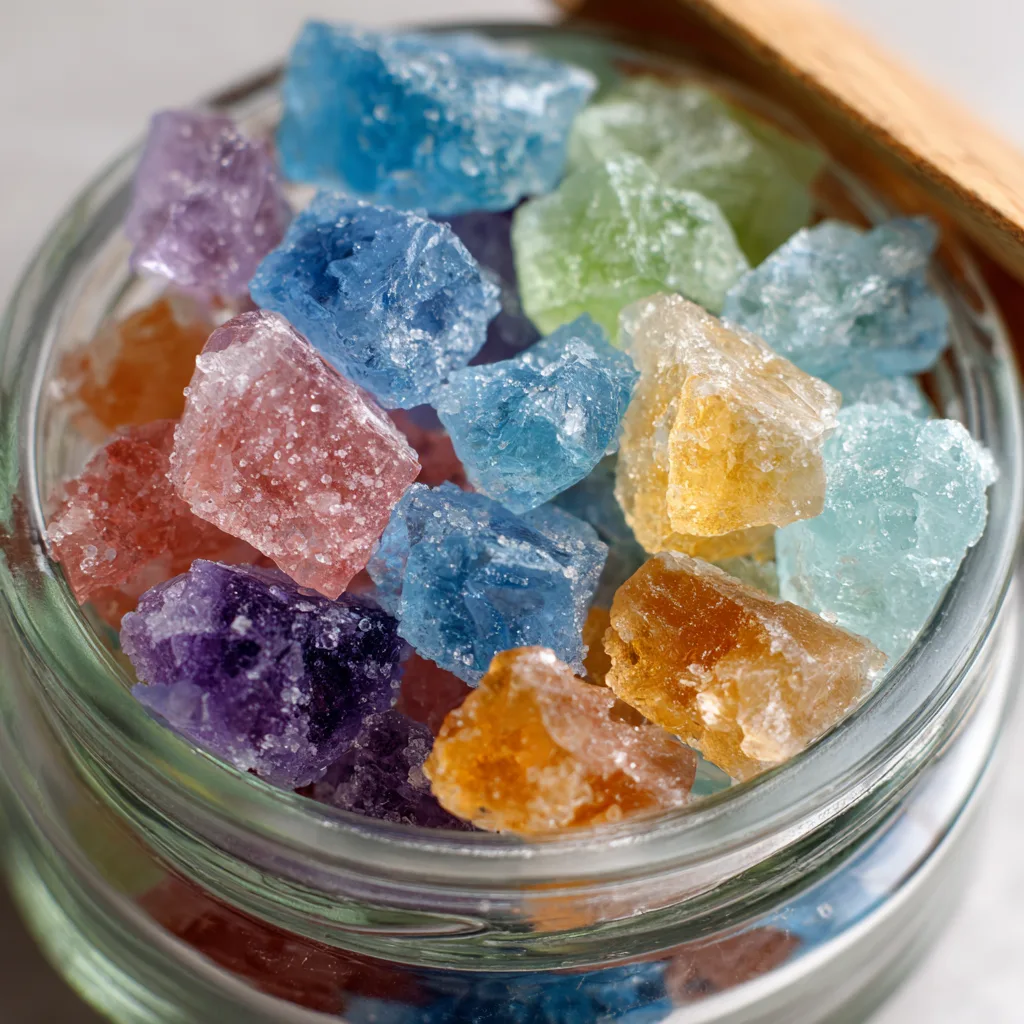
Introduction to Edible Crystal Rocks
Welcome to the enchanting world of Edible Crystal Rocks! If you’re looking for a fun and creative way to spend time with your kids or add a touch of sparkle to your desserts, you’ve come to the right place. This DIY project is not only simple but also incredibly rewarding. Watching sugar transform into beautiful, colorful crystals is like witnessing a little magic unfold right in your kitchen. Plus, these delightful treats are perfect for decorating cakes, cupcakes, or simply enjoying as a sweet snack. Let’s embark on this sugary adventure together!
Why You’ll Love This Edible Crystal Rocks
Making Edible Crystal Rocks is a delightful experience that brings joy and creativity into your home. It’s an affordable project that sparks imagination, allowing you and your kids to bond over the magic of sugar. Plus, the process is relaxing—watching the crystals grow is like waiting for a beautiful flower to bloom. You’ll love how easy it is to create these stunning treats that add a sprinkle of fun to any occasion!
Materials and Tools Needed for Edible Crystal Rocks
To create your own Edible Crystal Rocks, you’ll need a few simple materials that are easy to find. Here’s what you’ll need:
- Granulated sugar: This is the star of the show! It’s essential for forming the crystals.
- Water: Helps dissolve the sugar and is crucial for the crystallization process.
- Food coloring: Adds a splash of color to your crystals, making them visually stunning.
- Glass jar or container: A clear vessel allows you to watch the magic happen as the crystals form.
- Wooden stick or skewer: This is what your crystals will grow on, so choose one that fits well in your jar.
- String: Used to suspend the stick in the jar, ensuring it doesn’t touch the bottom.
- Pot for boiling: You’ll need this to heat your sugar solution.
- Stirring spoon: A simple tool to mix your ingredients together.
Most of these items are likely already in your kitchen, making this a budget-friendly project. If you’re looking for eco-friendly alternatives, consider using a reusable glass jar instead of plastic. Let’s gather our supplies and get ready to create some sweet magic!
How to Make Edible Crystal Rocks
Creating edible crystal rocks is a delightful journey that combines science and art. As I embarked on this sweet adventure, I felt like a mad scientist in my kitchen, ready to conjure up something magical. The process is simple yet rewarding, and I can’t wait to share it with you! Let’s dive into the steps to make these sparkling treats that are perfect for any occasion.
Step 1: Prepare the Sugar Solution
Start by combining granulated sugar and water in a pot. This is where the magic begins! Heat the mixture over medium heat, stirring continuously until the sugar completely dissolves. It’s like watching a tiny sugar storm as the granules vanish into the liquid. This step is crucial because a well-dissolved solution will lead to beautiful, uniform crystals. Remember, patience is key here—don’t rush it!
Step 2: Add Color
Once your sugar solution is ready, it’s time to add a splash of creativity! A few drops of food coloring will transform your mixture into a vibrant concoction. You can mix colors to create unique shades—think of it as painting with sugar! The soft shimmer of the colored solution is mesmerizing, and it’s a great way to engage kids in the process. Let them choose their favorite colors and watch their excitement grow!
Step 3: Pour into the Jar
Now, carefully pour the sugar solution into a clean glass jar or container. Make sure to leave some space at the top; this is where the magic happens! As you pour, you might feel like you’re filling a treasure chest with liquid gold. The anticipation builds as you imagine the sparkling crystals that will soon form. Just be cautious not to spill—cleaning up sticky sugar is no fun!
Step 4: Suspend the Stick
Next, it’s time to suspend your wooden stick or skewer in the jar. Attach it to a piece of string, ensuring it hangs straight down without touching the bottom. This is where the crystals will grow, so it’s important to get it right! I like to think of this step as setting the stage for a beautiful performance. The stick will be the star, and soon, it will be adorned with stunning edible crystal rocks!
Step 5: Cover and Wait
Cover the jar with a paper towel or cloth to keep dust out. This is a crucial step in the crystal-making process. Place the jar in a cool, undisturbed area for about 1-2 weeks. During this time, you’ll need to practice patience—like waiting for a cake to bake! It’s a great opportunity to teach kids about the science of crystallization. They’ll be amazed to see how something so simple can turn into something so beautiful!
Step 6: Harvest the Crystals
After a week or two, it’s time for the big reveal! Carefully remove the crystals from the jar, taking care not to break them. Let them dry on a paper towel, and watch as they sparkle in the light. This moment feels like unearthing hidden gems! The excitement of seeing your hard work pay off is truly rewarding. Plus, the kids will love helping with this part!
Step 7: Enjoy or Decorate
Now that your edible crystal rocks are ready, it’s time to enjoy them! You can eat them as a sweet treat or use them to decorate cakes and cupcakes. Imagine the delight on your family’s faces when they see these sparkling gems atop their favorite desserts! You can even package them as gifts for friends or use them to add a touch of whimsy to your holiday displays. The possibilities are endless!
Tips for Best Results
- Ensure your jar is clean to avoid contamination—this helps your crystals grow beautifully.
- If your crystals aren’t forming, try adding more sugar to the solution and restarting the process.
- For a fun twist, experiment with flavored extracts to add a unique taste to your edible crystal rocks.
- Always supervise kids when handling hot liquids to ensure safety.
- Store finished crystals in an airtight container to keep them fresh and sparkling!
Theme and Design Variations
- Rainbow Crystals: Use a mix of food coloring to create a vibrant rainbow effect. Each layer can represent a different color, making your crystals a stunning centerpiece!
- Seasonal Themes: For fall, use orange and yellow hues to mimic autumn leaves. In winter, try icy blues and whites for a frosty look.
- Kid-Friendly Versions: Let kids choose their favorite colors and even add edible glitter for extra sparkle. They’ll love personalizing their creations!
- Holiday Colors: For Christmas, use red and green; for Halloween, opt for purple and black. These themed colors can make your edible crystal rocks festive!
Display and Use Ideas
- Decorate Desserts: Use your edible crystal rocks to add a dazzling touch to cakes, cupcakes, or cookies. They’ll make any dessert look like a masterpiece!
- Gift Them: Package your crystal rocks in cute jars tied with ribbons for a sweet gift that friends and family will adore.
- Home Decor: Create a stunning centerpiece by placing the crystals in a decorative bowl or glass vase, adding a whimsical touch to your home.
- School Projects: Use them for science projects to demonstrate crystallization or as fun edible decorations for school events.
FAQs about Edible Crystal Rocks
Can I use different types of sugar for this project?
Absolutely! While granulated sugar is the most common choice, you can experiment with other sugars like brown sugar or even powdered sugar. Just keep in mind that the texture and color of your crystals may vary.
How long do the edible crystal rocks last?
When stored in an airtight container, your edible crystal rocks can last for several weeks. Just make sure they stay dry to maintain their sparkle and crunch!
Can I eat the crystals right away?
Not quite! You’ll need to wait for the crystals to form over 1-2 weeks. This waiting period is essential for achieving those beautiful, crunchy edible crystal rocks!
What if my crystals aren’t forming?
If your crystals aren’t forming, it could be due to a few reasons. Make sure your sugar solution is well-dissolved and that the jar is in a cool, undisturbed area. You can also try adding more sugar to the solution and starting over!
Are these safe for kids to make?
Yes, they are! However, adult supervision is necessary, especially when handling hot liquids. This project is a great way to teach kids about science while having fun!
Final Thoughts
Creating Edible Crystal Rocks is not just a fun project; it’s a delightful experience that brings joy and creativity into your home. The satisfaction of watching sugar transform into beautiful, sparkling crystals is truly magical. I encourage you to gather your materials, invite your kids to join in, and embark on this sweet adventure together. Don’t forget to share your results and any unique variations you come up with! The smiles and excitement on your family’s faces will be the sweetest reward of all. Happy crafting!
Print
Edible Crystal Rocks: Create Sparkling Treats for Any Occasion!
Description
Learn how to make beautiful and delicious edible crystal rocks that are perfect for decorating cakes, cupcakes, or enjoying as a sweet treat.
Instructions
- In a pot, combine 2 cups of granulated sugar and 1 cup of water. Heat the mixture over medium heat, stirring until the sugar completely dissolves.
- Once dissolved, remove from heat and add a few drops of food coloring to achieve your desired color.
- Pour the sugar solution into a clean glass jar or container, leaving some space at the top.
- Attach a wooden stick or skewer to a piece of string and suspend it in the jar, ensuring it doesn’t touch the bottom.
- Cover the jar with a paper towel or cloth to prevent dust from entering.
- Place the jar in a cool, undisturbed area for about 1-2 weeks, allowing the crystals to form.
- Once the crystals have formed, carefully remove them from the jar and let them dry on a paper towel.
- Enjoy your edible crystal rocks as a treat or use them to decorate desserts!
- Category: Candy Making
Keywords: Edible Crystal Rocks, Candy Making, DIY Treats, Sugar Crystals