
Introduction to Easy Cherry Danish Pastry
As a busy mom, I know how precious time can be, especially in the mornings. That’s why I adore this Easy Cherry Danish Pastry recipe! It’s a delightful treat that feels fancy but comes together in no time. Imagine serving warm, flaky pastries filled with sweet cherry goodness to your family or guests. They’ll think you’ve spent hours in the kitchen, but it’ll be our little secret! This recipe is perfect for breakfast, brunch, or even a sweet dessert. Let’s dive into this delicious adventure together!
Why You’ll Love This Easy Cherry Danish Pastry
This Easy Cherry Danish Pastry is a game-changer for busy days. It’s quick to whip up, taking just 35 minutes from start to finish. The taste? Absolutely divine! Flaky pastry meets luscious cherry filling, creating a delightful harmony of flavors. Plus, it’s versatile enough for breakfast or dessert. You’ll love how it impresses your loved ones without the fuss. Trust me, this recipe will become a staple in your kitchen!
Ingredients for Easy Cherry Danish Pastry
Gathering the right ingredients is the first step to creating your Easy Cherry Danish Pastry. Here’s what you’ll need:
- Puff Pastry: This flaky pastry is the star of the show. It’s light, airy, and perfect for creating that delightful crunch. You can find it in the freezer section of your grocery store.
- Cherry Pie Filling: Sweet and tangy, this filling adds a burst of flavor. You can use store-bought for convenience or make your own with fresh cherries if you’re feeling adventurous!
- Egg: A beaten egg is essential for the egg wash. It gives the pastries a beautiful golden color and a shiny finish. Plus, it helps seal the edges.
- Powdered Sugar: This is for dusting the finished pastries. It adds a touch of sweetness and makes them look extra special. You can skip this if you prefer a less sweet treat.
For exact measurements, check the bottom of the article where you can find everything listed for easy printing. Now that you have your ingredients ready, let’s get cooking!
How to Make Easy Cherry Danish Pastry
Now that we have our ingredients ready, let’s get into the fun part—making the Easy Cherry Danish Pastry! Follow these simple steps, and you’ll have a delicious treat in no time.
Step 1: Preheat the Oven
First things first, preheat your oven to 400°F (200°C). Preheating is crucial because it ensures that your pastries bake evenly. A hot oven helps the puff pastry rise beautifully, creating that flaky texture we all love. So, don’t skip this step!
Step 2: Prepare the Puff Pastry
Next, take your thawed puff pastry and roll it out on a floured surface. Aim for a thickness of about 1/8 inch. This will give you the perfect balance of flakiness and structure. Cut the rolled pastry into squares, roughly 4 inches by 4 inches. If the dough feels sticky, sprinkle a little more flour to make it easier to handle.
Step 3: Add the Cherry Filling
Now, it’s time to add the cherry pie filling! Place a spoonful of filling in the center of each square. Be careful not to overfill; a tablespoon is usually just right. Overfilling can lead to messy pastries that won’t seal properly. We want those lovely pockets of cherry goodness, not a cherry explosion!
Step 4: Fold the Pastry
Here comes the fun part—folding! Gently fold the corners of each pastry square over the filling to create a pocket. Pinch the edges together to seal them tightly. This step is essential to keep the filling inside while baking. Think of it as giving your pastries a cozy little hug!
Step 5: Brush with Egg Wash
To make your pastries shine, brush the tops with a beaten egg. This egg wash gives them a beautiful golden color and a glossy finish. It’s like giving your pastries a little spa treatment! Use a pastry brush for even coverage, and don’t forget the edges.
Step 6: Bake the Pastries
Place your pastries on a baking sheet lined with parchment paper. Bake them in the preheated oven for 15-20 minutes. Keep an eye on them! You’ll know they’re done when they’re golden brown and puffed up. The aroma will fill your kitchen, making it hard to resist sneaking a taste!
Step 7: Cool and Dust
Once baked, remove the pastries from the oven and let them cool slightly on a wire rack. This helps them maintain their crispiness. Just before serving, dust them with powdered sugar for that extra touch of sweetness and elegance. Your Easy Cherry Danish Pastry is now ready to impress!
Tips for Success
- Make sure your puff pastry is fully thawed for easy handling.
- Use a sharp knife or pizza cutter for clean edges when cutting the pastry.
- Experiment with different fillings like cream cheese or almond paste for variety.
- Keep an eye on the pastries while baking; ovens can vary in temperature.
- Serve warm for the best flavor and texture!
Equipment Needed
- Baking Sheet: A standard baking sheet works perfectly. If you don’t have one, a large oven-safe dish will do.
- Parchment Paper: This helps prevent sticking. If you’re out, lightly greasing the baking sheet is a good alternative.
- Rolling Pin: Essential for rolling out the pastry. A wine bottle can work in a pinch!
- Pastry Brush: For applying the egg wash. A clean paintbrush can be a fun substitute!
Variations of Easy Cherry Danish Pastry
- Fresh Cherry Filling: Swap out the pie filling for fresh cherries. Just pit and slice them, then toss with a bit of sugar for sweetness.
- Cheese Filling: Add a layer of cream cheese mixed with a little sugar and vanilla before the cherry filling for a creamy twist.
- Almond Paste: Spread a thin layer of almond paste on the pastry before adding the cherry filling for a nutty flavor.
- Chocolate Drizzle: After dusting with powdered sugar, drizzle melted chocolate on top for an indulgent touch.
- Gluten-Free Option: Use gluten-free puff pastry to make this treat suitable for those with dietary restrictions.
Serving Suggestions for Easy Cherry Danish Pastry
- Pair with a hot cup of coffee or tea for a delightful breakfast experience.
- Serve alongside fresh fruit like strawberries or blueberries for a colorful plate.
- For a brunch gathering, arrange pastries on a beautiful platter for an eye-catching display.
- Drizzle with a simple glaze made of powdered sugar and milk for added sweetness.
- Top with whipped cream for an indulgent dessert option!
FAQs about Easy Cherry Danish Pastry
As you embark on your journey to create this Easy Cherry Danish Pastry, you might have a few questions. Here are some common queries I’ve encountered, along with helpful answers to guide you along the way.
Can I use fresh cherries instead of cherry pie filling?
Absolutely! Fresh cherries can be a delightful alternative. Just pit and slice them, then toss with a bit of sugar to enhance their sweetness. This will give your pastries a fresh, vibrant flavor.
How do I store leftover pastries?
To keep your pastries fresh, store them in an airtight container at room temperature for up to two days. If you want to keep them longer, consider freezing them before baking. Just thaw and bake when you’re ready!
Can I make the pastry ahead of time?
Yes! You can prepare the pastries up to the point of baking. Just cover them with plastic wrap and refrigerate for a few hours. When you’re ready, simply brush with egg wash and bake as directed.
What can I substitute for puff pastry?
If you don’t have puff pastry on hand, you can use crescent roll dough as a quick substitute. It won’t be quite the same, but it will still yield delicious results!
Can I add other fillings to the Danish?
Definitely! Feel free to get creative. Cream cheese, almond paste, or even chocolate can make fantastic fillings. Just remember to adjust the sweetness based on your filling choice!
Final Thoughts
Creating this Easy Cherry Danish Pastry is more than just baking; it’s about sharing joy with those you love. The aroma wafting through your kitchen, the golden-brown pastries emerging from the oven, and the smiles on your family’s faces make it all worthwhile. This recipe is a delightful reminder that even on the busiest days, you can whip up something special. Whether it’s for breakfast, brunch, or dessert, these pastries are sure to impress. So, roll up your sleeves, embrace the process, and enjoy every delicious bite of your homemade creation!
Print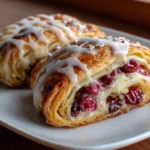
Easy Cherry Danish Pastry: Delight in Every Bite!
- Total Time: 35 minutes
- Yield: 8 pastries 1x
- Diet: Vegetarian
Description
A simple and delicious recipe for cherry Danish pastry that is perfect for breakfast or dessert.
Ingredients
- 1 package of puff pastry (thawed)
- 1 cup cherry pie filling
- 1 egg (beaten, for egg wash)
- Powdered sugar (for dusting)
Instructions
- Preheat the oven to 400°F (200°C).
- Roll out the puff pastry on a floured surface and cut into squares.
- Place a spoonful of cherry pie filling in the center of each square.
- Fold the corners of the pastry over the filling to create a pocket.
- Brush the tops with beaten egg.
- Bake for 15-20 minutes or until golden brown.
- Let cool slightly and dust with powdered sugar before serving.
Notes
- Feel free to use fresh cherries instead of pie filling.
- Serve warm for the best flavor.
- Can be stored in an airtight container for up to 2 days.
- Prep Time: 15 minutes
- Cook Time: 20 minutes
- Category: Dessert
- Method: Baking
- Cuisine: American
Nutrition
- Serving Size: 1 pastry
- Calories: 200
- Sugar: 10g
- Sodium: 150mg
- Fat: 10g
- Saturated Fat: 5g
- Unsaturated Fat: 3g
- Trans Fat: 0g
- Carbohydrates: 25g
- Fiber: 1g
- Protein: 2g
- Cholesterol: 30mg
Keywords: Easy Cherry Danish Pastry, Cherry Pastry, Danish Recipe, Easy Dessert


