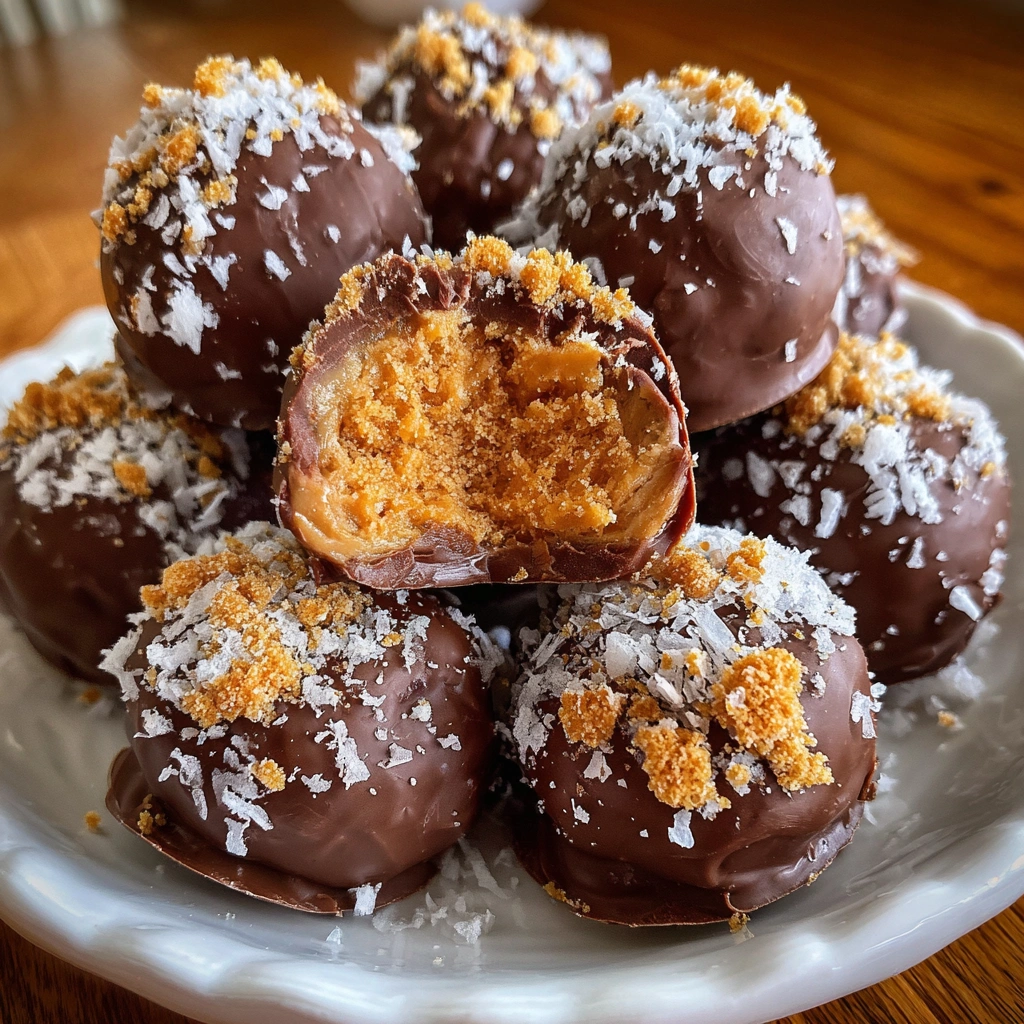
Easy Butterfinger Balls: Irresistibly Crispy & Creamy Delights!
Sensory-Rich Introduction with Immediate Craving
Imagine biting into a perfectly crafted ball of creamy peanut butter, where the crunch of graham crackers meets the smoothness of melted chocolate. The moment you take a bite, the flavors explode in your mouth, creating a delightful symphony of textures and tastes. These Easy Butterfinger Balls are not just a treat; they are a nostalgic journey back to childhood, evoking memories of carefree days filled with laughter and sweet indulgences. Whether you’re hosting a festive gathering, celebrating a birthday, or simply treating yourself after a long day, these delightful bites are the perfect addition to any occasion. Their irresistible charm and mouthwatering flavor will leave your guests clamoring for more, making them a must-have for any dessert table.
Why You’ll Love This Easy Butterfinger Balls
- Texture Contrast: The combination of crunchy graham crackers and creamy peanut butter creates a delightful mouthfeel that keeps each bite interesting.
- Flavor Balance: The sweetness of the chocolate perfectly complements the savory notes of peanut butter, creating a harmonious blend that appeals to all palates.
- Versatility: These treats can be customized with various toppings or fillings, making them suitable for any occasion or dietary preference.
- Ease of Preparation: With no baking required, these Butterfinger Balls can be whipped up in just 15 minutes, making them an ideal last-minute dessert.
- Universal Appeal: Loved by kids and adults alike, these treats are perfect for parties, holidays, or simply as a sweet snack at home.
Essential Tools & Preparation Strategy
- Mixing Bowl: Essential for combining ingredients smoothly and ensuring an even mixture.
- Measuring Cups: Accurate measurements are crucial for achieving the perfect balance of flavors.
- Parchment Paper: Prevents sticking and simplifies cleanup, making the process hassle-free.
- Microwave-Safe Bowl: Necessary for melting chocolate without the risk of burning it.
- Refrigerator: Helps firm up the balls and set the chocolate coating for a perfect finish.
- Spoon or Cookie Scoop: Ensures even portioning of the mixture into uniform balls for consistent size and presentation.
- Spatula: Useful for scraping down the sides of the mixing bowl and ensuring all ingredients are well incorporated.
- Storage Container: Ideal for keeping your Butterfinger Balls fresh in the refrigerator.
Ingredients & Their Roles in This Easy Butterfinger Balls
- Creamy Peanut Butter: The star ingredient that provides richness and a smooth texture.
- Powdered Sugar: Adds sweetness and helps bind the mixture together.
- Crushed Graham Crackers: Contributes crunch and mimics the texture of a Butterfinger candy bar.
- Milk Chocolate Chips: Used for coating, providing a sweet and creamy chocolate layer.
- Coconut Oil: Ensures a smooth chocolate coating and helps the chocolate set properly.
Substitutions & Preparation Notes
- Peanut Butter: For a nut-free version, use sunflower seed butter.
- Graham Crackers: Gluten-free options are available for those with dietary restrictions.
- Chocolate Chips: Dark chocolate can be used for a richer flavor, while white chocolate offers a sweeter alternative.
Step-by-Step Guide to Perfect Easy Butterfinger Balls
- Combine Ingredients: In a large mixing bowl, mix together 1 cup of creamy peanut butter, 1 cup of powdered sugar, and 1 ½ cups of crushed graham crackers until well combined.
- Form Balls: Using your hands, shape the mixture into small balls, about 1 inch in diameter, and place them on a parchment-lined baking sheet.
- Chill: Refrigerate the balls for 30 minutes to firm them up, making them easier to coat.
- Melt Chocolate: In a microwave-safe bowl, melt 1 cup of milk chocolate chips and 1 tablespoon of coconut oil together in 30-second intervals, stirring until smooth.
- Dip Balls: Once chilled, dip each ball into the melted chocolate, ensuring they are fully coated, and return them to the baking sheet.
- Set Chocolate: Refrigerate the chocolate-coated balls for an additional 30 minutes to allow the chocolate to set completely.
Chef’s Notes & Pro Tips for Flawless Results
- Make-Ahead Instructions: These Butterfinger Balls can be prepared up to a week in advance and stored in the refrigerator.
- Storage: Keep them in an airtight container in the fridge to maintain freshness.
- Customization Options: Add chopped peanuts or crushed toffee bits to the mixture for extra crunch and flavor.
Avoid These Common Cooking Mistakes
- Not Chilling the Mixture: This can lead to balls that are too soft. Always chill before dipping.
- Overheating the Chocolate: Can cause it to seize. Melt in short intervals and stir frequently.
- Using Too Much Powdered Sugar: This can make the mixture overly sweet. Measure accurately and adjust to taste.
- Not Using Parchment Paper: This can lead to sticking. Always line your baking sheet.
- Skipping Coconut Oil: Results in a thick chocolate coating. Always add oil for a smoother dip.
- Not Allowing Chocolate to Set: Leads to messy handling. Refrigerate until fully set.
- Using Chunky Peanut Butter: Alters the texture. Stick to creamy peanut butter for best results.
Creative Variations & Customizations
- Nut-Free Version: Substitute peanut butter with sunflower seed butter for a nut-free treat.
- Dark Chocolate Coating: Use dark chocolate for a richer flavor profile.
- White Chocolate Drizzle: Drizzle melted white chocolate on top for a decorative touch.
- Seasonal Flavors: Add a pinch of cinnamon or pumpkin spice for a seasonal twist.
- Dipped in Sprinkles: Roll the chocolate-coated balls in colorful sprinkles for a festive look.
Perfect Pairings: What to Serve With Easy Butterfinger Balls
- Cold Milk: A classic pairing that enhances the creamy texture.
- Coffee: Perfect for an afternoon treat, balancing sweetness with a rich brew.
- Fruit Platters: Fresh fruits provide a refreshing contrast to the rich flavors.
- Dessert Buffet: Include alongside other chocolate treats for a decadent spread.
- Vanilla Ice Cream: Serve with a scoop for an indulgent dessert experience.
- Sweet Dessert Wine: A sophisticated pairing that complements the chocolate.
- Gift Boxes: Perfect for holidays or special occasions, adding a personal touch.
- Cheese Board: Pair with mild cheeses for an unexpected flavor combination.
Storage & Meal Prep Instructions
- Refrigeration: Store in an airtight container in the fridge for up to 1 week.
- Freezing: For longer storage, freeze the balls in a single layer, then transfer to a freezer-safe container for up to 3 months.
- Reheating: Thaw in the refrigerator overnight before serving.
Nutrition Facts & Health Insights
| Nutrient | Per Serving (1 ball) |
|---|---|
| Calories | 120 |
| Sugar | 10 grams |
| Sodium | 50 milligrams |
| Fat | 7 grams |
| Saturated Fat | 3 grams |
| Unsaturated Fat | 4 grams |
| Trans Fat | 0 grams |
| Carbohydrates | 12 grams |
| Fiber | 1 gram |
| Protein | 3 grams |
| Cholesterol | 0 milligrams |
Health Benefits of Key Ingredients
- Peanut Butter: Rich in protein and healthy fats, providing sustained energy.
- Graham Crackers: A source of whole grains, adding fiber to the treat.
- Coconut Oil: Contains medium-chain triglycerides, which may support metabolism.
Frequently Asked Questions
- Can I use crunchy peanut butter? While you can, creamy peanut butter is recommended for the best texture.
- How long do these last in the fridge? They can be stored for up to 1 week in an airtight container.
- Can I freeze these? Yes, they freeze well for up to 3 months.
- What can I substitute for graham crackers? You can use crushed vanilla wafers or gluten-free alternatives.
- How do I prevent the chocolate from seizing? Melt chocolate in short intervals and stir frequently to avoid overheating.
- Can I add other flavors? Yes, consider adding vanilla extract or spices for extra flavor.
- What if my mixture is too dry? Add a little more peanut butter to achieve the desired consistency.
- Can I use a different type of chocolate? Absolutely! Dark or white chocolate can be used based on your preference.
Final Inspiration & Kitchen Confidence
As you embark on your journey to create these Easy Butterfinger Balls, remember that cooking is not just about following a recipe; it’s about expressing creativity and sharing joy with others. Celebrate your achievements in the kitchen, and don’t hesitate to experiment with flavors and textures. With each bite, you’ll not only satisfy your sweet tooth but also create lasting memories with friends and family. So gather your ingredients, roll up your sleeves, and let the magic of these delightful treats inspire you to create more delicious moments!
Print
Easy Butterfinger Balls: Irresistibly Crispy & Creamy Delights!
- Total Time: 45 minutes
- Yield: 24 balls 1x
- Diet: Vegetarian
Description
Easy Butterfinger Balls are a delightful combination of crispy peanut butter and chocolate flavors that melt in your mouth. The texture is a perfect balance of crunchy and creamy, making each bite a heavenly experience that leaves you craving more.
Ingredients
- 1 cup creamy peanut butter
- 1 cup powdered sugar
- 1 ½ cups crushed graham crackers
- 1 cup milk chocolate chips
- 1 tablespoon coconut oil
Instructions
- In a large mixing bowl, combine the creamy peanut butter, powdered sugar, and crushed graham crackers until well mixed.
- Using your hands, form the mixture into small balls, about 1 inch in diameter, and place them on a parchment-lined baking sheet.
- Chill the balls in the refrigerator for 30 minutes to firm up.
- In a microwave-safe bowl, melt the milk chocolate chips and coconut oil together in 30-second intervals, stirring until smooth.
- Dip each chilled ball into the melted chocolate, ensuring they are fully coated, and return them to the baking sheet.
- Refrigerate the chocolate-coated balls for an additional 30 minutes to set the chocolate.
Notes
- These Butterfinger Balls can be made ahead of time and stored in the refrigerator for up to 1 week.
- For a crunchier texture, consider adding chopped peanuts or crushed toffee bits to the mixture.
- Substitute dark chocolate for a richer flavor or use white chocolate for a sweeter option.
- Prep Time: 15 minutes
- Cook Time: 0 minutes
- Category: desserts
- Method: no-bake
- Cuisine: American
Nutrition
- Serving Size: 1 ball
- Calories: 120
- Sugar: 10 grams
- Sodium: 50 milligrams
- Fat: 7 grams
- Saturated Fat: 3 grams
- Unsaturated Fat: 4 grams
- Trans Fat: 0 grams
- Carbohydrates: 12 grams
- Fiber: 1 gram
- Protein: 3 grams
- Cholesterol: 0 milligrams
Keywords: Easy Butterfinger Balls, no-bake dessert, chocolate peanut butter balls, quick treats, party snacks, homemade candy, easy recipes, sweet treats, dessert ideas, holiday gifts, kid-friendly snacks, chocolate lovers, simple desserts