Introduction to DIY Snow
As the winter season approaches, many of us long for the beauty and magic of snow without the chill. Whether you’re a busy mom looking for a fun activity to engage your kids or a professional seeking a creative outlet, this DIY Snow project is perfect for you! With just a few simple materials, you can create instant snow that’s not only fun to play with but also makes for delightful winter-themed decorations. Let’s dive into this easy and enjoyable project that brings the joy of winter right into your home!
Why You’ll Love This DIY Snow
Creating DIY Snow is a fantastic way to unleash your creativity while keeping costs low. This project is not only simple and quick, taking just 15 minutes from start to finish, but it also provides endless opportunities for sensory play and decoration. Plus, it’s a great way to bond with your kids, making memories that will last a lifetime!
Materials Needed for DIY Snow
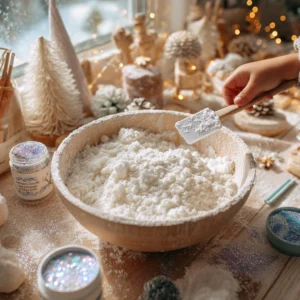
To create your own instant snow, you will need the following materials:
- 1 cup of baking soda: This is the main ingredient that gives your snow its fluffy texture.
- 1/2 cup of shaving cream: This adds the necessary moisture and helps achieve that snow-like consistency.
- Optional: glitter for sparkle: For a magical touch, add some glitter to your snow!
For a printable full list of materials, see below.
Tools Required for DIY Snow
Before you start crafting, gather these essential tools:
- Mixing bowl: To combine your ingredients.
- Spoon or spatula: For mixing everything together.
If you don’t have a mixing bowl, any large container will work just fine!
How to Make DIY Snow
Follow these simple steps to create your own instant snow:
- Combine Ingredients: In a mixing bowl, combine 1 cup of baking soda with 1/2 cup of shaving cream.
- Mix Together: Use a spoon or spatula to mix the ingredients until you achieve a fluffy, snow-like consistency.
- Add Sparkle: If desired, sprinkle in some glitter for a magical touch.
- Enjoy: Play with your instant snow or use it for decoration!
Tips for Best Results
To ensure your DIY Snow turns out perfectly, keep these tips in mind:
- Adjust the amount of shaving cream for your desired consistency.
- Store any leftover snow in an airtight container to keep it fresh.
- Use food coloring to create colored snow for added fun!
Project Variations
Get creative with your DIY Snow by trying out these variations:
- Colorful Snow: Add a few drops of food coloring to create vibrant, colored snow.
- Seasonal Themes: Use different glitter colors or add small decorations like mini pinecones or faux snowflakes for a festive touch.
- Texture Changes: Experiment with different ratios of baking soda and shaving cream to find your perfect snow texture.
Decoration and Usage Ideas
Here are some fun ways to use your finished DIY Snow:
- Winter Centerpieces: Use it as a base for holiday decorations on your dining table.
- Sensory Play: Let your kids explore the texture and feel of the snow for a fun sensory experience.
- Craft Projects: Incorporate it into other crafts, like creating snowmen or winter scenes.
FAQs about DIY Snow
Q: Is DIY Snow safe for kids?
A: Yes, the materials used are non-toxic and safe for children. However, supervision is recommended for younger kids.
Q: How long does the DIY Snow last?
A: The snow can last for several days if stored properly in an airtight container.
Q: Can I use this snow for outdoor play?
A: While it’s designed for indoor use, you can take it outside for a short time, but it may not hold up well in wet conditions.
Final Thoughts
Creating DIY Snow is not just a fun project; it’s a wonderful way to bring the magic of winter into your home, especially during the colder months. Whether you’re crafting with your kids or enjoying a moment of creativity for yourself, this instant snow experiment is sure to bring smiles and joy. So gather your materials, unleash your creativity, and let the winter magic begin!
Why You’ll Love This DIY Snow
Creating DIY Snow is a fantastic way to unleash your creativity while keeping costs low. This project is not only simple and quick, taking just 15 minutes from start to finish, but it also provides endless opportunities for sensory play and decoration. Plus, it’s a great way to bond with your kids, making memories that will last a lifetime!
Materials Needed for DIY Snow
To create your own instant snow, you will need the following materials:
- 1 cup of baking soda: This is the main ingredient that gives your snow its fluffy texture.
- 1/2 cup of shaving cream: This adds the necessary moisture and helps achieve that snow-like consistency.
- Optional: glitter for sparkle: For a magical touch, add some glitter to your snow!
For a printable full list of materials, see below.
Tools Required for DIY Snow
Before you start crafting, gather these essential tools:
- Mixing bowl: To combine your ingredients.
- Spoon or spatula: For mixing everything together.
If you don’t have a mixing bowl, any large container will work just fine!
How to Make DIY Snow
Follow these simple steps to create your own instant snow:
- Combine Ingredients: In a mixing bowl, combine 1 cup of baking soda with 1/2 cup of shaving cream.
- Mix Together: Use a spoon or spatula to mix the ingredients until you achieve a fluffy, snow-like consistency.
- Add Sparkle: If desired, sprinkle in some glitter for a magical touch.
- Enjoy: Play with your instant snow or use it for decoration!
Tips for Best Results
To ensure your DIY Snow turns out perfectly, keep these tips in mind:
- Adjust the amount of shaving cream for your desired consistency.
- Store any leftover snow in an airtight container to keep it fresh.
- Use food coloring to create colored snow for added fun!
Project Variations
Get creative with your DIY Snow by trying out these variations:
- Colorful Snow: Add a few drops of food coloring to create vibrant, colored snow.
- Seasonal Themes: Use different glitter colors or add small decorations like mini pinecones or faux snowflakes for a festive touch.
- Texture Changes: Experiment with different ratios of baking soda and shaving cream to find your perfect snow texture.
Decoration and Usage Ideas
Here are some fun ways to use your finished DIY Snow:
- Winter Centerpieces: Use it as a base for holiday decorations on your dining table.
- Sensory Play: Let your kids explore the texture and feel of the snow for a fun sensory experience.
- Craft Projects: Incorporate it into other crafts, like creating snowmen or winter scenes.
FAQs about DIY Snow
Q: Is DIY Snow safe for kids?
A: Yes, the materials used are non-toxic and safe for children. However, supervision is recommended for younger kids.
Q: How long does the DIY Snow last?
A: The snow can last for several days if stored properly in an airtight container.
Q: Can I use this snow for outdoor play?
A: While it’s designed for indoor use, you can take it outside for a short time, but it may not hold up well in wet conditions.
Final Thoughts
Creating DIY Snow is not just a fun project; it’s a wonderful way to bring the magic of winter into your home, especially during the colder months. Whether you’re crafting with your kids or enjoying a moment of creativity for yourself, this instant snow experiment is sure to bring smiles and joy. So gather your materials, unleash your creativity, and let the winter magic begin!
Why You’ll Love This DIY Snow
Creating DIY Snow is a fantastic way to unleash your creativity while keeping costs low. I remember the first time I made this with my kids; it was a chilly afternoon, and we were all craving a bit of winter magic. In just 15 minutes, we transformed our kitchen into a snowy wonderland, and the smiles on their faces were priceless!
This project is not only simple and quick, but it also provides endless opportunities for sensory play and decoration. The fluffy texture of the snow is so satisfying to touch, and I found myself getting lost in the moment, just like my kids. It’s amazing how something so easy can spark such joy and creativity!
Plus, it’s a great way to bond with your kids, making memories that will last a lifetime. I love how this DIY Snow project encourages us to work together, mixing and playing, and even adding our own personal touches with glitter and food coloring. It’s a reminder that even in our busy lives, we can carve out time for fun and creativity.
So, if you’re looking for a delightful winter activity that’s both engaging and budget-friendly, this DIY Snow is the perfect choice. Let’s embrace the magic of winter together, one fluffy scoop at a time!
Materials Needed for DIY Snow
To create your own instant snow, you will need the following materials:
- 1 cup of baking soda: This is the main ingredient that gives your snow its fluffy texture.
- 1/2 cup of shaving cream: This adds the necessary moisture and helps achieve that snow-like consistency.
- Optional: glitter for sparkle: For a magical touch, add some glitter to your snow!
For a printable full list of materials, see below.
Tools Required for DIY Snow
Before you start crafting, gather these essential tools:
- Mixing bowl: To combine your ingredients. I love using a clear bowl so I can see the fluffy snow take shape as I mix!
- Spoon or spatula: For mixing everything together. A spatula works wonders for getting every last bit of shaving cream and baking soda combined.
If you don’t have a mixing bowl, any large container will work just fine! I’ve even used a large plastic food storage container in a pinch. The key is to have enough space to mix without making a mess. Trust me, I’ve learned the hard way that a too-small bowl can lead to a snowy explosion!
Gathering your tools ahead of time not only saves you from scrambling mid-project but also adds to the excitement. I always feel a rush of joy when I see everything laid out, ready for our crafting adventure. So, let’s get those tools together and prepare for some winter magic!
How to Make DIY Snow
Follow these simple steps to create your own instant snow:
- Combine Ingredients: In a mixing bowl, combine 1 cup of baking soda with 1/2 cup of shaving cream. I love watching the two ingredients come together; it’s like a little science experiment right in my kitchen!
- Mix Together: Use a spoon or spatula to mix the ingredients until you achieve a fluffy, snow-like consistency. This part is so satisfying! As you mix, you’ll feel the texture change, and it’s hard not to sneak a handful to play with.
- Add Sparkle: If desired, sprinkle in some glitter for a magical touch. I always let my kids choose the glitter color; it adds a personal flair to our snowy creation. Watching them sprinkle it in is one of my favorite moments!
- Enjoy: Play with your instant snow or use it for decoration! We often create little winter scenes with our snow, adding toy figures or even crafting mini snowmen. The possibilities are endless, and the joy it brings is truly heartwarming.
Remember, the best part of this DIY Snow project is the fun you have while making it. Don’t worry if it doesn’t turn out perfect on the first try; crafting is all about experimenting and enjoying the process. So, roll up your sleeves, and let’s make some winter magic together!
Tips for Best Results
To ensure your DIY Snow turns out perfectly, keep these tips in mind:
- Adjust the amount of shaving cream for your desired consistency. I’ve found that a little extra shaving cream can make the snow even fluffier, which is always a hit with the kids!
- Store any leftover snow in an airtight container to keep it fresh. We usually make a big batch, and I love being able to pull it out for spontaneous playdates or winter-themed crafts later on.
- Use food coloring to create colored snow for added fun! This is one of my kids’ favorite parts. We’ve made everything from pink snow to blue, and it adds a whole new level of excitement to our crafting sessions.
Remember, crafting is all about having fun and experimenting. Don’t stress if things don’t go exactly as planned. I’ve had my fair share of crafting mishaps, but those moments often lead to the best memories. So, embrace the process, and let your creativity shine!
Project Variations
Get creative with your DIY Snow by trying out these fun variations:
- Colorful Snow: Add a few drops of food coloring to create vibrant, colored snow. I remember the first time we did this; my kids were thrilled to see the snow transform into a rainbow of colors! It’s a simple way to add a splash of creativity and excitement to your project.
- Seasonal Themes: Use different glitter colors or add small decorations like mini pinecones or faux snowflakes for a festive touch. One year, we made a winter wonderland scene with our DIY Snow, complete with glittery snowflakes and tiny trees. It was a delightful way to celebrate the season and made for a beautiful centerpiece!
- Texture Changes: Experiment with different ratios of baking soda and shaving cream to find your perfect snow texture. I’ve found that a little more baking soda can create a denser snow, while more shaving cream gives it that light, fluffy feel. Don’t be afraid to play around until you find what works best for you and your kids!
These variations not only keep the project fresh and exciting but also encourage creativity and exploration. I love how each time we make DIY Snow, it can turn into a completely different experience. So gather your materials, let your imagination run wild, and enjoy the process of creating your own unique winter magic!
Decoration and Usage Ideas
Here are some fun ways to use your finished DIY Snow:
- Winter Centerpieces: Use it as a base for holiday decorations on your dining table. I love creating a cozy winter scene with our DIY Snow, adding candles and pinecones for a rustic touch. It instantly transforms our dining area into a winter wonderland, perfect for family gatherings!
- Sensory Play: Let your kids explore the texture and feel of the snow for a fun sensory experience. I often set up a sensory bin filled with our DIY Snow, adding small toys like animals or figures. Watching my kids dive in and create their own little worlds is such a joy. It’s a great way to keep them engaged while also encouraging imaginative play!
- Craft Projects: Incorporate it into other crafts, like creating snowmen or winter scenes. One of my favorite memories is when we built a mini snowman using our DIY Snow, complete with tiny buttons and a paper hat. It was a delightful afternoon filled with laughter and creativity, and it’s amazing how something so simple can spark such joy!
These ideas not only make the most of your DIY Snow but also encourage creativity and bonding time with your family. I always find that the best moments come from simple activities like these, where we can laugh, create, and enjoy each other’s company. So, gather your supplies, and let’s get crafting! The possibilities are endless, and the fun is just beginning!
FAQs about DIY Snow
Q: Is DIY Snow safe for kids?
A: Yes, the materials used are non-toxic and safe for children. However, supervision is recommended for younger kids. I always make sure to keep an eye on my little ones while they play, just to ensure they’re having fun safely!
Q: How long does the DIY Snow last?
A: The snow can last for several days if stored properly in an airtight container. I’ve found that it stays fluffy and fun for quite a while, which is perfect for spontaneous playdates or winter-themed crafts later on!
Q: Can I use this snow for outdoor play?
A: While it’s designed for indoor use, you can take it outside for a short time, but it may not hold up well in wet conditions. I remember one time we took our DIY Snow outside for a mini snowball fight, and while it was a blast, it quickly turned into a gooey mess when it got too damp. So, keep that in mind if you decide to venture outdoors!
Final Thoughts
Creating DIY Snow is not just a fun project; it’s a wonderful way to bring the magic of winter into your home, especially during the colder months. I can still remember the first time I made this with my kids; the excitement in their eyes as we mixed the ingredients together was truly priceless. It’s amazing how something so simple can create such joy and laughter!
Whether you’re crafting with your kids or enjoying a moment of creativity for yourself, this instant snow experiment is sure to bring smiles and joy. I love how it transforms our living space into a winter wonderland, even if the weather outside is less than magical. Plus, it’s a fantastic way to bond with your family, creating memories that will last a lifetime.
So gather your materials, unleash your creativity, and let the winter magic begin! Don’t worry about making it perfect; the beauty of crafting lies in the process and the fun you have along the way. Embrace the mess, enjoy the laughter, and let your imagination run wild. Happy crafting!
Print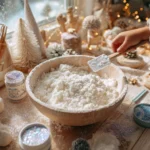
DIY Snow: Create Instant Winter Magic at Home!
Description
This DIY project allows you to create instant snow at home using simple materials, perfect for winter-themed decorations or sensory play for kids.
Instructions
- In a mixing bowl, combine 1 cup of baking soda with 1/2 cup of shaving cream.
- Mix the ingredients together until you achieve a fluffy, snow-like consistency.
- If desired, add a sprinkle of glitter for a magical touch.
- Play with your instant snow or use it for decoration!
Keywords: DIY Snow, Instant Snow Experiment, Winter Crafts, Kids Activities, Sensory Play