In a world filled with digital distractions, capturing a child’s wonder with a simple, tangible experiment is a special kind of magic. Imagine creating a mesmerizing display of color that mimics the graceful burst of fireworks, all within the safe confines of a glass jar using everyday kitchen ingredients. This activity, known as the “Firework Jar,” is more than just a beautiful spectacle; it is a gateway to hands-on science, sparking curiosity and laying the foundation for fundamental concepts in chemistry and physics.
This experiment is a staple for a reason: it is remarkably simple, incredibly safe, and visually stunning. It transforms abstract ideas like density and solubility into a captivating dance of color that children can observe and manipulate. This guide will not only walk you through the creation of your own firework jars but will also delve deep into the science behind the magic, offer creative variations to extend the learning, and provide a framework for turning this fun activity into a genuine educational experience.
The Foundation of the Experiment: Gathering Your Supplies
The beauty of this project lies in its accessibility. The ingredients are likely already in your home, making it a perfect spontaneous activity for a rainy afternoon or a planned highlight for a playdate or classroom session.
Core Ingredients:
-
1 Clear Mason Jar or Transparent Container: The vessel for our experiment. A classic mason jar is ideal, but any clear glass or sturdy plastic container will work. Transparency is key, as it allows for observation from all angles.
-
¾ Cup of Warm Water: Warm water is recommended as it helps the “fireworks” move a little more freely than cold water, though the experiment will work with any temperature.
-
2-3 Tablespoons of Vegetable Oil: A clear oil, such as canola or sunflower oil, provides the best visibility, but any vegetable oil will work. This is the non-polar agent in our experiment.
-
5-10 Drops of Food Coloring: This is our source of color. Liquid food coloring is water-based, which is a crucial property for the reaction to work.
Essential Tools:
-
A Small Bowl: For mixing the oil and food coloring.
-
A Spoon or Fork: For the gentle mixing process.
Optional Enhancements for Extended Learning:
-
Glitter: Adds a sparkling, magical dimension to the falling colors.
-
Pipettes or Droppers: These are excellent tools for allowing children to add the oil mixture drop by drop, fostering fine motor skills and control.
-
Test Tubes or Small Cups: For pre-mixing different colors, turning the activity into a color-mixing lab.
-
A Large Tray or Baking Sheet: Placing the jar on a tray is a simple yet effective strategy for containing any potential spills and making cleanup effortless.
The Scientific Method in Action: A Step-by-Step Guide
Engage your young scientist by framing this activity as an experiment. Follow these steps carefully to create the most dramatic and educational effect.
Step One: Preparing the Stage
Begin by filling your clear jar about three-quarters full with warm water. Leaving this space at the top is important; it prevents the water from overflowing when you add the oil mixture and allows for better observation of the surface interaction.
Step Two: Creating the Colorful Mixture
In your separate small bowl, pour the 2-3 tablespoons of vegetable oil. Now, add your drops of food coloring. Here is the first critical instruction: do not overmix. You are not trying to dissolve the food coloring into the oil. Instead, gently stir or whisk the mixture for just a few seconds. The goal is to break the food coloring into tiny, distinct droplets that are suspended in the oil, not blended with it. You should see a constellation of small color beads throughout the oil.
Step Three: The Grand Unveiling
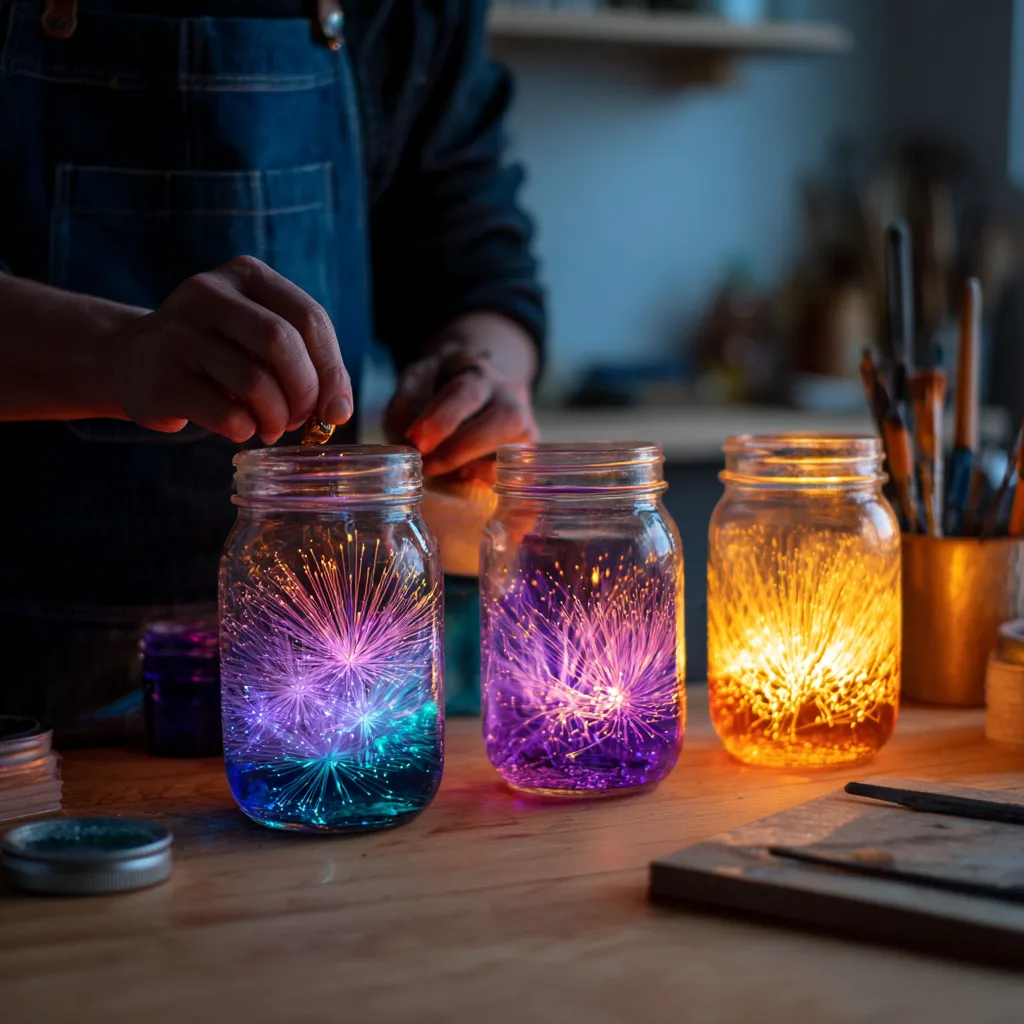
Slowly and carefully pour the oil and food coloring mixture into the jar of water. As the oil forms a layer on top of the water, you will witness the magic begin. The tiny droplets of food coloring will start to separate from the oil and sink down through the water. As they fall, they dissolve, creating vibrant, streaking tendrils that look remarkably like miniature fireworks exploding in slow motion.
Step Four: Observation and Repetition
The show does not have to end after one pour. You can repeat the process with different colors in the same jar for a layered effect, or set up multiple jars to create a rainbow of firework displays. Using a pipette to add a single color drop-by-drop can create a new, fascinating pattern each time.
The Science Behind the Spectacle: Unlocking the Principles of Chemistry
The mesmerizing dance of color in the firework jar is not magic—it is science in action. This simple experiment beautifully demonstrates several key scientific principles in a way that is intuitive and memorable for children.
The Concept of Density
This is the most fundamental concept at play. Density is defined as mass per unit volume. In simpler terms, it’s how much “stuff” is packed into a space. Oil is less dense than water. This means that for the same volume, oil is lighter than water. Because it is less dense, it cannot mix with or sink into the water; instead, it floats on top, forming a distinct layer.
The Principle of Polarity and Solubility
This is the heart of the “firework” effect. Water is a polar molecule, meaning it has a slight positive charge on one end and a slight negative charge on the other. Food coloring is also water-based and is therefore polar. Oil, on the other hand, is non-polar. The classic rule of chemistry is “like dissolves like.” Polar substances dissolve in other polar substances, and non-polar substances mix with other non-polar substances.
Since food coloring (polar) and oil (non-polar) are not “alike,” they refuse to mix. When you gently stir them, you are merely physically breaking the food coloring into tiny droplets, but they remain separate entities suspended in the oil. When this mixture is poured into the jar, the oil floats, but the food coloring droplets, being denser and water-based, are pulled down by gravity. As they fall through the water (their polar partner), they begin to dissolve, creating the beautiful, streaking “firework” effect you see.
Cause and Effect and The Scientific Method
This activity is a perfect model for the scientific method. Children naturally form a hypothesis: “What will happen if I pour this in?” They then test it through the experiment, observe the results, and can discuss their conclusions. You can encourage further experimentation by asking questions like, “What would happen if we used cold water?” or “Will the same thing happen if we use milk instead of water?”
Expanding the Horizon: Creative Variations and Thematic Play
Once you have mastered the basic firework jar, the learning and fun can be extended with these creative variations.
Sensory and Aesthetic Enhancements
-
Sparkling Fireworks: Add a pinch of fine glitter to the oil mixture for an extra layer of sparkle as the colors descend.
-
Glow-in-the-Dark Display: Use neon or glow-in-the-dark food coloring and observe your jars in a dimly lit room for an ethereal, magical effect.
Thematic and Seasonal Jars
Turn this science experiment into a holiday celebration.
-
Patriotic Display: Use red and blue food coloring for a Fourth of July or Memorial Day theme.
-
Festive Colors: Create red and green jars for Christmas, or orange and black for Halloween.
-
Pastel Rainbows: Use lighter drops of pastel food coloring for a beautiful Easter-themed activity.
The Shape of Science
Try different jar shapes. A tall, narrow vase will create long, streaking fireworks, while a wide, shallow bowl will cause the color to disperse differently. This introduces children to the concept of variables and how changing one element can alter the outcome of an experiment.
A Guide for Parents and Educators: Facilitating a Successful Learning Experience
To ensure the activity is both safe and educationally rich, a little preparation is key.
The Role of Supervision
While the materials are non-toxic, adult supervision is recommended, especially for younger children. An adult should handle the pouring of the oil mixture if fine motor skills are still developing. This is also a prime opportunity for guided interaction, asking open-ended questions to prompt critical thinking.
Strategies for Easy Cleanup
The “tray method” is highly recommended. Conducting the entire experiment on a large rimmed baking sheet or tray will catch any drips or accidental spills, making the post-experiment cleanup a simple wipe-down. The jars themselves can be reused after a thorough rinse with warm, soapy water to break down the oil.
Framing the Learning
Position yourself as a co-investigator rather than a lecturer. Use inquiry-based questions like:
-
“What do you think will happen when we pour this in?”
-
“Why do you think the oil is staying on top?”
-
“Look how the red is moving compared to the blue. Why might that be?”
-
“Can you predict where the next droplet will go?”
This approach empowers the child, builds confidence in their reasoning abilities, and fosters a genuine love for discovery.
Conclusion: More Than Just a Pretty Jar
The DIY Firework Jar is a powerful reminder that some of the most profound scientific lessons are hidden in plain sight, waiting to be discovered in our kitchen cabinets. It transforms the abstract into the tangible, allowing children to see the forces of density and polarity with their own eyes. This experiment does more than create a beautiful object; it ignites a spark of curiosity, encourages questioning, and provides a foundational experience that makes complex scientific concepts approachable and exciting. So, gather your jars, prepare your colors, and get ready to launch a spectacular, safe, and deeply educational firework show that your young scientist will remember for years to come.