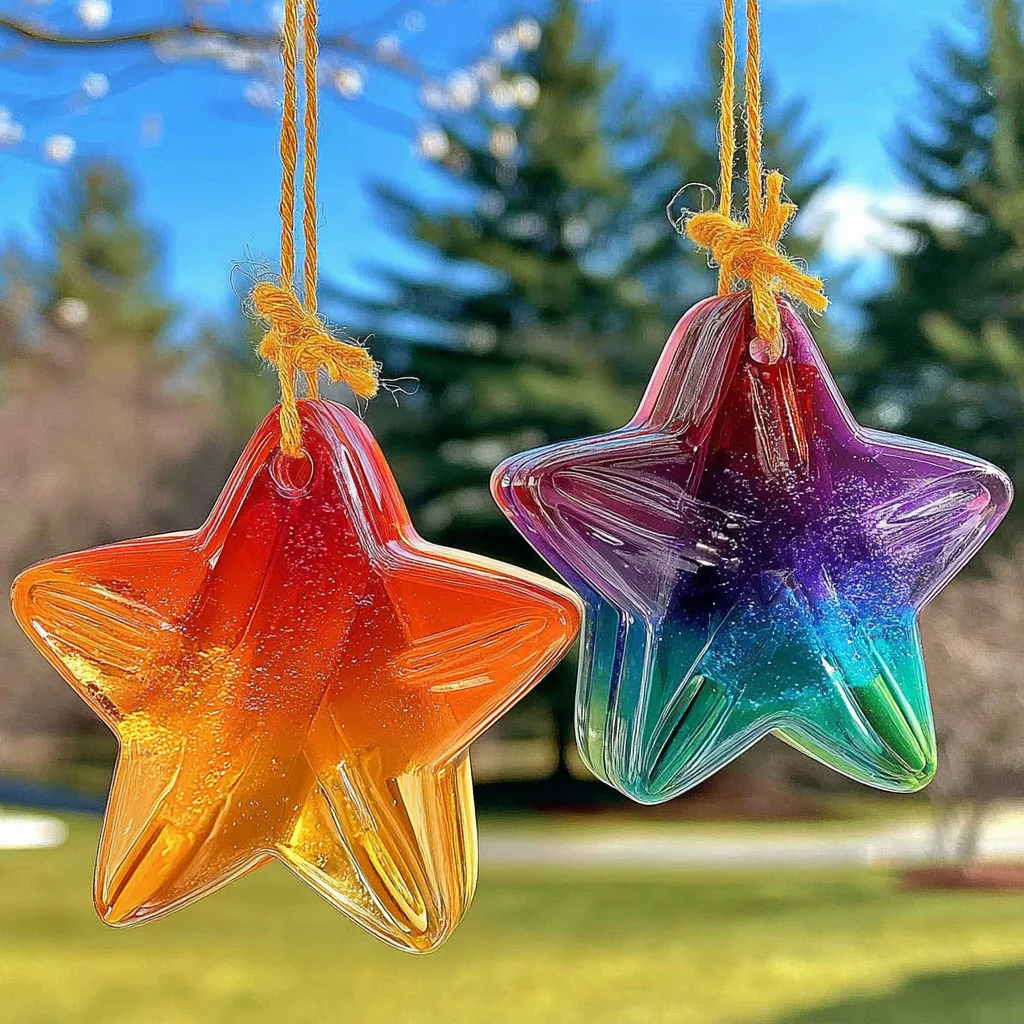
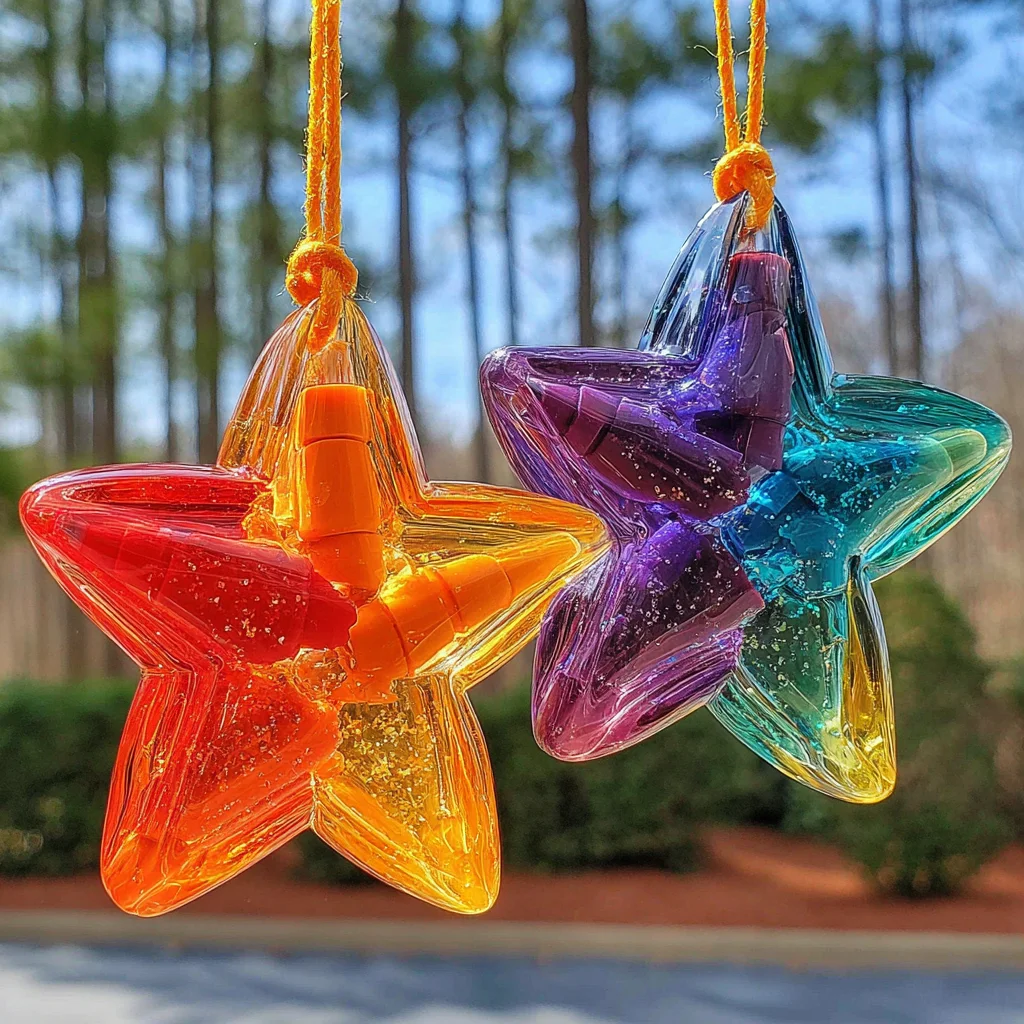
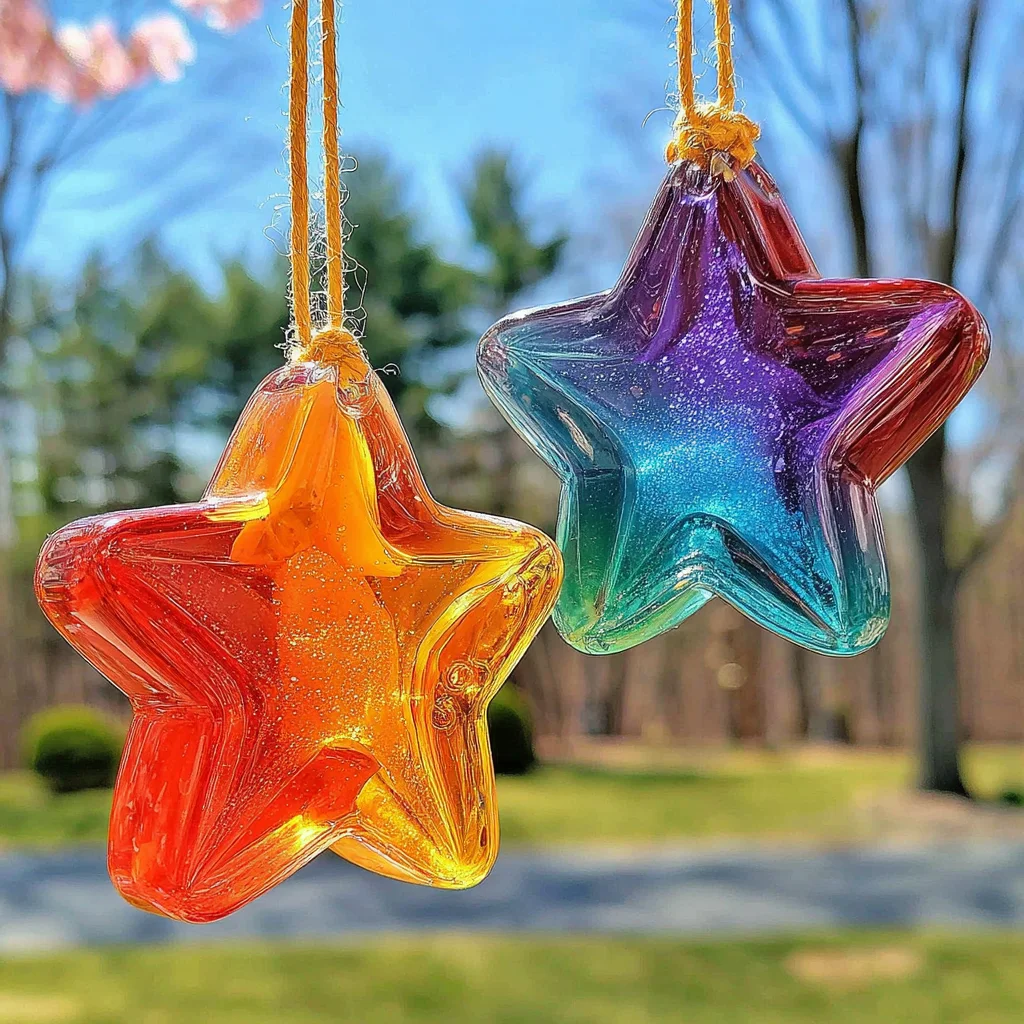
Broken crayons are something every household with kids (or creative adults) ends up with. They’re too short to color comfortably, too fragile to sharpen, and often left forgotten at the bottom of a drawer. Instead of throwing them away, why not give them a second life? With just a few simple supplies, those little bits of wax can be transformed into beautiful suncatchers—bright, stained-glass-like creations that add a splash of color to any window.
This project is more than just a craft. It’s an opportunity to recycle, experiment with color, and create something unique. Watching crayon shavings melt together into vibrant, luminous designs is magical, and the finished suncatchers make wonderful decorations or gifts.
In this guide, we’ll walk you through everything you need to know—from gathering supplies to creative variations, troubleshooting tips, and fun ways to use your finished creations.
Why You’ll Love Making Crayon Suncatchers
Before diving into the steps, let’s talk about why this craft is worth your time.
-
Eco-Friendly Upcycling
Instead of adding broken crayons to the trash, you’re repurposing them into something useful and beautiful. It’s a small step toward reducing waste and encouraging sustainability. -
Budget-Friendly Crafting
Chances are you already have most of the supplies at home—old crayons, a baking sheet, and cookie cutters. This makes the project inexpensive yet rewarding. -
Creative Expression
No two suncatchers will ever be the same. You can experiment with color palettes, create seasonal designs, and try out different shapes. -
Family Fun
Kids love this project. They get to choose colors, sprinkle shavings, and watch the crayons melt into mesmerizing swirls. Adults will enjoy the artistry of arranging colors and experimenting with designs. -
Decorative and Functional
These suncatchers aren’t just fun to make—they serve as cheerful home décor. Hang them in a sunny window, and they’ll scatter light in colorful patterns across your room.
Supplies You’ll Need
To get started, gather the following items:
-
Old crayons (remove the wrappers)
-
Pencil sharpener or small knife (for making shavings)
-
Bowls or cups (to separate colors)
-
Baking sheet
-
Parchment paper (to line the sheet)
-
Metal cookie cutters (variety of shapes)
-
Chopstick or skewer (to poke holes for hanging)
-
Ribbon or string (for display)
These basic tools will allow you to create an endless variety of designs.
Step-by-Step Instructions
Step 1: Preheat Your Oven
Set your oven to 250°F (120°C). This low temperature ensures that the crayons melt slowly and evenly, preventing them from burning or releasing too strong of an odor.
Step 2: Prepare the Crayons
Remove the paper wrappers from your crayons. If they’re stubborn, soak the crayons in warm water for a few minutes, and the labels will peel right off.
Step 3: Make Crayon Shavings
Using a pencil sharpener, create fine crayon shavings. You can also use a knife, but a sharpener is safer and more efficient. Keep colors separate if you want to control the palette, or mix them together for a surprise.
Step 4: Set Up Your Cookie Cutters
Place a sheet of parchment paper on your baking tray. Arrange the metal cookie cutters on top. These will form the molds for your suncatchers.
Step 5: Fill with Crayon Shavings
Sprinkle a thin layer of shavings inside each cookie cutter. Keep it about a quarter inch thick for best results. You can:
-
Use a single color for bold, solid suncatchers.
-
Mix complementary shades for a blended look.
-
Create rainbow swirls with many colors.
-
Stick to seasonal themes (reds and greens for Christmas, pastels for spring).
Step 6: Melt in the Oven
Place the baking tray in the oven for 3–5 minutes. Keep an eye on it—crayons melt quickly. Once the shavings are fully melted into smooth wax, remove the tray.
Step 7: Make a Hanging Hole
While the wax is still warm, use a chopstick or skewer to poke a small hole near the top of each shape. This hole will be used to attach the ribbon. If the hole closes as it cools, you can reheat slightly and re-poke.
Step 8: Cool and Release
Allow the suncatchers to cool completely before touching them. Once hardened, gently push them out of the cookie cutters. They should pop out cleanly.
Step 9: Attach Ribbon and Display
Thread a ribbon or string through the hole, tie it securely, and hang your suncatchers in a sunny window. The sunlight will shine through, casting colorful reflections across your room.
Creative Variations
This project is versatile, and you can experiment in many ways:
-
Layered Suncatchers – Add shavings in multiple stages, letting each layer melt and cool before adding the next, creating a striped effect.
-
Glitter Glow – Sprinkle in a touch of fine glitter before baking for extra sparkle.
-
Holiday Shapes – Use cookie cutters that match the season: hearts for Valentine’s Day, leaves for autumn, snowflakes for winter.
-
Mosaic Style – Instead of shavings, place larger chunks of crayon to create a stained-glass, mosaic look.
-
Blended Gradients – Use different shades of the same color to create ombre transitions.
Tips for Success
-
Always use metal cookie cutters; plastic ones will melt in the oven.
-
Avoid overfilling the cutters; too much wax can overflow and make messy edges.
-
Ventilate your kitchen while baking. Although crayons melt safely at low temperatures, some odor may be noticeable.
-
If edges look uneven, trim them with scissors once cooled.
-
To prevent sticking, make sure the parchment paper covers the baking tray fully.
Safety Notes
-
Adult supervision is a must when children are involved. The oven and melted wax are very hot.
-
Allow the suncatchers to cool fully before handling, as warm wax can still cause burns.
-
Keep your work area organized to avoid spills or accidents.
Fun Ways to Use Your Suncatchers
These creations aren’t just for windows. Here are some creative uses:
-
Holiday Ornaments – Hang them on a Christmas tree for homemade decorations.
-
Gift Tags – Tie one to a wrapped present for a personal touch.
-
Party Favors – Hand them out at children’s parties or craft events.
-
Wall Art – Arrange several suncatchers on a string to create a colorful garland.
-
Seasonal Décor – Change your shapes and colors to match the time of year.
Troubleshooting Common Issues
-
The wax overflowed: Use fewer shavings next time, keeping the layer thin and even.
-
Shapes won’t pop out: Let them cool longer, or gently press from underneath the parchment paper.
-
Hole closed up: Reheat slightly and poke again with a skewer.
-
Colors look muddy: Stick to fewer shades at once; too many can blend into brown tones.
Why They Make Great Gifts
Handmade crayon suncatchers are more than just crafts—they’re meaningful keepsakes. Each one is unique, reflecting the personality and creativity of the maker. They’re perfect for:
-
Teacher appreciation gifts
-
Stocking stuffers
-
Birthday party giveaways
-
Small “thank you” presents
-
Classroom projects
The handmade element makes them feel special in a way that store-bought gifts often don’t.
Educational Benefits for Kids
This project isn’t just fun—it’s also educational. Kids can:
-
Learn about color theory (how shades mix and blend).
-
Practice fine motor skills by shaving crayons and sprinkling shavings.
-
Observe a science experiment as solid crayons turn into liquid and back again.
-
Explore creativity by designing their own color schemes.
It’s a great activity for rainy days, school projects, or simply nurturing artistic expression.
Final Thoughts
DIY crayon suncatchers prove that art doesn’t have to come from expensive supplies. Sometimes, the most beautiful creations emerge from what we might otherwise consider waste. By repurposing broken crayons, you not only save them from the trash but also create radiant decorations that brighten your home.
Whether you’re crafting with kids, making gifts, or simply exploring your creative side, these colorful little ornaments are as satisfying to make as they are to admire.
The next time you find yourself holding a box of stubby, broken crayons, remember this: you’re just a few steps away from turning them into glowing masterpieces that will scatter light and joy throughout your space.