Introduction to DIY Colored Salt Jar
Welcome to the colorful world of DIY Colored Salt Jars! This delightful project is not only simple but also a fantastic way to unleash your creativity. I remember the first time I made these jars with my kids; the joy on their faces as they mixed colors was priceless! With just a few materials, you can create stunning decor that brightens up any space or makes heartfelt gifts. Plus, it’s a wonderful bonding experience that brings families together. So, let’s dive into this fun and rewarding craft that will leave you with beautiful creations to cherish!
Why You’ll Love This DIY Colored Salt Jar
This DIY Colored Salt Jar project is a breath of fresh air for anyone looking to add a splash of color to their home! It’s incredibly easy and budget-friendly, making it perfect for busy moms or teachers. Plus, it’s a wonderful way to bond with your kids while sparking their creativity. The satisfaction of creating something beautiful together is truly rewarding, and the end result is a stunning piece of decor that you can proudly display!
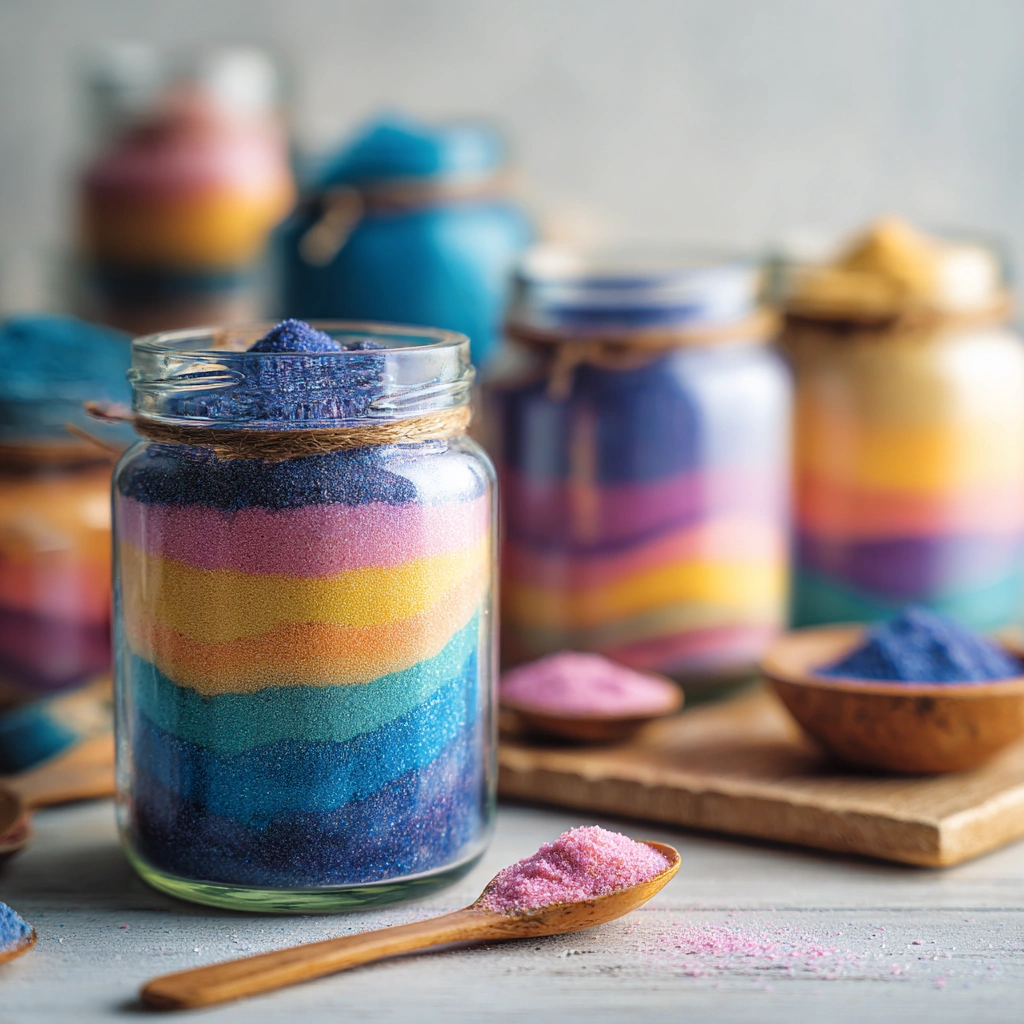
Materials and Tools Needed for DIY Colored Salt Jar
Before we jump into crafting our beautiful DIY Colored Salt Jars, let’s gather our materials! Here’s what you’ll need:
- Salt: You can use either table salt or coarse salt. The texture of the salt can affect the final look, so feel free to experiment!
- Food coloring: This is where the magic happens! Choose your favorite colors to create vibrant or pastel shades. Non-toxic food coloring is a must, especially if little hands are involved.
- Glass jars with lids: These will hold your colorful creations. Opt for jars that are clear to showcase the beautiful layers of salt. Recycled jars work great too!
- Mixing bowls: You’ll need a few bowls to mix your salt and food coloring. Any size will do, just make sure they’re big enough to stir without spilling.
- Spoons: Grab some spoons for mixing and layering the salt. Wooden or plastic spoons are perfect for this project.
- Wax paper or parchment paper: This is essential for drying your colored salt. It prevents sticking and makes cleanup a breeze!
Gathering these materials is part of the fun! Plus, many of these items can be found around your home or at your local craft store, making this project both accessible and budget-friendly. Let’s get ready to create some colorful magic!
How to Make DIY Colored Salt Jar
Creating your own DIY Colored Salt Jar is not just a craft; it’s a delightful journey into color and creativity! I remember the first time I made these with my kids. The kitchen was filled with laughter and the soft shimmer of the colored salt felt magical as we layered it into jars. Let’s dive into the steps to make your own stunning salt jars!
Step 1: Prepare Your Colored Salt
Start by gathering your mixing bowls and salt. In one of the bowls, combine a generous amount of salt with a few drops of food coloring. The fun part? Watching the salt transform as you stir! Keep mixing until the color is evenly distributed. You can create vibrant hues or soft pastels—whatever suits your style! Just remember, the more food coloring you add, the more intense the color will be.
Step 2: Dry the Colored Salt
Once your salt is beautifully colored, it’s time to let it dry. Spread the colored salt out on a piece of wax paper or parchment paper. This step is crucial because it prevents clumping. Let it sit for a few hours, and during this time, you can enjoy a cup of tea or tackle another small project. The anticipation of seeing the final product is half the fun!
Step 3: Layer the Salt in Jars
Now comes the exciting part—layering your colored salt into the glass jars! Start with one color and gently pour it into the jar. You can use a funnel to avoid spills, which is a lifesaver, especially when crafting with kids. Create patterns by alternating colors or layering them in sections. Let your creativity run wild! I love to think of this step as painting with salt, where each layer tells a story.
Step 4: Seal and Label Your Jars
Once you’ve filled your jars to your liking, it’s time to seal them with the lids. This not only keeps your beautiful creation safe but also adds a polished look. If you’re feeling extra crafty, consider labeling your jars. You can use cute tags or even paint directly on the glass. It’s a lovely touch that makes your DIY Colored Salt Jars feel even more special!
Step 5: Display or Gift Your Creation
Finally, it’s time to show off your colorful salt jars! You can use them as stunning home decor pieces, creating a vibrant centerpiece for your dining table or a cheerful display on your shelves. Alternatively, these jars make fantastic gifts for friends and family. Imagine their delight when they receive a handmade gift that’s both beautiful and personal. Trust me, they’ll cherish it!
As you embark on this DIY adventure, remember that the joy is in the process. Whether you’re crafting solo or with loved ones, the experience of creating something beautiful together is what makes it truly special. So grab your materials and let’s get crafting!
Tips for Best Results
- Experiment with different color combinations for unique effects. Mixing colors can lead to stunning surprises!
- Use a funnel to help pour the salt into the jars without spilling. This little tool can save you from a colorful mess!
- Consider adding small decorative items like dried flowers or shells between layers for added interest. It’s a fun way to personalize your jars!
- Make a themed set for holidays or special occasions. Think red and green for Christmas or pastel colors for Easter!
Theme and Design Variations
One of the best parts of creating DIY Colored Salt Jars is the endless possibilities for themes and designs! Here are some fun ideas to inspire your creativity:
- Bright pastels: Perfect for springtime decor, think soft pinks, yellows, and blues that evoke the freshness of blooming flowers.
- Warm autumn colors: Embrace the season with rich oranges, deep reds, and golden yellows that reflect the beauty of falling leaves.
- Red and green: Create festive jars for Christmas themes, adding a touch of holiday cheer to your home.
- Ocean-inspired: Use calming blues and greens for a summer vibe, reminiscent of sandy beaches and tranquil waters.
- Kid-friendly versions: Add a sprinkle of glitter or use glow-in-the-dark elements for a magical twist that kids will love!
These variations not only make your jars visually stunning but also allow you to celebrate different seasons and occasions throughout the year!
Display and Use Ideas
Now that you’ve created your stunning DIY Colored Salt Jars, it’s time to think about how to showcase them! Here are some fun and creative ways to use, display, or gift your beautiful creations:
- Use as centerpieces for dining tables, adding a pop of color to family meals or gatherings.
- Create a colorful display on shelves, mixing different sizes and colors for an eye-catching arrangement.
- Gift jars for birthdays or holidays, sharing your handmade charm with friends and family.
- Use in classrooms for educational projects, teaching kids about colors, layering, and creativity.
- Incorporate into seasonal decorations, switching colors to match the holidays or changing seasons.
These ideas not only enhance your home decor but also spread joy and creativity wherever they go!
FAQs about DIY Colored Salt Jar
As you embark on your colorful crafting journey, you might have a few questions about the DIY Colored Salt Jar project. Here are some common queries and their answers to help you along the way!
- Q: Can I use any type of salt?
A: Yes, both table salt and coarse salt work well for this project. The choice depends on the texture you prefer for your jars! - Q: Is the food coloring safe?
A: Absolutely! Just make sure to use non-toxic food coloring, especially if little hands are involved in the crafting process. - Q: How long will the colored salt last?
A: The colored salt can last indefinitely if kept in sealed jars. Just make sure to store them in a cool, dry place to maintain their vibrant colors! - Q: Can I add scents to my colored salt?
A: Yes! You can mix in a few drops of essential oils to add a lovely fragrance to your jars. Just be cautious with the amount to avoid clumping. - Q: What if my colored salt clumps together?
A: If you notice clumping, try breaking it apart gently with your fingers. You can also add a little more salt to absorb any moisture.
These FAQs should help clarify any concerns you might have as you create your beautiful DIY Colored Salt Jars. Happy crafting!
Final Thoughts
Creating your own DIY Colored Salt Jars is not just about the end product; it’s about the joy and laughter shared during the crafting process. I hope you feel inspired to dive into this colorful adventure and let your creativity shine! Whether you’re making these jars for your home or as heartfelt gifts, the satisfaction of seeing your beautiful creations come to life is truly rewarding. So gather your materials, invite your loved ones, and start crafting! I can’t wait to see your stunning salt jars—don’t forget to share your results and inspire others in our crafting community!
Print
DIY COLORED SALT JAR: Create Stunning Decor with Ease!
Description
Create beautiful and colorful salt jars that can be used as home decor or gifts. This simple DIY project allows you to customize colors and patterns to match your style.
Instructions
- In a mixing bowl, combine salt with a few drops of food coloring. Adjust the amount of coloring to achieve your desired shade.
- Mix the salt thoroughly until the color is evenly distributed.
- Repeat the process with different colors of salt in separate bowls.
- Once you have your colored salts ready, start layering them in the jars. Use a spoon to carefully add layers of different colors.
- Continue layering until the jar is filled, creating a beautiful pattern.
- Seal the jars with lids and display them as decor or give them as gifts!
- Category: Home Decor
Keywords: DIY Colored Salt Jar, Home Decor, Craft Project, Colorful Decor