
Introduction to DIY Borax Crystals
Creating beautiful home décor doesn’t have to be complicated or expensive. With just a few simple materials, you can craft stunning DIY Borax crystals that will add a touch of elegance to your space. This project is perfect for busy moms and professionals looking to unleash their creativity without spending hours on intricate designs.
I remember the first time I stumbled upon this project. I was searching for a quick and easy craft to do with my kids on a rainy afternoon. The idea of making crystals sounded like a fun science experiment, and I was thrilled to discover that it could also double as a beautiful decoration for our home.
Whether you want to decorate your home or create a unique gift, DIY Borax crystals are a fun and rewarding craft that anyone can enjoy. The best part? You don’t need to be a crafting expert to achieve stunning results. Just a little patience and a willingness to experiment will lead you to beautiful creations.
As I gathered the materials, I felt a wave of excitement. The thought of watching those crystals form was like waiting for a surprise to unfold. And trust me, the anticipation is half the fun! So, if you’re ready to dive into a world of creativity and beauty, let’s get started on this delightful journey of making DIY Borax crystals.
Why You’ll Love This DIY Borax Crystals
As a busy mom, I often find myself juggling a million tasks, from school drop-offs to work meetings. But when I discovered the joy of crafting DIY Borax crystals, it felt like a breath of fresh air. Not only are these crystals visually stunning, but they also offer a therapeutic escape from my hectic routine.
One of the things I love most about this project is how affordable it is. With just a few materials, I can create beautiful pieces that brighten up my home. I remember the first time I made these crystals; I was amazed at how something so simple could transform my living room into a cozy, inviting space. The way the light catches the crystals is simply magical!
What’s even better is that this project is perfect for involving my kids. We spent an afternoon shaping pipe cleaners into fun designs, laughing and chatting as we worked together. It was a wonderful bonding experience, and seeing their excitement as the crystals formed was priceless. I realized that crafting isn’t just about the end product; it’s about the memories we create along the way.
Plus, the satisfaction of creating something beautiful with my own hands is unmatched. Every time I look at my DIY Borax crystals, I’m reminded of that special day spent with my family. So, if you’re looking for a fun, easy, and rewarding craft project, I wholeheartedly encourage you to dive into the world of DIY Borax crystals. You won’t regret it!
Materials Needed for DIY Borax Crystals
To get started on your DIY Borax crystals, you will need the following materials:
- 1 cup of borax: The main ingredient that forms the crystals. I love how this simple powder can create such beautiful results!
- 3 cups of water: Used to dissolve the borax. Boiling the water is a crucial step, and I always make sure to handle it with care.
- String: To suspend your pipe cleaner shapes in the solution. I often use colorful string to add an extra pop to my creations.
- Pipe cleaners: These will be shaped into various designs to create unique crystal formations. The possibilities are endless, and I enjoy experimenting with different shapes!
- Glass jar: To hold the borax solution and the pipe cleaner shapes. I recommend using a clear jar so you can watch the magic happen as the crystals form.
*For a printable full list of materials, see below.*
Tools Required for DIY Borax Crystals
To embark on your journey of creating stunning DIY Borax crystals, you’ll need a few basic tools that are likely already in your kitchen or craft drawer. I remember when I first started this project; I was pleasantly surprised at how simple the tool list was!
- Stirring stick: This is essential for mixing the borax and water solution. I often use a wooden spoon or even a chopstick if I’m in a pinch. Just make sure it’s something you don’t mind getting a little borax on!
- Measuring cup: Accurate measurements are key to ensuring your crystals form beautifully. I always keep a dedicated measuring cup for my crafting projects, so I don’t mix it up with my cooking supplies.
- Scissors: You’ll need these to cut the string and pipe cleaners as needed. I find that having a good pair of scissors makes the crafting process smoother and more enjoyable.
If you don’t have these tools on hand, don’t worry! You can easily find alternatives around your home. For instance, a sturdy spoon can work as a stirring stick, and any cup can serve as a measuring tool as long as you keep the proportions consistent. The beauty of crafting is that it encourages creativity and resourcefulness!
So gather your tools, and let’s get ready to create some dazzling DIY Borax crystals that will surely impress your family and friends!
How to Make DIY Borax Crystals
Creating your own stunning DIY Borax crystals is a delightful process that I find both exciting and rewarding. Follow these simple step-by-step instructions, and you’ll be amazed at the beautiful results!
Step 1: Boil Water
Start by boiling 3 cups of water in a pot on the stove. I always make sure to keep an eye on it, as boiling water can be a bit unpredictable. The sound of bubbling water is like music to my ears, signaling the start of our crystal-making adventure!
Step 2: Dissolve Borax
Once the water is boiling, add 1 cup of borax to the pot and stir until it is completely dissolved. Watching the borax disappear into the water feels like a little magic trick! Just be careful, as the steam can be quite hot.
Step 3: Shape Pipe Cleaners
While the solution is cooling, it’s time to get creative! Shape your pipe cleaners into desired forms. You can create stars, hearts, or any other design you like. I love making whimsical shapes that reflect my personality. Don’t forget to tie a string to the top of each shape; this will help suspend them in the solution.
Step 4: Suspend Shapes
Attach the pipe cleaner shapes to the string and suspend them in the glass jar, ensuring they do not touch the bottom. This part is so much fun! I often find myself rearranging the shapes until they look just right. It’s all about finding that perfect balance!
Step 5: Pour Solution
Carefully pour the borax solution into the jar, making sure the pipe cleaners are fully submerged. I like to pour slowly to avoid any splashes. The anticipation builds as I watch the solution fill the jar, knowing that beautiful crystals are on their way!
Step 6: Let Crystals Form
Now comes the hardest part—waiting! Allow the jar to sit undisturbed for 24 hours. During this time, the crystals will begin to form around the pipe cleaners. I often check in on them, peeking through the jar to see the progress. It’s like waiting for a surprise to unfold!
Step 7: Remove and Dry
After 24 hours, carefully remove the pipe cleaners from the jar and let the crystals dry completely. This moment is so rewarding! I can’t help but admire the beautiful formations that have emerged. Each crystal is unique, just like the memories we create while crafting.
Tips for Best Results
As I’ve dived deeper into the world of crafting DIY Borax crystals, I’ve learned a few tips that can truly elevate your crystal-making experience. These little nuggets of wisdom have helped me achieve stunning results, and I’m excited to share them with you!
- Use different colors of pipe cleaners: One of the easiest ways to add a pop of color to your crystals is by using various colored pipe cleaners. I remember the first time I used a rainbow of colors; the resulting crystals were so vibrant and eye-catching! It’s like bringing a piece of a colorful garden into your home.
- Experiment with various shapes: Don’t be afraid to get creative with your pipe cleaner designs! I’ve made everything from whimsical stars to elegant snowflakes. Each shape produces unique crystal formations, and it’s always a delightful surprise to see how they turn out. The more you experiment, the more fun you’ll have!
- Ensure the jar is in a cool, undisturbed location: For optimal crystal growth, it’s essential to place your jar in a cool, quiet spot. I’ve found that keeping it away from direct sunlight and drafts helps the crystals form more evenly. It’s like giving them a cozy little home to grow in!
By following these tips, you’ll be well on your way to creating beautiful DIY Borax crystals that will impress everyone who sees them. Remember, crafting is all about enjoying the process, so have fun and let your creativity shine!
Project Variations
One of the most exciting aspects of crafting DIY Borax crystals is the endless possibilities for creativity! I love experimenting with different variations to make each batch unique. Here are some fun ideas to inspire your next crystal-making adventure:
- Color Changes: Why not add a splash of color to your crystals? You can use colored borax if you can find it, or simply add a few drops of food coloring to the borax solution. I remember the first time I tried this; the vibrant hues transformed my crystals into a stunning rainbow display. It’s a simple tweak that makes a big impact!
- Seasonal Adaptations: Get festive by creating holiday-themed shapes! For winter, I love making snowflakes that sparkle like real ice. In spring, I shape pipe cleaners into flowers or butterflies. It’s a wonderful way to celebrate the seasons and bring a touch of seasonal charm into your home.
- Size Variations: Don’t be afraid to play with the size of your crystals! Using larger or smaller jars can create different sizes of crystals, which can be a fun surprise. I once used a tiny jar for a mini crystal garden, and the results were adorable! It’s a great way to experiment and see how size affects the final look.
These variations not only keep the crafting process fresh and exciting but also allow you to personalize your DIY Borax crystals to fit your style and home décor. So gather your materials, let your imagination run wild, and enjoy the creative journey!
Decoration and Usage Ideas
Once your DIY Borax crystals are complete, the fun doesn’t stop there! I love finding creative ways to showcase these beautiful creations around my home. Here are some delightful ideas on how to use them:
- Home Décor: One of my favorite ways to display my crystals is by placing them in a decorative bowl or on a shelf. The way they catch the light adds a magical touch to any room. I often arrange them with other decorative items, like candles or plants, to create a stunning focal point. It’s amazing how something so simple can elevate the overall aesthetic of my space!
- Gift Ideas: These crystals make for thoughtful and unique gifts! I love packaging them in a beautiful box or wrapping them in sheer fabric tied with a ribbon. It’s a personal touch that shows I care. Friends and family are always impressed when they receive a handmade gift, and it’s a wonderful way to share the joy of crafting with others.
- Party Decorations: If you’re hosting a special occasion, consider using your DIY Borax crystals as centerpieces. They can add a touch of elegance to your table settings. I once used them for a birthday party, and they were a hit! I arranged them in small jars with fairy lights, creating a whimsical atmosphere that my guests loved.
These ideas not only allow you to enjoy your creations but also inspire others to appreciate the beauty of handmade crafts. So, let your imagination run wild and find the perfect way to showcase your stunning DIY Borax crystals! Remember, the joy of crafting is all about sharing and celebrating creativity.
FAQs about DIY Borax Crystals
As I’ve dived into the world of crafting DIY Borax crystals, I’ve encountered a few common questions that many crafters have. I remember feeling curious about these topics myself, so I’m excited to share the answers with you!
Q: How long do the crystals last?
A: With proper care, your DIY Borax crystals can last for months or even years. I’ve had some of mine on display for over a year, and they still look beautiful! Just be sure to keep them in a safe spot where they won’t get knocked over or damaged.
Q: Can I use other types of salt?
A: Borax is specifically used for this project, as it creates the best crystal formations. I’ve tried using other salts in the past, but they didn’t yield the same stunning results. Stick with borax for the most beautiful crystals!
Q: Is this project safe for kids?
A: While the project is safe, adult supervision is recommended, especially when handling boiling water and borax. I always make sure to involve my kids in the fun parts, like shaping the pipe cleaners, while I handle the boiling water. It’s a great way to teach them about safety while enjoying a creative activity together!
These FAQs can help ease any concerns you might have as you embark on your DIY Borax crystals journey. Remember, crafting is all about having fun and learning along the way, so don’t hesitate to dive in and enjoy the process!
Final Thoughts
Creating DIY Borax crystals has truly been a delightful journey for me, and I hope it will be for you too! This simple project is not just about making beautiful decorations; it’s about expressing your creativity and finding joy in the process. I can still remember the first time I watched those crystals form, and the sense of accomplishment I felt was incredible.
What I love most is how this project brings people together. Whether you’re crafting with your kids, friends, or even enjoying some quiet time alone, the experience is enriching. I’ve had some of my best conversations with my children while we shaped pipe cleaners and waited for the crystals to grow. It’s a wonderful way to bond and create lasting memories.
So, gather your materials and unleash your inner artist! Don’t be afraid to experiment and make this project your own. Each batch of DIY Borax crystals will be unique, just like the moments you share while making them. Remember, the joy of crafting lies not just in the final product, but in the laughter, creativity, and love that fills the air during the process.
Happy crafting! I can’t wait to hear about your own adventures in making DIY Borax crystals. Share your stories and creations, and let’s inspire each other to keep crafting beautiful memories!
Print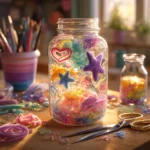
DIY Borax Crystals: Create Stunning Home Décor Easy!
Description
This DIY project teaches you how to create beautiful borax crystals that can be used as stunning home décor items.
Instructions
- Boil 3 cups of water in a pot.
- Add 1 cup of borax to the boiling water and stir until dissolved.
- Shape pipe cleaners into desired forms and tie a string to them.
- Attach the pipe cleaner shapes to the string and suspend them in the glass jar.
- Pour the borax solution into the jar, ensuring the pipe cleaners are submerged.
- Let the jar sit undisturbed for 24 hours.
- Remove the pipe cleaners and let the crystals dry.
Keywords: DIY Borax Crystals, Home Decor, Craft Project, Easy Crafts


