Introduction to DIY Blue Crayon Suncatchers
Welcome to the colorful world of DIY Blue Crayon Suncatchers! If you’re looking for a fun and simple craft that will brighten up your home, you’ve come to the right place. This project is perfect for all ages, making it a fantastic way to bond with your kids or spark creativity in the classroom. I remember the joy of watching the crayons melt and transform into beautiful art pieces that danced with light. Not only is this craft rewarding, but it also adds a pop of color to your windows, creating a cheerful atmosphere in any space!
Why You’ll Love This DIY Blue Crayon Suncatchers
You’re going to adore making these DIY Blue Crayon Suncatchers! Not only are they easy and affordable, but they also spark creativity and provide a wonderful opportunity to bond with your kids. I find that crafting together is a fantastic way to relax and share laughter. Plus, the satisfaction of seeing your colorful creations brighten up your home is simply unbeatable. It’s a win-win for everyone!
Materials and Tools Needed for DIY Blue Crayon Suncatchers
Gathering the right materials is the first step to creating your stunning DIY Blue Crayon Suncatchers! Each item plays a vital role in bringing your colorful vision to life. You’ll need blue crayons, which are the star of the show, providing that vibrant hue that will shine through your windows. Wax paper is essential for melting the crayons without making a mess, while parchment paper protects your iron from any wax residue. Don’t forget the scissors for cutting out your shapes, and if you want to hang your creations, a hole punch and some string or ribbon will do the trick!
Essential Materials
- Blue crayons
- Wax paper
- Parchment paper
Tools Required
- Iron
- Scissors
- Hole punch (optional)
- String or ribbon (optional)
How to Make DIY Blue Crayon Suncatchers
Creating your own DIY Blue Crayon Suncatchers is not just a fun craft; it’s a delightful way to bring a splash of color into your home! I remember the first time I made these with my kids; the excitement in their eyes as they watched the crayons melt was simply magical. Let’s dive into the steps to make these beautiful suncatchers together!
Step 1: Preheat Your Iron
First things first, preheat your iron to a low setting without steam. This is crucial because we want to melt the crayons gently without burning the wax paper. Trust me, a low heat setting is your best friend here!
Step 2: Prepare the Crayons
Next, grab those blue crayons! You can shave them with a knife or break them into small pieces. Spread the crayon bits evenly on a sheet of wax paper. The more colorful the spread, the more vibrant your suncatcher will be. I love mixing different shades of blue for a beautiful gradient effect!
Step 3: Create the Wax Paper Sandwich
Now, cover the crayon pieces with another sheet of wax paper. This is where the magic happens! Make sure the crayon bits are completely covered to avoid any mess when you start melting.
Step 4: Protect Your Iron
To protect your iron from any wax residue, place a piece of parchment paper on top of the wax paper sandwich. This step is essential, as it keeps your iron clean and ready for future crafting adventures!
Step 5: Melt the Crayons
Carefully press the iron on top of the parchment paper for a few seconds. You’ll see the crayons start to melt and fuse together, creating a beautiful swirl of blue. It’s like watching a mini art show right in your kitchen! Just be sure to keep the iron moving to avoid any hot spots.
Step 6: Cool Down
Once you’ve melted the crayons, remove the iron and let the wax paper cool for a minute. This is the perfect time to admire your work and get excited about the colorful masterpiece you’re about to create!
Step 7: Cut Out Shapes
After it’s cooled, take your scissors and cut the wax paper into fun shapes like circles, stars, or even hearts. The possibilities are endless! I love making a variety of shapes to hang together for a stunning display.
Step 8: Add a Hanging Option
If you want to hang your suncatcher, use a hole punch to create a hole at the top. Then, thread a string or ribbon through it. This little touch makes it easy to display your beautiful creation in a sunny window!
Step 9: Display Your Art
Finally, hang your suncatchers in a sunny window and watch as the light dances through the colors. The soft shimmer of the blue crayon suncatchers under the sunlight feels magical, transforming your space into a vibrant art gallery. Enjoy the colorful light display and the smiles it brings!
Tips for Best Results
- Experiment with different shades of blue or mix in other colors for a unique look.
- Make sure to use a low heat setting to avoid burning the wax paper.
- Use a heavy book to press down on the wax paper while it cools for a flatter finish.
- Consider making a whole set of suncatchers in various colors for a vibrant display.
Theme and Design Variations
- Create a rainbow of suncatchers by mixing in other colors for a vibrant display that brightens any room.
- Use seasonal colors like orange and yellow for fall or soft pastels for spring to celebrate the changing seasons.
- Make themed shapes for holidays, such as hearts for Valentine’s Day or snowflakes for winter, adding a festive touch to your decor.
- Encourage kids to create their own designs and shapes for a personalized touch, making each suncatcher a unique masterpiece!
Display and Use Ideas
Now that you’ve created your stunning DIY Blue Crayon Suncatchers, it’s time to showcase your beautiful art! Here are some fun and creative ways to display and use your suncatchers:
- Hang them in windows to catch sunlight and create colorful reflections that brighten up any room.
- Use them as unique decorations for birthday parties or special events, adding a personal touch to your celebrations.
- Gift them to friends or family as a handmade present, spreading joy and creativity with your thoughtful creations.
- Incorporate them into classroom decor for a fun and educational project that inspires creativity in students.
FAQs about DIY Blue Crayon Suncatchers
Got questions about making your own DIY Blue Crayon Suncatchers? Don’t worry, I’ve got you covered! Here are some common queries that might pop up as you embark on this colorful crafting adventure:
- Can I use other colors of crayons?
Yes! While blue is the focus, mixing in other colors can create beautiful effects. Imagine a rainbow of colors dancing in your window! - Is this project safe for kids?
Absolutely! However, adult supervision is required when using the iron. It’s a great opportunity to teach kids about safety while having fun! - How long do the suncatchers last?
With proper care, they can last for several months. Just be sure to avoid direct sunlight for extended periods to prevent fading. - Can I make these suncatchers without an iron?
While an iron is the easiest method, you can also try using a hairdryer on a low setting to melt the crayons, but it may take a bit longer. - What if my suncatcher doesn’t turn out as expected?
No worries! If the crayons didn’t melt evenly, you can always reheat them with the iron to fix any imperfections. Crafting is all about experimenting!
Final Thoughts
Creating your own DIY Blue Crayon Suncatchers is not just a craft; it’s a joyful experience that fills your home with color and warmth. I can’t tell you how satisfying it is to see the sunlight dance through your creations, casting beautiful reflections all around. I encourage you to gather your materials, invite your kids or friends, and dive into this fun project. Don’t forget to share your colorful results with me! Let’s spread the joy of crafting and brighten up our spaces together!
Print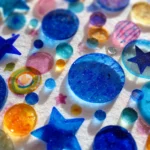
DIY Blue Crayon Suncatchers: Brighten Your Space with Fun Art!
Description
Create beautiful blue crayon suncatchers that will add a pop of color to your windows and brighten up your space.
Instructions
- Preheat your iron to a low setting without steam.
- Shave or break blue crayons into small pieces and spread them evenly on a sheet of wax paper.
- Cover the crayon pieces with another sheet of wax paper.
- Place a piece of parchment paper on top of the wax paper sandwich to protect your iron.
- Carefully press the iron on top of the parchment paper for a few seconds until the crayons melt and fuse together.
- Remove the iron and let the wax paper cool for a minute.
- Once cooled, cut the wax paper into fun shapes (like circles or stars).
- If desired, use a hole punch to create a hole at the top of your suncatcher and thread a string or ribbon through it for hanging.
- Hang your suncatchers in a sunny window and enjoy the colorful light display!
- Category: Crafts
Keywords: DIY Blue Crayon Suncatchers, suncatchers, crafts, home decor, kids craft