
Introduction to DIY Bioplastic Suncatchers
Welcome to the colorful world of DIY Bioplastic Suncatchers! If you’re looking for a fun and eco-friendly craft that the whole family can enjoy, you’ve come to the right place. This project is not only simple but also incredibly rewarding as you watch your creations come to life in the sunlight. Imagine the joy of seeing vibrant colors dance across your windows, all while knowing you’re making a positive impact on the environment. So, gather your materials, unleash your creativity, and let’s brighten up your home with these delightful suncatchers!
Why You’ll Love This DIY Bioplastic Suncatcher
This DIY Bioplastic Suncatcher project is a delightful blend of creativity and bonding time with your kids. It’s easy on the wallet, making it a budget-friendly option for family fun. Plus, the process is relaxing—there’s something soothing about mixing colors and shaping your designs. As you craft together, you’ll create not just beautiful art but also cherished memories that will brighten your home and your hearts!
Materials and Tools Needed for DIY Bioplastic Suncatchers
To embark on your DIY Bioplastic Suncatchers adventure, you’ll need a few essential materials and tools. First up, bioplastic sheets or homemade bioplastic made from cornstarch, glycerin, and water are the stars of the show. They form the base of your colorful creations!
Next, grab some food coloring or natural dyes to bring your suncatchers to life with vibrant hues. Scissors will help you cut out shapes, while a paintbrush is perfect for mixing in those colors. Cookie cutters or templates will allow you to create fun designs, and don’t forget string or fishing line for hanging your masterpieces!
Lastly, an oven or microwave is necessary if you’re making your bioplastic from scratch, and parchment paper will keep everything mess-free. These materials are not only easy to find but also budget-friendly, making this project accessible for everyone!
How to Make DIY Bioplastic Suncatchers
Creating your own DIY Bioplastic Suncatchers is not only a fun project but also a fantastic way to brighten up your home with eco-friendly art! Let’s dive into the steps that will guide you through this colorful adventure. Grab your materials, and let’s get crafting!
Step 1: Prepare Your Bioplastic
First things first, let’s whip up some bioplastic! In a medium saucepan, combine cornstarch, glycerin, and water. As you stir the mixture over medium heat, watch it transform into a thick, gooey substance. It’s like magic! Keep stirring until it reaches a consistency similar to pancake batter. Just be careful—this part can get a bit steamy, so make sure to keep your little ones at a safe distance!
Step 2: Spread the Bioplastic
Once your bioplastic is ready, it’s time to pour it onto a piece of parchment paper. Use a spatula or the back of a spoon to spread it out evenly. Aim for about a quarter-inch thickness. The smoother you spread it, the prettier your suncatchers will be! This is where the excitement builds as you envision the colorful creations that will soon adorn your windows.
Step 3: Add Color
Now comes the fun part—adding color! Grab your food coloring or natural dyes and add a few drops to the bioplastic. Use a paintbrush to mix it in, swirling the colors together like a painter on a canvas. The soft shimmer of the colors blending felt magical to me, and I couldn’t help but smile at the vibrant hues taking shape. Let your creativity flow!
Step 4: Cut Out Shapes
Once your bioplastic has cooled slightly but is still pliable, it’s time to cut out shapes! Use cookie cutters or templates to create fun designs. Think pumpkins, leaves, or even spooky ghosts for Halloween! As I pressed the cookie cutters into the bioplastic, I felt like a kid again, excited to see what shapes would emerge. Remember, the more unique the shapes, the more eye-catching your suncatchers will be!
Step 5: Create Hanging Holes
Before your creations dry completely, make a small hole at the top of each shape using a straw or a skewer. This is where your string or fishing line will go, allowing you to hang your beautiful suncatchers in the sun. I always find this step thrilling, as it’s the final touch that brings everything together!
Step 6: Drying Time
Now, let’s play the waiting game! Allow your suncatchers to dry completely, which may take several hours or even overnight. I recommend placing them in a warm, dry area to speed up the process. The anticipation builds as you imagine how stunning they will look when they catch the sunlight!
Step 7: Hang Your Suncatchers
Once your suncatchers are dry, it’s time to bring them to life! Thread a piece of string or fishing line through the holes you made earlier. Find a sunny window in your home and hang your creations. As the sunlight streams through, watch your DIY Bioplastic Suncatchers glow with vibrant colors, filling your space with warmth and joy. It’s a rewarding moment that makes all the crafting effort worthwhile!
Tips for Best Results
- For a smoother finish, ensure your bioplastic is evenly spread before it sets.
- If your bioplastic is too thick, add a little water to thin it out.
- Always supervise younger children when using hot materials to ensure safety.
- Experiment with layering colors for a stunning effect!
- Use a clear sealant for outdoor suncatchers to protect them from the elements.
Theme and Design Variations
- For a fall theme, use warm colors like orange, red, and yellow to create leaves and pumpkins.
- In winter, try icy blues and whites for snowflakes and winter scenes.
- Spring can be celebrated with pastel colors for flowers and butterflies.
- For a Halloween twist, use spooky colors like purple, black, and green to craft ghosts and bats.
- Encourage kids to create their own designs by using their favorite characters or animals!
Display and Use Ideas
- Hang your DIY Bioplastic Suncatchers in sunny windows to create a colorful glow that brightens any room.
- Use them as unique decorations for birthday parties or seasonal celebrations.
- Gift them to friends or family as thoughtful, handmade presents that showcase your creativity.
- Incorporate them into classroom projects to teach kids about colors and light.
- Display them in your garden or patio for a whimsical outdoor touch!
FAQs about DIY Bioplastic Suncatchers
Can I use store-bought bioplastic sheets instead of making my own?
Absolutely! Store-bought bioplastic sheets are a great time-saver and can be just as effective for creating beautiful suncatchers. Just make sure to follow the manufacturer’s instructions for best results.
How long do the suncatchers last?
With proper care, your DIY Bioplastic Suncatchers can last for several months. If you want them to be more durable, consider applying a clear sealant, especially if you plan to display them outdoors.
Can I use natural dyes instead of food coloring?
Yes! Natural dyes from fruits, vegetables, or spices can create stunning colors and are a fantastic eco-friendly option. Just keep in mind that the colors may vary in intensity compared to food coloring.
Is this project safe for young children?
While the crafting process is generally safe, adult supervision is essential, especially when heating the bioplastic. Make sure to keep hot materials out of reach and assist younger kids with cutting and handling the shapes.
What if my bioplastic is too sticky or doesn’t set properly?
If your bioplastic is too sticky, it may need more time to dry. Ensure you’re in a warm, dry area. If it doesn’t set properly, try adjusting the cornstarch-to-water ratio next time for a better consistency!
Final Thoughts
Creating your own DIY Bioplastic Suncatchers is not just a craft; it’s an experience filled with joy, creativity, and a splash of color! As you watch the sunlight dance through your vibrant creations, you’ll feel a sense of accomplishment that’s hard to beat. I encourage you to gather your family, unleash your imagination, and dive into this eco-friendly project. Don’t forget to share your beautiful suncatchers with friends and family—let’s spread the joy of crafting together! Happy crafting, and may your windows shine bright with your colorful masterpieces!
Print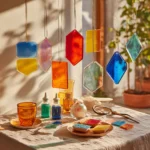
DIY Bioplastic Suncatchers: Brighten Your Home with Eco-Friendly Art!
Description
Create beautiful and eco-friendly suncatchers using bioplastics that will add a splash of color to your windows while being kind to the environment.
Instructions
- Prepare your bioplastic according to the recipe if making it from scratch. Mix cornstarch, glycerin, and water, then heat until it thickens.
- Once the bioplastic is ready, pour it onto a piece of parchment paper and spread it out evenly.
- Add a few drops of food coloring or natural dyes to the bioplastic and mix well.
- Use cookie cutters or templates to cut out shapes from the bioplastic once it has cooled and set.
- Make a small hole at the top of each shape for hanging.
- Allow the suncatchers to dry completely, which may take several hours or overnight.
- Once dry, thread string or fishing line through the holes and hang your suncatchers in a sunny window.
- Category: Crafts
Keywords: DIY Bioplastic Suncatchers, eco-friendly crafts, suncatcher project, homemade bioplastic, colorful window art


