
Introduction to DIY Aroma Stones
Welcome to the enchanting world of DIY Aroma Stones! If you’re looking for a fun and simple craft project that adds a personal touch to your home, you’ve come to the right place. These delightful scented gems not only fill your space with lovely aromas but also provide a wonderful opportunity to unleash your creativity. I love how easy it is to involve my kids in this project, making it a perfect family-friendly activity. Plus, the satisfaction of crafting something beautiful and fragrant is truly rewarding. Let’s embark on this aromatic adventure together!
Why You’ll Love This DIY Aroma Stones
Creating DIY Aroma Stones is a delightful blend of creativity and relaxation. This project is not only easy on the wallet but also a fantastic way to bond with your kids. Imagine the joy of crafting together, laughing, and sharing ideas! Plus, the soothing scents that fill your home will create a warm, inviting atmosphere. It’s a simple yet rewarding way to express your artistic side while enhancing your living space!
Materials and Tools Needed for DIY Aroma Stones
Gathering the right materials is the first step in your DIY Aroma Stones adventure! Here’s what you’ll need:
- Air-dry clay: This is the foundation of your aroma stones. It’s easy to work with and doesn’t require baking, making it perfect for a fun afternoon project.
- Essential oils: Choose your favorite scents to infuse into the stones. They’ll provide a lovely aroma that can uplift your home’s atmosphere.
- Cookie cutters or molds: These will help you create fun shapes. You can find affordable options at craft stores or even use items from your kitchen!
- Rolling pin: Essential for rolling out the clay to the right thickness. If you don’t have one, a smooth bottle can work just as well.
- Toothpick or skewer: This handy tool is perfect for making holes in your shapes for scent diffusion or hanging.
- Paint (optional): If you want to add a splash of color, non-toxic acrylic paint is a great choice. It’s safe and easy to use!
- Sealer (optional): A clear sealer can protect your painted stones and keep them looking fresh. Look for eco-friendly options to keep it safe for your home.
With these materials in hand, you’re all set to create your own beautiful and fragrant aroma stones!
How to Make DIY Aroma Stones
Creating your own DIY Aroma Stones is not just a craft; it’s a delightful journey into the world of scents and creativity! I remember the first time I rolled out the clay, the soft texture beneath my fingers felt like a blank canvas waiting for my imagination to take flight. Let’s dive into the step-by-step process of making these charming scented gems that will fill your home with lovely aromas.
Step 1: Prepare Your Clay
Start by grabbing your air-dry clay and a rolling pin. Roll out the clay to about 1/4 inch thickness. The key here is to make it even, so your aroma stones dry uniformly. As I rolled the clay, I felt like a kid again, lost in the simple joy of crafting. If you find the clay sticking, a sprinkle of cornstarch can help keep things smooth and easy!
Step 2: Cut Out Shapes
Now comes the fun part! Use cookie cutters or molds to cut out various shapes from the rolled clay. Think about seasonal themes or your favorite shapes—stars, hearts, or even spooky Halloween designs! Each shape you create is a little piece of art. I love how the shapes come to life, and it’s a great way to involve the kids. They can pick their favorite shapes and help with the cutting!
Step 3: Create Holes for Scent Diffusion
Next, take a toothpick or skewer and make a small hole in each shape. This step is crucial as it allows the scent to diffuse beautifully throughout your home. Plus, if you want to hang them, these holes will come in handy! I always find it satisfying to see the little details come together, like the finishing touches on a masterpiece.
Step 4: Drying Time
Once your shapes are cut and holes are made, it’s time to let them dry. Follow the package instructions, which usually suggest a drying time of 24-48 hours. Patience is key here! I often use this time to plan where I’ll place my aroma stones around the house. The anticipation of the lovely scents to come makes the wait worthwhile!
Step 5: Optional Painting
If you want to add a splash of color, now’s your chance! Once the stones are dry, you can paint them with your favorite colors. I love using bright, cheerful hues that match my home decor. Just remember to let the paint dry completely before moving on to the next step. The soft shimmer of the paint under the lamp felt magical when I did this!
Step 6: Sealing the Stones
To protect your beautiful creations, consider applying a sealer. This step is optional, but it can help keep your stones looking fresh and vibrant. Just a light coat will do! I always find it rewarding to see my hard work come to life, and sealing them adds that extra touch of care.
Step 7: Infusing with Essential Oils
Finally, it’s time to add the magic! Place a few drops of your favorite essential oil on each stone. Lavender for relaxation, citrus for a burst of energy, or eucalyptus for a refreshing vibe—choose what speaks to you! Once infused, place your aroma stones around your home, and let the delightful scents fill the air. I love placing them in my living room and bathroom; it’s like having a little piece of nature indoors!
Tips for Best Results
- For a smoother finish, knead the air-dry clay before rolling it out.
- If your shapes crack while drying, simply dampen the area and smooth it out with your fingers.
- Always work in a well-ventilated area when using essential oils to avoid irritation.
- Mix different essential oils for unique scents—experiment until you find your perfect blend!
- Consider adding glitter or dried flowers to the clay for extra flair.
Theme and Design Variations
- Seasonal Themes: Create autumn leaves in warm oranges and browns, or winter snowflakes in icy blues and whites.
- Color Schemes: Use pastel colors for a soft, calming effect, or vibrant hues for a cheerful pop in your decor.
- Kid-Friendly Versions: Let kids decorate their stones with fun stickers or paint splatters for a personal touch.
- Nature-Inspired: Incorporate natural elements like dried flowers or herbs into the clay for a rustic look.
- Holiday Designs: Make spooky shapes for Halloween or festive stars for the winter holidays!
Display and Use Ideas
Once your DIY Aroma Stones are complete, the fun doesn’t stop there! Here are some creative ways to use and display your fragrant creations:
- Home Decor: Place them in decorative bowls or on trays to add a charming touch to your coffee table or shelves.
- Gift Ideas: Wrap them up as thoughtful gifts for friends and family, perfect for any occasion!
- School Crafts: Use them as a fun project for kids in the classroom, teaching them about scents and creativity.
- Holiday Displays: Incorporate seasonal designs into your holiday decor for a festive aroma that enhances the atmosphere.
FAQs about DIY Aroma Stones
Can I use any type of clay for DIY Aroma Stones?
While air-dry clay is the best choice for this project due to its ease of use and no-bake requirement, you can experiment with other types of clay. Just make sure they are safe and suitable for crafting!
How long do the scents last on the aroma stones?
The scents can last anywhere from a few days to a couple of weeks, depending on the essential oils used and the environment. You can refresh the aroma by adding more essential oil as needed!
Are DIY Aroma Stones safe for kids?
Yes, DIY Aroma Stones are generally safe for kids aged 8 and up, especially with adult supervision. Just ensure good ventilation when using essential oils and avoid contact with eyes.
Can I customize the shapes of my aroma stones?
Absolutely! Use cookie cutters or molds to create any shape you like. This is a great way to make seasonal or themed designs that reflect your personality!
What should I do if my aroma stones crack while drying?
If you notice cracks, don’t worry! Simply dampen the area and smooth it out with your fingers. This can help restore the shape and keep your stones looking beautiful.
Final Thoughts
Creating DIY Aroma Stones is not just a craft; it’s a joyful experience that fills your home with delightful scents and your heart with satisfaction. I hope you feel inspired to gather your materials and embark on this aromatic adventure! Whether you’re crafting with kids or enjoying some solo time, the process is sure to bring smiles and creativity to your day. Don’t forget to share your beautiful creations with friends and family—after all, the joy of crafting is even better when shared! Happy crafting, and may your home be filled with lovely aromas!
Print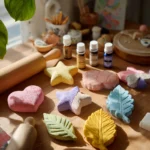
DIY Aroma Stones: Discover Fun Ways to Craft Your Scented Gems!
Description
Create your own scented aroma stones using simple materials. These decorative stones can be infused with essential oils to add a pleasant fragrance to your home.
Instructions
- Start by rolling out the air-dry clay to about 1/4 inch thickness using a rolling pin.
- Use cookie cutters or molds to cut out shapes from the rolled clay.
- Make a small hole in each shape using a toothpick or skewer for hanging or to allow the scent to diffuse.
- Let the shapes dry according to the package instructions (usually 24-48 hours).
- Once dry, you can paint the stones if desired and let them dry again.
- After painting, apply a sealer if you want to protect the finish.
- Finally, add a few drops of your favorite essential oil to each stone and place them around your home for a lovely aroma.
- Category: Home Decor
Keywords: DIY Aroma Stones, scented stones, essential oils, home fragrance, craft project


