Introduction to DIY Aroma Stones
Welcome to the wonderful world of DIY aroma stones! If you’re looking for a fun and creative way to enhance your home’s ambiance, you’ve come to the right place. These charming little creations not only fill your space with delightful scents but also provide a fantastic opportunity for family bonding. I remember the joy of crafting these with my kids, their laughter echoing as we shaped the clay together. This DIY project is simple, rewarding, and perfect for all ages, making it an ideal choice for moms, teachers, and creative hobbyists alike. Let’s get started on this aromatic adventure!
Why You’ll Love This DIY Aroma Stones
Creating DIY aroma stones is not just a craft; it’s a delightful experience that brings families together. The ease of making these stones means you can whip them up in no time, even on a busy day! Plus, they’re budget-friendly and allow for endless creativity. As you bond with your kids, you’ll find relaxation in the process, and the lovely scents will transform your home into a cozy haven. What’s not to love?
Materials and Tools Needed for DIY Aroma Stones
To create your beautiful DIY aroma stones, you’ll need a few essential materials and tools. First, grab some air-dry clay, which is the star of this project. It’s easy to work with and doesn’t require any baking, making it perfect for busy crafters like us!
Next, you’ll need essential oils to infuse your stones with delightful scents. Choose your favorites—lavender, lemon, or eucalyptus are all fantastic options. Cookie cutters or molds will help you shape the clay into fun designs, while a rolling pin is essential for flattening the clay evenly.
Don’t forget a toothpick or skewer for making holes in your shapes, and optional paint and sealer if you want to add a splash of color and protect your creations. If you’re looking for eco-friendly alternatives, consider using natural paints or even skipping the paint altogether for a more rustic look. Happy crafting!
How to Make DIY Aroma Stones
Creating your own DIY aroma stones is not just a fun craft; it’s a delightful way to fill your home with lovely scents that can uplift your mood and create a cozy atmosphere. I remember the first time I made these with my kids; the excitement in their eyes as they shaped the clay was priceless! Let’s dive into the step-by-step process of making these charming aroma stones.
Step 1: Prepare Your Clay
Start by taking your air-dry clay and rolling it out to about 1/4 inch thickness using a rolling pin. The texture of the clay is soft and pliable, making it easy to work with. As you roll, you might find it helpful to sprinkle a little cornstarch on your surface to prevent sticking. This step is like preparing a canvas for a beautiful painting, and trust me, the anticipation builds as you see the flat, smooth surface ready for creativity!
Step 2: Cut Out Shapes
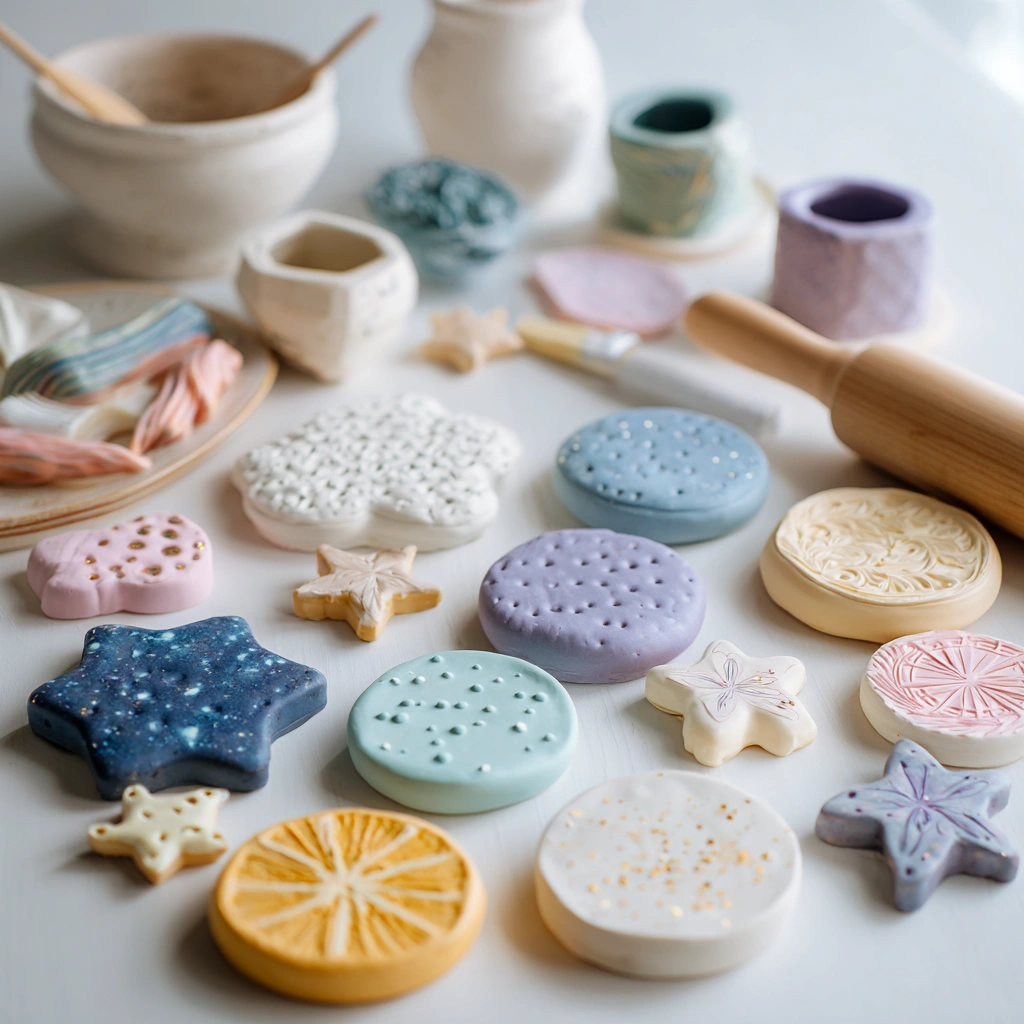
Now comes the fun part! Use cookie cutters or molds to cut out various shapes from the rolled clay. You can go for classic shapes like hearts and stars, or get creative with seasonal themes like pumpkins or snowflakes. Each shape will hold the essential oils beautifully, and the variety adds a playful touch to your decor. I love how the kids get to choose their favorite shapes, making this a truly personalized project!
Step 3: Create Holes for Hanging
Once you have your shapes, it’s time to make small holes in each one using a toothpick or skewer. This step is essential if you plan to hang your aroma stones or place them on a dish. The holes allow the scent to disperse more effectively, filling your space with fragrance. Plus, it’s a great way for the kids to practice their fine motor skills while having fun!
Step 4: Drying Time
After shaping and poking holes, allow the stones to dry completely according to the package instructions, usually around 24-48 hours. This waiting period can feel like forever, especially for little hands eager to see the final product! But trust me, it’s worth it. The anticipation builds, and you can use this time to plan where you’ll place your lovely aroma stones around the house.
Step 5: Optional Painting
If you want to add a splash of color, now is the time to paint your stones! Use non-toxic paint to decorate them in vibrant hues or soft pastels, depending on your home’s decor. The soft shimmer of the paint under the lamp felt magical when I did this with my kids. Let the paint dry completely before moving on to the next step. This is where your creativity can really shine!
Step 6: Sealing the Stones
To protect your painted stones, consider applying a sealer. This step is optional but highly recommended if you want to keep your colors vibrant and prevent any wear and tear. Just a light coat will do the trick! It’s like giving your stones a little armor, ensuring they stay beautiful for a long time.
Step 7: Adding Essential Oils
Finally, it’s time to add a few drops of your favorite essential oil to each stone. This is where the magic happens! The aroma will slowly release into the air, creating a lovely ambiance in your home. I love placing them in different rooms—lavender in the bedroom for relaxation, citrus in the kitchen for a fresh vibe, and eucalyptus in the living room for a refreshing touch. The possibilities are endless!
And there you have it! Your very own DIY aroma stones, ready to enhance your home with delightful scents. I can’t wait for you to try this project and experience the joy it brings!
Tips for Best Results
- For a smoother finish, knead the air-dry clay before rolling it out.
- If your shapes crack while drying, simply dampen your fingers and smooth them out gently.
- Always work in a well-ventilated area when using essential oils to avoid irritation.
- Mix different essential oils to create unique scents that reflect your personality.
- Consider adding glitter or dried flowers to the clay for extra flair!
Theme and Design Variations
- Seasonal Themes: Create autumn leaves in warm oranges and browns, or winter snowflakes in icy blues and whites.
- Color Schemes: Use pastel colors for a soft, calming effect, or vibrant hues for a cheerful pop in your decor.
- Kid-Friendly Versions: Let kids decorate their stones with fun stickers or markers instead of paint for a mess-free option.
- Nature-Inspired: Incorporate natural elements like dried flowers or herbs into the clay for a rustic look.
- Holiday Themes: Make spooky shapes for Halloween or festive stars for Christmas to celebrate the seasons!
Display and Use Ideas
Your DIY aroma stones are not just beautiful; they’re versatile too! Here are some fun ways to use and display them:
- Place them in decorative bowls around your home for a charming touch.
- Hang them in closets or on doorknobs for a subtle scent boost.
- Gift them to friends or teachers in pretty packaging as thoughtful presents.
- Use them as table centerpieces during holidays or family gatherings.
- Incorporate them into seasonal decor by changing scents and colors!
FAQs about DIY Aroma Stones
Can I use any type of clay for this project?
While air-dry clay is the best option for DIY aroma stones, you can experiment with other types like polymer clay. Just remember that polymer clay requires baking, which might not be as kid-friendly!
How long do the scents last on the aroma stones?
The scents can last anywhere from a few days to a couple of weeks, depending on the essential oils used and the environment. You can refresh the aroma by adding more essential oil as needed.
Are DIY aroma stones safe for kids?
Yes! DIY aroma stones are safe for kids aged 8 and up, especially with adult supervision. Just ensure proper ventilation when using essential oils and avoid contact with eyes.
Can I customize the shapes of the aroma stones?
Absolutely! Use cookie cutters or molds to create any shape you like. This is a great way to make seasonal or themed decorations that reflect your personality!
What should I do if my stones crack while drying?
If your stones crack, don’t worry! You can gently smooth the cracks with a little water and your fingers before they fully dry. This will help maintain their beauty!
Final Thoughts
Creating DIY aroma stones is not just a craft; it’s a joyful journey filled with creativity and bonding moments. The satisfaction of seeing your unique creations come to life, infused with your favorite scents, is truly rewarding. I encourage you to gather your family or friends and dive into this delightful project. Share your results and experiences—there’s nothing quite like the joy of crafting together! So, roll up your sleeves, let your imagination run wild, and transform your home with these charming aroma stones. Happy crafting!
Print
DIY Aroma Stones: Transform Your Home with Simple Crafts!
Description
Create beautiful and fragrant aroma stones to enhance the ambiance of your home. These DIY aroma stones are easy to make and can be customized with your favorite essential oils.
Instructions
- Start by rolling out the air-dry clay to about 1/4 inch thickness using a rolling pin.
- Use cookie cutters or molds to cut out shapes from the rolled clay.
- Make a small hole in each shape using a toothpick or skewer for hanging or placing on a dish.
- Allow the shapes to dry completely according to the package instructions (usually 24-48 hours).
- Once dry, you can paint the stones if desired and let them dry again.
- After painting, apply a sealer if you want to protect the paint.
- Finally, add a few drops of your favorite essential oil to each stone and place them around your home for a lovely aroma.
- Category: Home Decor
Keywords: DIY Aroma Stones, home fragrance, essential oils, air-dry clay crafts