Introduction to Crystal Growing Science Activity
Are you looking for a fun and educational project that can also beautify your home? The Crystal Growing Science Activity is the perfect blend of creativity and science, allowing you to create stunning decor while engaging in a hands-on learning experience. This DIY project is not only enjoyable for busy moms and professionals but also serves as a fantastic way to bond with your kids.
I remember the first time I introduced this activity to my children. Their eyes lit up with curiosity as we mixed the ingredients together. It was a simple yet magical moment that sparked their interest in science. With just a few simple household ingredients, you can grow beautiful crystals that will add a touch of elegance to any space.
As we embarked on this journey, I found that the anticipation of watching the crystals grow was just as exciting as the final result. It’s a wonderful way to teach kids about patience and the wonders of nature. Plus, it’s a great conversation starter when guests come over and admire your stunning creations!
So, let’s dive into the world of crystal growing! I promise you’ll not only end up with gorgeous decor but also create lasting memories with your loved ones. Whether you’re a seasoned crafter or a beginner, this project is sure to bring joy and a sense of accomplishment.
Why You’ll Love This Crystal Growing Science Activity
This Crystal Growing Science Activity is a delightful way to unleash your creativity without breaking the bank. I can’t tell you how many times I’ve found myself searching for a project that’s both fun and budget-friendly. This one checks all the boxes! With just a few simple household ingredients, you can create something truly beautiful.
What I love most about this activity is its simplicity. As a busy mom, I often feel overwhelmed by the demands of daily life. This project requires minimal time commitment, making it perfect for my hectic schedule. In just 10 minutes of prep and 5 minutes of craft time, I can set the stage for a stunning display that will grow right before my eyes.
There’s something incredibly satisfying about watching the crystals form over several days. It’s like a little science experiment happening in my kitchen! I remember the first time I checked on my crystals after a day; I was amazed at how quickly they began to take shape. It’s a wonderful reminder of the beauty of patience and the magic of nature.
Whether you’re looking to enhance your home decor or create a unique gift, this project is sure to impress. I’ve gifted these beautiful crystals to friends, and they always rave about how special and thoughtful the gift is. Plus, it’s a great conversation starter when guests come over and admire your stunning creations!
So, if you’re ready to dive into a project that’s not only enjoyable but also educational, gather your materials and let’s get started! You’ll be amazed at the results and the joy it brings to your home.
Materials Needed for Crystal Growing Science Activity
To get started with your Crystal Growing Science Activity, gather the following materials:
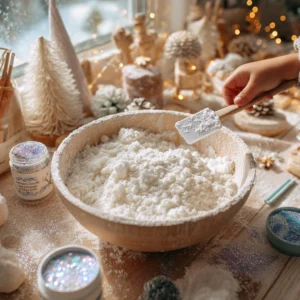
- 1 cup of water: The base for your crystal solution.
- 3 tablespoons of sugar: Helps form the crystals.
- 1 tablespoon of salt: Adds to the crystal structure.
- 1 tablespoon of baking soda: Aids in the growth process.
- Food coloring (optional): For adding color to your crystals.
- Glass jar: The container where your crystals will grow.
- String: To suspend in the solution for crystal formation.
- Pencil or stick: To hold the string in place.
*For a printable full list of materials, see below.*
Tools Required for Crystal Growing Science Activity
To successfully complete your Crystal Growing Science Activity, you will need the following tools:
- Stirring spoon: This is essential for mixing the solution thoroughly. I always use a wooden spoon, as it feels sturdy and helps me blend the ingredients well.
- Measuring cups: Accurate measurements are key to achieving the best results. I recommend using clear measuring cups so you can see exactly how much you’re pouring.
- Heat source (stove or microwave): You’ll need this to boil the water for your solution. If you’re short on time, a microwave can be a quick alternative for boiling water.
When I first started this project, I didn’t realize how important the right tools were. I tried using a regular spoon for stirring, and it just didn’t mix the ingredients well enough. After that experience, I made sure to have a dedicated stirring spoon just for my crafting adventures!
Having the right tools not only makes the process smoother but also enhances the overall experience. So, gather these essentials, and let’s get ready to create some stunning crystals together!
How to Make Crystal Growing Science Activity
Creating your own stunning crystals is easier than you might think! Follow these simple step-by-step instructions, and soon you’ll have beautiful decor that you can proudly display in your home.
Step 1: Boil Water
Start by boiling 1 cup of water in a pot on your stove or in the microwave. I love using a kettle for this, as it boils water quickly and efficiently. Just be careful when handling the hot water!
Step 2: Mix Ingredients
Once the water is boiling, add 3 tablespoons of sugar, 1 tablespoon of salt, and 1 tablespoon of baking soda. Stir the mixture until everything is fully dissolved. I remember the first time I did this; the solution looked so clear and inviting!
Step 3: Add Color (Optional)
If you want colorful crystals, now’s the time to add a few drops of food coloring to the solution. Stir it in gently. I love experimenting with different colors; it’s like painting with science!
Step 4: Cool the Solution
Remove the pot from heat and let it cool slightly for a few minutes. This step is crucial! I learned the hard way that pouring the solution too hot can lead to messy results.
Step 5: Pour into Jar
Carefully pour the solution into a glass jar, leaving some space at the top. I like to use a funnel for this part to avoid spills. It makes the process so much cleaner!
Step 6: Prepare the String
Attach a string to a pencil or stick, and place it across the top of the jar, ensuring the string hangs into the solution. This is where the magic happens, as the crystals will form on the string!
Step 7: Let Crystals Grow
Now, leave the jar in a cool, undisturbed place for several days. I often check back daily, and it’s so exciting to see the crystals slowly forming. It’s like watching a little miracle unfold!
Step 8: Enjoy Your Creation
After a few days, check the crystals and enjoy your stunning creation! I can’t tell you how rewarding it is to see the fruits of your labor. You’ll be amazed at how beautiful they turn out!
Tips for Best Results
To ensure the best results with your Crystal Growing Science Activity, consider the following tips that I’ve learned through my own crafting adventures:
- Use a clean jar to avoid contamination. I can’t stress this enough! The first time I tried this project, I used a jar that had some residue from a previous craft, and it affected the crystal growth. A clean slate is essential for beautiful results!
- Experiment with different types of sugar or salt for varied crystal shapes. I’ve tried using brown sugar and sea salt, and the results were fascinating! Each type creates a unique texture and appearance, making your crystals even more special.
- Try different colors of food coloring for a more vibrant look. I love mixing colors to create a rainbow effect. It’s like a mini science experiment every time, and the kids adore the colorful results!
These tips not only enhance the beauty of your crystals but also make the process more enjoyable. I remember feeling like a scientist in my kitchen, experimenting with different combinations and eagerly awaiting the results. So, don’t hesitate to get creative and have fun with this project!
Project Variations
Get creative with your Crystal Growing Science Activity by trying these fun variations that I’ve discovered along the way:
- Style Variations: Use different jars or containers, such as mason jars or decorative bowls. I love using vintage glass jars for a rustic look, and they add a charming touch to my home decor. You can even decorate the jars with ribbons or stickers to personalize them!
- Color Changes: Mix multiple colors of food coloring for a rainbow effect. I remember the first time I tried this; the result was a stunning array of colors that looked like a piece of art! It’s a great way to engage kids and let them choose their favorite colors.
- Seasonal Adaptations: Create themed crystals for holidays, like red and green for Christmas or pastel colors for Easter. I love making these seasonal crystals as gifts or decorations. They add a festive flair to my home and are always a hit with family and friends!
These variations not only enhance the visual appeal of your crystals but also make the crafting experience more enjoyable. I encourage you to experiment and let your creativity shine! Each variation brings a new twist to the project, making it exciting every time you try it. So gather your materials, and let’s see what beautiful creations you can come up with!
Decoration and Usage Ideas
Once your crystals are ready, you’ll be amazed at how versatile they can be! Here are some creative ideas on how to use your stunning creations:
- Home Decor: Place your beautiful crystals on shelves, windowsills, or coffee tables for a stunning display. I love arranging them in clusters of different sizes and colors; it adds a touch of elegance to any room. They catch the light beautifully, creating a sparkling effect that brightens up my home.
- Gifts: Package your crystals in decorative boxes as unique gifts for friends and family. I’ve given these as birthday presents and holiday gifts, and they always receive rave reviews! You can even personalize the packaging with a handwritten note explaining the science behind the crystals, making it a thoughtful and educational gift.
- Educational Displays: Use your crystals as a teaching tool for kids to learn about science and nature. I often set up a little display in my home office, showcasing the different types of crystals we’ve made. It sparks curiosity and provides a great opportunity for discussions about chemistry and the natural world.
These ideas not only enhance the beauty of your crystals but also allow you to share the joy of crafting with others. I remember the first time I gifted a set of crystals to a friend; her excitement was contagious! It’s a wonderful way to spread creativity and inspire others to try their hand at this fun Crystal Growing Science Activity.
So, get creative with your stunning crystals and let them shine in your home or as gifts. You’ll be proud to showcase your hard work and the beauty of nature right at your fingertips!
FAQs about Crystal Growing Science Activity
Q: How long does it take for the crystals to grow?
A: It typically takes several days for the crystals to fully form. I remember the anticipation I felt as I checked on my crystals each day, eagerly waiting to see how they transformed. It’s a wonderful exercise in patience!
Q: Can I use other ingredients?
A: Yes, you can experiment with different types of sugar or salt to see how it affects the crystal growth. I’ve tried using brown sugar and sea salt, and the results were fascinating! Each type creates a unique texture and appearance, making your crystals even more special.
Q: Is this activity safe for children?
A: Yes, but adult supervision is recommended, especially when handling boiling water. I always make sure to involve my kids in the process while keeping a close eye on them during the boiling steps. It’s a great way to teach them about safety in the kitchen while having fun!
Final Thoughts
The Crystal Growing Science Activity is not just a fun project; it’s a wonderful way to explore creativity and science while creating beautiful decor for your home. I can’t tell you how fulfilling it is to watch the transformation from a simple solution to stunning crystals that sparkle in the light. It’s like bringing a piece of nature indoors!
Whether you’re a busy mom looking for a quick craft or a professional seeking a relaxing activity, this DIY project is perfect for you. I often find myself sneaking in little crafting moments during my hectic week, and this project fits right in. It’s a delightful escape that allows me to unwind while creating something beautiful.
So gather your materials, invite your kids, and embark on this exciting journey of crystal creation. I promise you’ll not only enjoy the process but also create lasting memories with your loved ones. The joy of seeing those crystals grow is truly magical, and it’s a wonderful way to bond over science and art.
You’ll be amazed at the stunning results and the joy it brings to your home! So, let your creativity shine, and don’t forget to share your beautiful creations with friends and family. Happy crafting!
Print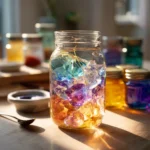
Crystal Growing Science Activity: Create Stunning Decor!
Description
This DIY project allows you to grow beautiful crystals using simple household ingredients, creating stunning decor for your home or as a gift.
Instructions
- Boil 1 cup of water in a pot.
- Add 3 tablespoons of sugar, 1 tablespoon of salt, and 1 tablespoon of baking soda to the boiling water, stirring until fully dissolved.
- If desired, add a few drops of food coloring to the solution.
- Remove the pot from heat and let it cool slightly.
- Pour the solution into a glass jar.
- Attach a string to a pencil or stick and place it across the top of the jar, ensuring the string hangs into the solution.
- Leave the jar in a cool, undisturbed place for several days to allow crystals to form.
- After a few days, check the crystals and enjoy your beautiful creation!
Keywords: Crystal Growing, Science Activity, DIY Decor, Home Project, Educational Craft