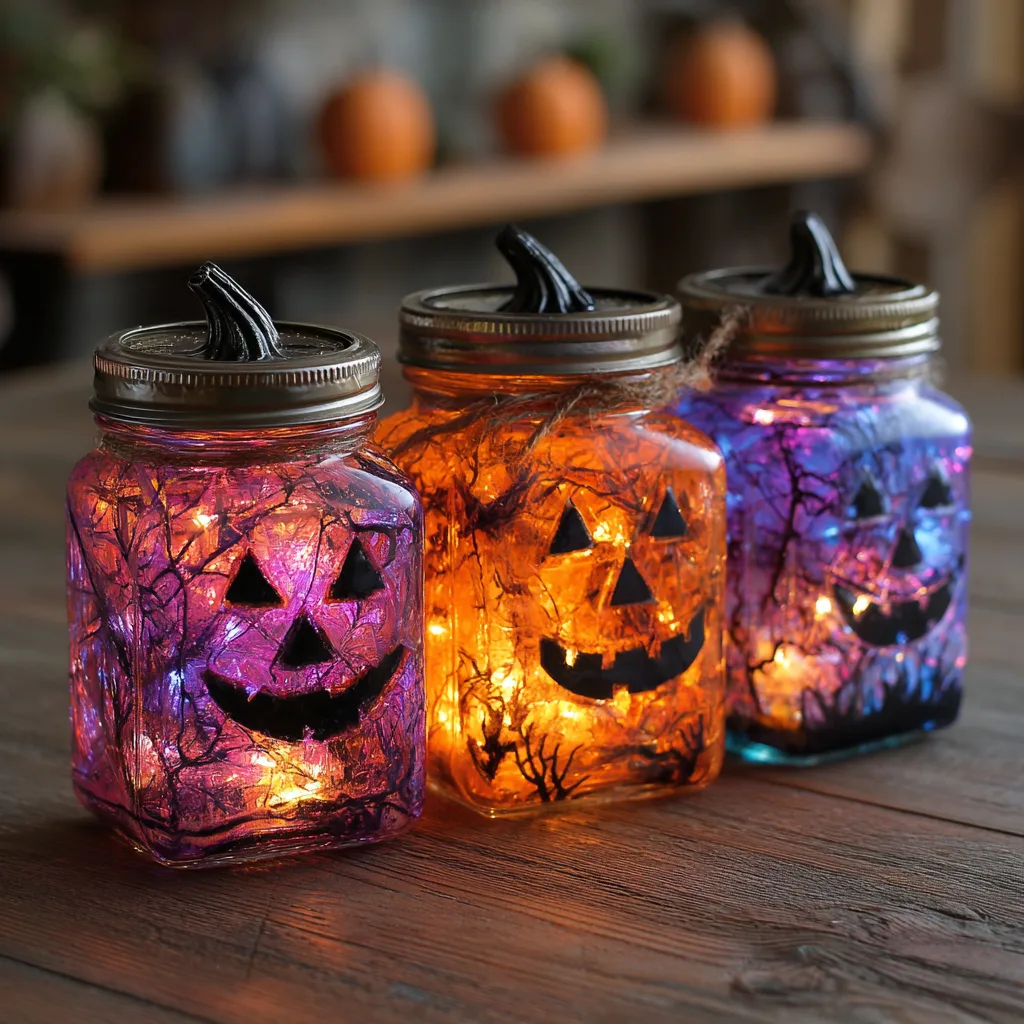
As the autumn air turns crisp and leaves begin to fall, the timeless tradition of pumpkin carving takes center stage. However, for many, the sharp tools, slimy pulp, and quickly decaying results are less than ideal. If you are looking for a spooky craft that is fun, safe, and glowingly creative, these Glow-in-the-Dark Pumpkin Jars offer the perfect solution. They are colorful, incredibly festive, and represent a brilliant no-carve way to light up your Halloween nights. With just a few simple supplies, you can create an entire family of glowing jack-o’-lanterns that shine brightly in the dark, offering a reusable and mess-free alternative to traditional decor.
This project is ideal for parents of young children, classroom activities, or anyone seeking a longer-lasting Halloween decoration. It combines art, basic science, and seasonal fun into a single, captivating activity. By the end of this guide, you will not only know how to construct your own luminous pumpkin jar but also understand the fascinating photoluminescent science that makes it glow, ensuring a project that is as educational as it is entertaining.
The Science Behind the Glow: Understanding Photoluminescence
Before dipping your brush into the paint, it is valuable to understand the magic behind the glow. Unlike the chemical reaction that powers glow sticks (chemiluminescence), glow-in-the-dark paints operate on a principle called photoluminescence.
Photoluminescent materials, like the pigments in the paint you will be using, contain substances known as phosphors. These phosphors have the unique ability to absorb and store energy from a light source, a process often called “charging.” When you place your painted jar under a bright lamp or in direct sunlight, the phosphors are excited by the photons in the light, causing their electrons to jump to a higher energy state.
When you then move the jar into a dark room, these excited electrons slowly return to their normal, stable state. As they do, they release the stored energy in the form of visible light—the eerie, persistent glow that defines this project. The quality and duration of the glow depend on the composition of the phosphors and the intensity and duration of the charging light. This scientific principle transforms a simple craft into a demonstration of fundamental physics, happening right on your windowsill.
Gathering Your Spooky Supplies: A Comprehensive Material List
A successful crafting experience begins with proper preparation. Here is a detailed breakdown of everything you will need to create one glowing pumpkin jar, along with the role each component plays.
The Foundation and Canvas
-
1 Clear Mason Jar with Lid (Any Size): The jar serves as the body of your pumpkin. A standard mason jar is perfect, but feel free to use different sizes to create a pumpkin “family.” The clear glass allows the internal light to amplify the painted glow and provides a smooth, ideal surface for painting.
The Luminous Medium
-
Glow-in-the-Dark Paint: This is the star of the show. While orange is the classic choice, green, purple, or white glow paint can create ghosts, monsters, or other spooky creatures. For the best results, select a paint specifically designed for crafts on glass or plastic surfaces. Acrylic-based glow paints are widely available and work excellently.
The Defining Tools
-
Black Acrylic Paint or a Black Permanent Marker: This is used to draw the jack-o’-lantern’s face. Black acrylic paint applied with a fine brush offers more control for classic, bold features. A permanent marker is a great, less-messy alternative for older children or for creating intricate, detailed designs.
-
Paintbrushes: You will need two types. A flat brush (about 1/2 to 1 inch wide) is perfect for applying the base coats of glow paint smoothly and efficiently. A fine-tip brush is essential for painting the facial details with precision and clarity.
The Internal Illumination
-
Battery-Operated LED Tea Light or Fairy Lights: Safety is paramount. You must use battery-operated LEDs. Traditional candles are a fire hazard and would produce soot on the inside of your jar. An LED tea light provides a steady, flicker-free glow, while a string of small fairy lights can create a twinkling, magical effect from within.
The Embellishments and Utilities
-
Glitter (Optional): For an extra touch of Halloween sparkle, clear or orange glitter can be sprinkled onto the final coat of glow paint. This adds a textured, magical shimmer that catches both the external and internal light.
-
Paper Towels and a Water Cup: Essential for cleaning brushes, wiping up small mistakes, and maintaining a tidy workspace.
A Step-by-Step Guide to Crafting Your Luminous Jack-o’-Lantern
With your materials assembled, you are ready to embark on the creative process. Follow these steps carefully for a professional-looking, long-lasting result.
Step 1: Prepare Your Canvas
Begin by washing and thoroughly drying your mason jar. Remove any labels, adhesive residue, or fingerprints. Any grease or dust on the glass will prevent the paint from adhering properly and can lead to peeling or an uneven finish. A clean, dry surface is the foundation for a flawless paint job.
Step 2: Apply the Glowing Base Coat
Shake your bottle of glow-in-the-dark paint vigorously for at least one minute. This ensures the phosphorescent pigments are fully suspended in the medium. Using your flat brush, apply a thin, even layer of paint over the entire exterior of the jar. Do not worry about complete opacity on the first coat. It is far more effective to apply two to three thin coats than one thick, gloopy coat. Thick paint is prone to cracking, peeling, and will not glow as uniformly. Allow each coat to dry completely according to the paint manufacturer’s instructions before applying the next. This patience will be rewarded with a smooth, vibrant, and long-lasting glow.
Step 3: Design and Define the Face
Once the final coat of glow paint is completely dry, it is time to give your pumpkin its personality. Plan your jack-o’-lantern face on a piece of paper first if you like. Using your fine-tip brush and black acrylic paint (or your permanent marker), carefully draw the eyes, nose, and mouth. Classic triangular eyes and a jagged-tooth grin are always effective, but you can also create a silly, spooked, or sophisticated expression. The black paint will block the glow, creating a stark, dramatic contrast that makes the face pop in the darkness. Let the black paint or ink dry completely.
Step 4: Add Optional Sparkle
If you have chosen to use glitter, this is the time to apply it. Wait until your final coat of glow paint is applied but has not yet fully dried—it should be tacky to the touch. Sprinkle the glitter over the areas where you want sparkle, such as around the lid or on the “cheeks” of the pumpkin. Gently tap the jar to shake off any excess glitter onto a paper towel. This technique ensures the glitter will be embedded in the paint and less likely to shed over time.
Step 5: Illuminate and Reveal the Magic
The moment of transformation has arrived. Ensure the inside of your jar is completely dry, then place your battery-operated LED tea light or coiled string of fairy lights inside. You do not need to use the lid for this step, as the open top allows for easy access to turn the light on and off. To activate the glow paint, “charge” your jar by placing it under a bright household lamp or in a sunny spot for several minutes. Then, carry it into a dark room, turn on the internal LED light, and witness the magic. Your pumpkin will emanate an eerie, ethereal glow from within, while the painted surface shines with its own stored light, creating a stunning, multi-layered luminous effect.
Troubleshooting and Creative Variations
Even the most straightforward projects can benefit from a few pro tips and creative twists.
-
Weak Glow: If the glow is faint, the paint may not have been charged long enough or the coats may be too thin. Ensure you are using a high-quality glow paint and applying multiple, even coats. Charge the jar with a brighter light source for a longer period.
-
Streaky Paint: Streaks are often the result of paint that is too thick or a dirty brush. Always use thin coats and ensure your brushes are clean before you start.
-
Advanced Designs: Move beyond the classic jack-o’-lantern. Use white glow paint to create ghosts, using the black paint to define eyes and a mouth. Use green paint to make a Frankenstein’s monster jar. You can also use painter’s tape to create stripes or other geometric patterns for a more modern, spooky look.
-
Themed Display: Create a whole Halloween scene by grouping jars of different sizes and colors. Add artificial cobwebs, black tulle, or autumn leaves to your display table to enhance the spooky atmosphere.
Conclusion: A New Halloween Tradition
These DIY Glow-in-the-Dark Pumpkin Jars are more than just a simple craft; they are a testament to creativity, safety, and scientific wonder. They offer a inclusive activity for all ages, free from the sharp knives and messy cleanup of traditional carving. By mixing art and basic physics, this project sparks imagination and provides a tangible, beautiful result that can be enjoyed year after year. So gather your supplies, unleash your inner artist, and light up your Halloween with the safe, spectacular, and spook-tacular glow of your very own handmade pumpkin jars.