Introduction to Crayon Shaving & Wax Paper Hearts
Welcome to the colorful world of Crayon Shaving & Wax Paper Hearts! This delightful DIY craft is not only a fantastic way to unleash your creativity but also a wonderful opportunity to bond with your kids. Imagine the joy of transforming simple crayon shavings into vibrant heart-shaped art that can brighten up any space. It’s fun, simple, and incredibly rewarding! Whether you’re a seasoned crafter or just starting out, this project is perfect for all ages. So, gather your materials, and let’s create something magical together!
Why You’ll Love This Crayon Shaving & Wax Paper Hearts
This Crayon Shaving & Wax Paper Hearts project is a delightful blend of creativity and bonding time with your kids. It’s easy on the wallet, using materials you likely already have at home. Plus, the process is incredibly relaxing—watching the colors melt and blend is like a mini therapy session! You’ll create beautiful art while making cherished memories, all while enjoying the simple joy of crafting together.
Materials and Tools Needed for Crayon Shaving & Wax Paper Hearts
Before we dive into crafting, let’s gather our materials! Here’s what you’ll need:
- Crayons: A variety of colors will bring your hearts to life! You can use old crayons that might be lying around the house, making this a budget-friendly project.
- Wax paper: This is essential for melting the crayon shavings and creating those beautiful heart shapes. It’s easy to find and inexpensive!
- Iron: A household iron is used to melt the crayon shavings safely. Just remember to keep it on a low setting to avoid any mishaps.
- Scissors: You’ll need these to cut out your heart shapes. A good pair of scissors will make the job easier and more precise.
- Pencil: This handy tool will help you shave the crayons into small pieces. If you have younger kids, you might want to handle this part for safety.
With these materials in hand, you’re all set to create some colorful magic! Let’s get crafting!
How to Make Crayon Shaving & Wax Paper Hearts
Now that you have your materials ready, let’s dive into the fun part—creating your colorful hearts! This project is not only a fantastic way to unleash creativity but also a wonderful opportunity to bond with your kids. So, roll up your sleeves, and let’s get started!
Step 1: Prepare Your Crayons
First things first, let’s get those crayons ready! Start by peeling the wrappers off your crayons. This is a great task for little hands, but if you have younger kids, you might want to help them out. Once they’re naked, use a pencil sharpener or a knife (with adult supervision, of course) to shave the crayons into small pieces. The vibrant colors will be a feast for the eyes!
Step 2: Set Up Your Workspace
Next, lay a piece of wax paper on a flat surface. This is where the magic will happen! Make sure you have enough space to work, as you’ll want to spread out those crayon shavings. I love to set up a cozy crafting corner with some fun music playing in the background—it really sets the mood!
Step 3: Add Crayon Shavings
Now comes the fun part! Sprinkle the crayon shavings onto one half of the wax paper. Feel free to get creative with your color combinations! You can create a rainbow effect or stick to a monochromatic theme. The soft shimmer of the crayon shavings is like a tiny treasure waiting to be revealed.
Step 4: Fold the Wax Paper
Once you’re happy with your colorful arrangement, fold the wax paper over to cover the crayon shavings. This will keep everything contained and prevent any mess. Plus, it adds an element of surprise—what will your hearts look like once they’re melted?
Step 5: Iron the Wax Paper
Now it’s time to bring the heat! Carefully iron the wax paper on a low setting for a few seconds. You’ll see the crayon shavings start to melt and spread out, creating beautiful patterns. Remember, safety first! Always supervise children during this step, as the iron can get hot.
Step 6: Cool and Unfold
After a few moments, let the wax paper cool down. This is the hardest part—waiting to see your creation! Once it’s cool enough to handle, gently unfold the wax paper to reveal your colorful design. It’s like unwrapping a present, and I promise, the excitement never gets old!
Step 7: Cut Out Heart Shapes
Now, grab your scissors and start cutting out heart shapes from the melted crayon art. You can make various sizes for different uses—big hearts for decorations and smaller ones for gift tags. Each cut will reveal a unique design, and I love how no two hearts are ever the same!
Step 8: Display Your Creations
Finally, it’s time to show off your colorful hearts! You can hang them in windows for a beautiful display of sunlight reflections or use them as decorations for special occasions. They also make lovely gifts for friends and family. Trust me, everyone will be impressed by your creative flair!
And there you have it—your very own Crayon Shaving & Wax Paper Hearts! This project is not just about crafting; it’s about creating memories and sharing joy with those you love. So gather your supplies, invite your kids to join in, and let the colorful fun begin!
Tips for Best Results
- Experiment with different colors of crayons for unique designs. Mixing colors can lead to stunning results!
- Use a piece of cardboard under the wax paper to protect your work surface while ironing. This will save you from any accidental mess.
- Make smaller hearts to use as gift tags or embellishments. They add a personal touch to gifts!
- Always supervise children when using the iron. Safety is key to ensuring a fun crafting experience!
Theme and Design Variations
One of the best parts about Crayon Shaving & Wax Paper Hearts is the endless possibilities for creativity! Here are some fun themes and design variations to inspire your crafting:
- Pastel Colors: Use soft pastel shades for a gentle spring theme that’s perfect for Easter or baby showers.
- Vibrant Rainbow Hearts: Create cheerful rainbow hearts that can brighten up any room or celebration.
- Holiday Colors: Incorporate festive colors like red and green for Christmas or orange and black for Halloween to match the season.
- Smaller Hearts: Make tiny hearts for Valentine’s Day cards or as charming party decorations that add a personal touch.
Feel free to mix and match these ideas to create your own unique designs! The only limit is your imagination!
Display and Use Ideas
Now that you’ve created your beautiful Crayon Shaving & Wax Paper Hearts, it’s time to showcase your colorful creations! Here are some fun and creative ways to use and display your hearts:
- Hang hearts in windows for colorful sunlight reflections that will brighten up any room.
- Use them as decorations for birthday parties or special events, adding a personal touch to your celebrations.
- Attach to gifts as unique gift tags, making your presents even more special and heartfelt.
- Create a heart garland for festive home decor, perfect for any occasion or just to add a splash of color to your space.
These ideas will not only help you display your art but also spread joy and creativity wherever you go!
FAQs about Crayon Shaving & Wax Paper Hearts
As you embark on your colorful crafting journey, you might have a few questions about the Crayon Shaving & Wax Paper Hearts project. Don’t worry; I’ve got you covered! Here are some common queries and their answers to help you along the way:
- Q: Can I use any type of crayon?
A: Yes, you can use any type of crayon, but wax crayons work best for melting and achieving vibrant colors. They create the most beautiful designs! - Q: Is this project safe for young children?
A: Absolutely! This project is safe for kids, but adult supervision is required, especially during the ironing step. Safety first ensures a fun crafting experience! - Q: How do I store my wax paper hearts?
A: To keep your colorful creations in great shape, store them flat in a cool, dry place. This will help prevent any warping or damage to your beautiful hearts. - Q: Can I use other types of paper instead of wax paper?
A: While wax paper is ideal for this project, you can experiment with parchment paper. Just keep in mind that results may vary! - Q: What if my crayon shavings don’t melt evenly?
A: If you notice uneven melting, try adjusting the heat setting on your iron or moving it around a bit more. Sometimes, a little extra patience is all you need!
These FAQs should help clarify any concerns you might have. Now, let’s get back to crafting and creating those stunning hearts!
Final Thoughts
Creating Crayon Shaving & Wax Paper Hearts is not just a craft; it’s a joyful experience filled with laughter, creativity, and bonding moments with your loved ones. The satisfaction of transforming simple crayon shavings into vibrant art is truly magical! I encourage you to gather your materials, invite your kids or friends, and dive into this colorful adventure. Don’t forget to share your beautiful creations with us! Whether you hang them in your windows or gift them to someone special, these hearts are sure to spread joy and brighten any space. Happy crafting!
Print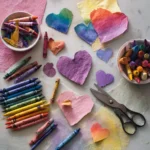
Crayon Shaving & Wax Paper Hearts: Create Colorful Art Together!
Description
Create beautiful and colorful hearts using crayon shavings and wax paper. This fun and easy craft is perfect for kids and adults alike, making it a great activity for any occasion.
Instructions
- Start by peeling the crayons and shaving them into small pieces using a pencil sharpener or a knife (with adult supervision).
- Lay a piece of wax paper on a flat surface.
- Sprinkle the crayon shavings onto one half of the wax paper.
- Fold the wax paper over to cover the crayon shavings.
- Carefully iron the wax paper on a low setting for a few seconds until the crayon shavings melt and spread out.
- Let it cool for a moment, then unfold the wax paper.
- Use scissors to cut out heart shapes from the melted crayon art.
- Display your colorful hearts as decorations or gifts!
- Category: Art & Craft
Keywords: Crayon Shavings, Wax Paper, Hearts, Kids Craft, Colorful Art