Introduction to Crayon Shaving Stained Glass Shapes
Welcome to the colorful world of Crayon Shaving Stained Glass Shapes! This delightful DIY project is perfect for unleashing your creativity while spending quality time with your kids. Imagine transforming simple crayon shavings into vibrant, eye-catching designs that mimic the beauty of stained glass. It’s a fun, simple, and rewarding craft that anyone can enjoy, regardless of age or skill level. Plus, it’s a fantastic way to recycle those broken crayons lying around the house! So, gather your materials, and let’s embark on this colorful adventure together!
Why You’ll Love This Crayon Shaving Stained Glass Shapes
This Crayon Shaving Stained Glass Shapes project is a delightful blend of creativity and simplicity. It’s an affordable way to spend quality time with your kids, allowing you to bond while creating colorful masterpieces. The process is relaxing, and watching the crayons melt into beautiful designs is truly satisfying. Plus, it’s a fantastic opportunity to teach kids about color mixing and art, making it a win-win for everyone!
Materials and Tools Needed for Crayon Shaving Stained Glass Shapes
To create your stunning Crayon Shaving Stained Glass Shapes, you’ll need a few simple materials that are easy to find around the house. Here’s what you’ll need:
- Crayons (various colors): These are the stars of the show! Use a mix of colors to create vibrant designs. If you have broken crayons, don’t toss them—this project is perfect for recycling!
- Wax paper: This is essential for containing your crayon shavings and allowing them to melt together beautifully.
- Pencil sharpener: You’ll need this to shave your crayons into colorful bits. It’s a fun task for kids to help with!
- Iron: This is the magic tool that fuses your crayon shavings into a masterpiece. Just be sure to use it on a low setting for safety.
- Scissors: You’ll need these to cut out your shapes once the crayon design has cooled.
- Cardboard or a baking sheet: This provides support while you iron, protecting your surfaces from heat.
- Optional: black construction paper: Use this for a striking stained glass effect that enhances your colorful creations.
These materials are not only affordable but also eco-friendly, making this craft a guilt-free way to express creativity!
How to Make Crayon Shaving Stained Glass Shapes
Now that you’re all set with your materials, let’s dive into the fun part—creating your very own Crayon Shaving Stained Glass Shapes! This project is not only a fantastic way to unleash your creativity, but it also provides a wonderful opportunity to bond with your kids. So, roll up your sleeves, and let’s get started!
Step 1: Prepare Your Crayons
First things first, grab your pencil sharpener and a handful of crayons. I love using a mix of colors to create vibrant designs, so don’t be shy—experiment! As you shave the crayons, the sweet scent of wax fills the air, and the colorful shavings pile up like confetti. Aim for small pieces, about the size of a sprinkle, to ensure they melt evenly. Remember, the more colors you mix, the more unique your stained glass shapes will be!
Step 2: Create Your Design
Next, lay a piece of wax paper on a flat surface. This is where the magic happens! Sprinkle your crayon shavings onto one half of the wax paper, creating a colorful design that speaks to your heart. You can go for a rainbow effect, a sunset, or even a spooky Halloween theme! Let your imagination run wild—this is your canvas, after all. The soft shimmer of the crayon shavings under the light feels almost magical, doesn’t it?
Step 3: Fold and Support
Once you’re happy with your design, carefully fold the other half of the wax paper over the shavings to cover them. This step is crucial, as it keeps everything contained while you work your magic with the iron. Now, place a piece of cardboard or a baking sheet underneath the wax paper for support. This will protect your surfaces and make it easier to handle. Trust me, you’ll want that extra stability!
Step 4: Ironing the Design
Now comes the exciting part—ironing! Set your iron to a low setting and gently press it over the wax paper for just a few seconds. You’ll see the crayon shavings start to melt and fuse together, creating a beautiful, colorful masterpiece. Be sure to keep an eye on the process, as it can get a bit melty! And remember, this is a job for an adult, so if you’re crafting with kids, make sure to supervise closely.
Step 5: Cut Out Shapes
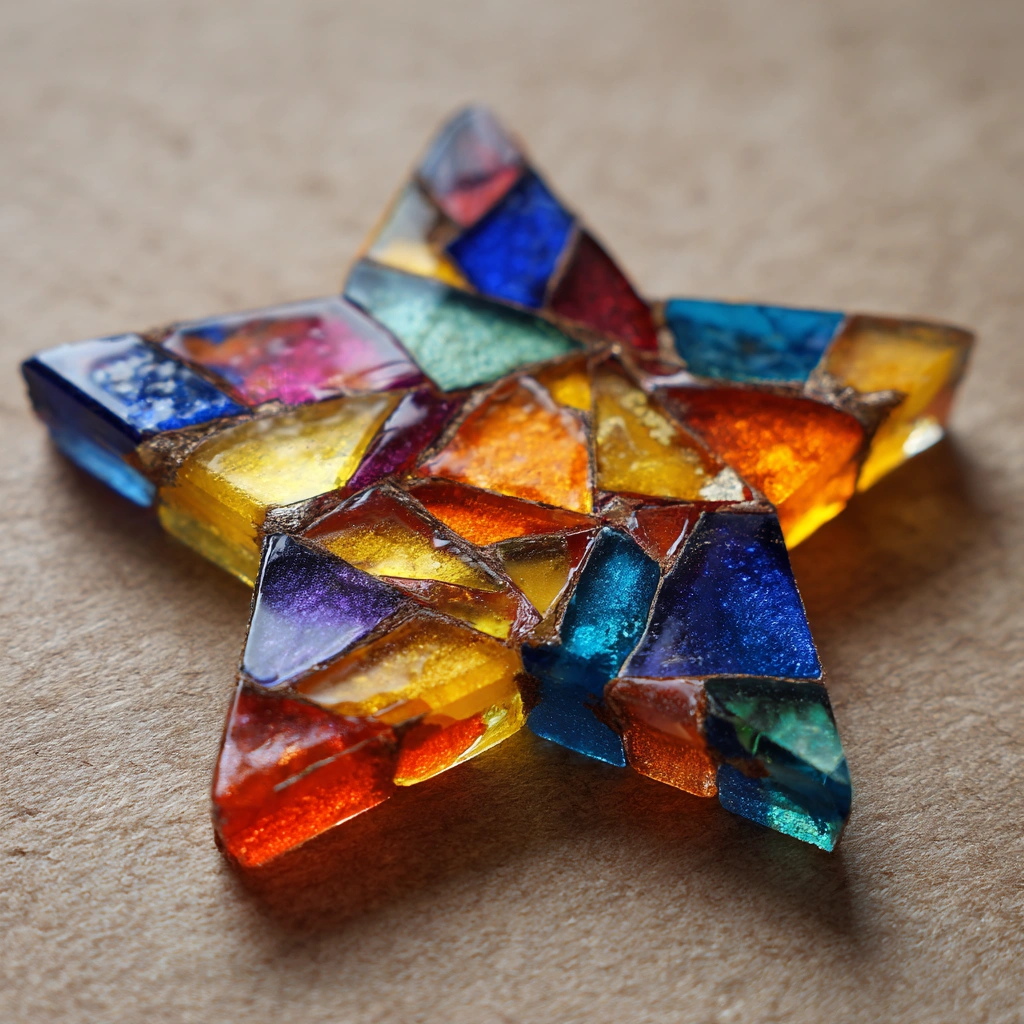
After a few moments, carefully lift the wax paper off the heat and let it cool. Once it’s cool to the touch, it’s time to cut out shapes! You can use scissors or even cookie cutters for fun designs like hearts, stars, or flowers. The melted crayon design will be soft and pliable, making it easy to cut. As you snip away, you’ll feel a sense of accomplishment—each shape is a little piece of art!
Optional: Adding a Stained Glass Effect
For an extra touch, you can glue your colorful shapes onto black construction paper. This will create a stunning stained glass effect that really makes the colors pop! Just imagine how beautiful they’ll look hanging in a window, letting the sunlight shine through. It’s a simple step that adds a whole new dimension to your creations!
Tips for Best Results
- For vibrant colors, use a variety of crayon shades and mix them well.
- If the crayon shavings don’t melt evenly, try adjusting the iron’s heat slightly.
- Always supervise children when using the iron and sharp tools to ensure safety.
- Experiment with different shapes and sizes for unique designs.
- Use leftover crayon bits to create new color combinations for future projects!
Theme and Design Variations
- Rainbow Delight: Use a spectrum of colors to create a vibrant rainbow effect that brightens any window.
- Spooky Halloween: Incorporate black, orange, and purple for a festive Halloween theme, perfect for decorating your home.
- Winter Wonderland: Use icy blues and whites to create snowflake shapes that capture the essence of winter.
- Floral Fantasy: Mix pinks, yellows, and greens for beautiful flower shapes that celebrate spring.
- Kid-Friendly Shapes: Encourage kids to create their favorite animals or cartoon characters for a personal touch!
Display and Use Ideas
- Window Decor: Hang your stained glass shapes in windows to let the sunlight shine through, creating a colorful glow in your home.
- Seasonal Displays: Use them as part of your seasonal decorations, swapping designs for different holidays or themes.
- Gift Tags: Attach smaller shapes to gifts as unique, handmade tags that add a personal touch.
- Classroom Art: Use these creations as vibrant decorations for your classroom or art displays.
FAQs about Crayon Shaving Stained Glass Shapes
Can I use any type of crayon for this project?
Absolutely! You can use regular crayons, but avoid using specialty or glitter crayons, as they may not melt as well. The classic wax crayons work best for creating vibrant Crayon Shaving Stained Glass Shapes.
What if I don’t have wax paper?
No worries! If you don’t have wax paper, you can use parchment paper as a substitute. Just make sure it’s heat-resistant, so it holds up during the ironing process.
How do I clean up the mess from crayon shavings?
Crayon shavings can be a bit messy, but they’re easy to clean! Simply sweep them up with a broom or use a damp cloth to wipe down the surface. You can also use a vacuum for quick cleanup!
Can kids help with this project?
Definitely! Kids can help with shaving the crayons, sprinkling the shavings, and cutting out shapes. Just remember that an adult should handle the ironing for safety. It’s a great way to bond and encourage creativity!
How can I store my Crayon Shaving Stained Glass Shapes?
To keep your colorful creations safe, store them flat in a cool, dry place. You can also place them between sheets of wax paper to prevent sticking. They make lovely decorations for any season!
Final Thoughts
Creating Crayon Shaving Stained Glass Shapes is not just a craft; it’s a joyful experience filled with color, creativity, and connection. As you watch the crayons melt into beautiful designs, you’ll feel a sense of accomplishment that’s hard to beat. I encourage you to gather your materials, invite your kids to join in, and let your imaginations run wild! Don’t forget to share your colorful masterpieces with friends and family. I can’t wait to see the unique creations you come up with—each one is a little piece of art that brings joy to your home!
Print
Crayon Shaving Stained Glass Shapes: Create Colorful Masterpieces!
Description
Create beautiful stained glass shapes using crayon shavings and wax paper. This fun and colorful project is perfect for kids and adults alike!
Instructions
- Use the pencil sharpener to shave crayons into small pieces.
- Lay a piece of wax paper on a flat surface.
- Sprinkle the crayon shavings onto one half of the wax paper, creating a colorful design.
- Fold the other half of the wax paper over the shavings to cover them.
- Place a piece of cardboard or a baking sheet underneath the wax paper for support.
- Carefully iron the wax paper on a low setting for a few seconds until the crayon shavings melt and fuse together.
- Let it cool, then cut out shapes (like hearts, stars, or flowers) from the melted crayon design.
- Optional: Glue the shapes onto black construction paper for a stained glass effect.
- Category: Art & Craft
Keywords: Crayon Shaving, Stained Glass, Kids Craft, DIY Art