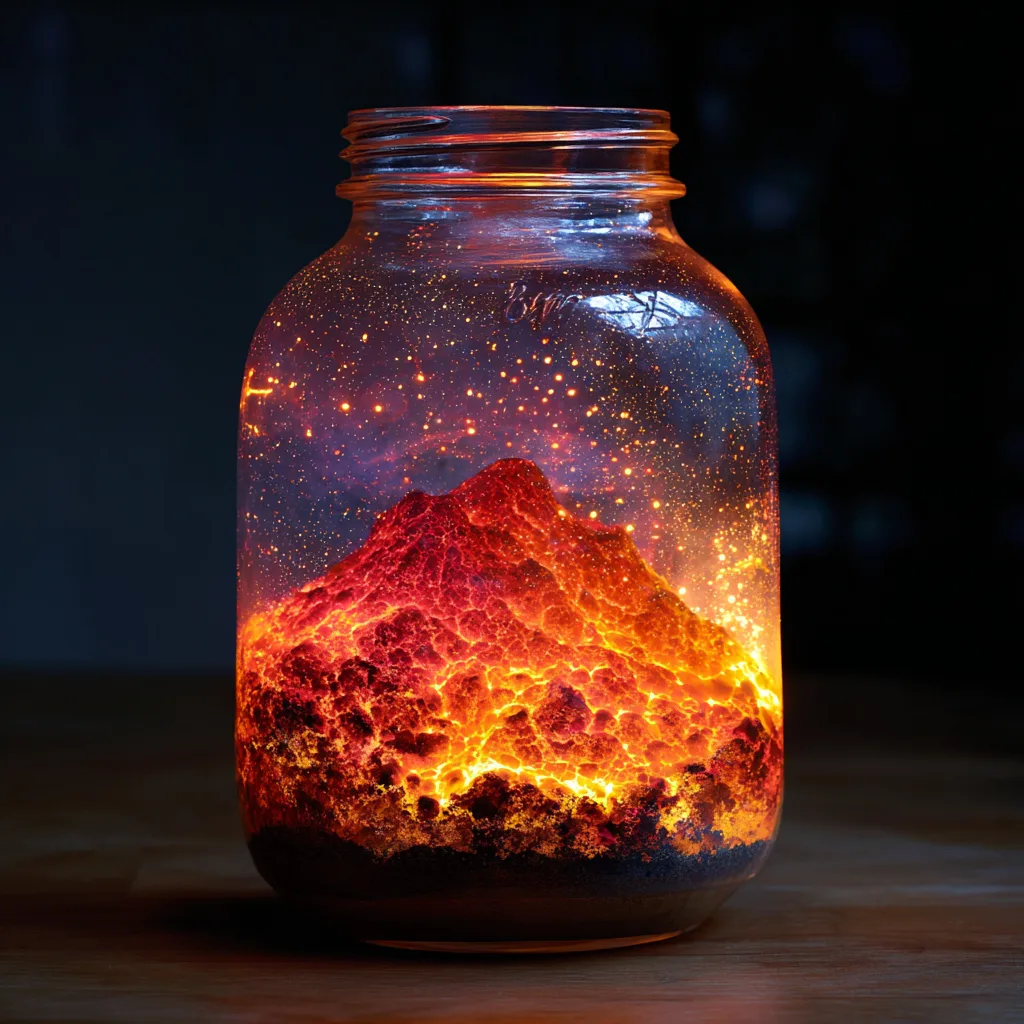
The allure of a volcano—raw, untamable power made visible in rivers of molten rock and incandescent ash—has captivated humanity for millennia. While we cannot bring a real volcano into our homes, we can capture its mesmerizing essence in a safe, creative, and stunningly beautiful form. This project guides you through creating your own Glowing Baking Soda Volcano Jar, a decorative piece that immortalizes the moment of eruption in a shimmering, glass-encased display. It is more than a simple craft; it is a hands-on lesson in geology, chemistry, and art, resulting in a luminous object that will spark conversation and wonder.
This project is perfect for parents seeking an engaging STEM activity, educators looking for a dynamic classroom project, or anyone in need of a unique and personalized nightlight or desk ornament. By the end of this article, you will not only know how to construct your volcano jar but also understand the scientific principles that make it so visually compelling.
The Science Behind the Glow: Understanding Lava and Light
Before we gather our materials, it’s helpful to understand what we are recreating. Real lava is rock heated to a staggering 1,300 to 2,200 degrees Fahrenheit, causing it to melt and become incandescent. Incandescence is the emission of light from a hot body. The brightest, hottest parts of lava flow appear white or yellow, cooling to orange and then to red as they lose thermal energy.
Our volcano jar simulates this effect not with heat, but with light and color theory. We use an LED light as our “heat source.” The yellow and white glitter suspended in the clear medium captures and refracts this light, creating the illusion of the hottest, most vibrant core of the lava. The orange and red liquid watercolors layered around the volcano’s base provide the deeper, cooler tones, completing the spectrum of a realistic lava flow. This understanding of how light interacts with different materials is key to achieving a professional-looking result.
Gathering Your Eruptive Ingredients: A Comprehensive Material List
Precision and preparation are the foundations of any great project. Here is a detailed breakdown of everything you will need and why each component is important.
The Foundation and Vessel
-
1 Clear Glass Jar with a Lid: A mason jar is ideal for its straight sides and airtight seal. The clarity of the glass is non-negotiable, as it is your window into the volcanic world you are creating. The lid is crucial for sealing in the liquid medium and preventing evaporation or spills.
The Volcanic Structure
-
Black or Dark Brown Paint (Acrylic Recommended): This forms the base of your volcano. Acrylic paint is water-resistant when dry, which prevents it from bleeding into your colored lava streams. The dark color represents the cooled basaltic rock that forms the volcano’s cone.
-
Baking Soda (Optional but Recommended): This common household ingredient is the secret to realistic texture. When mixed with paint, it creates a gritty, crystalline structure that perfectly mimics the porous, rough surface of volcanic rock.
-
Black or Dark Brown Fine Glitter (Optional): This adds another layer of texture and visual interest. As the light hits the volcano, the minute specks of dark glitter will create a subtle sparkle, resembling minerals embedded in the rock.
The Lava Flow and Magma Chamber
-
Liquid Watercolor or Food Coloring (Orange, Red, Yellow): Liquid watercolor is preferred for its vibrant, transparent quality, which allows light to pass through beautifully. Food coloring works perfectly well as a substitute. These colors will be used to paint the lava streams directly onto the dried volcano base.
-
Clear Glue: This is the base of your liquid medium. It dries clear and has a viscous consistency that suspends glitter perfectly, creating the illusion of a thick, shimmering magma chamber surrounding the volcano.
-
Fine White or Iridescent Glitter: This is the heart of the “glow.” The fine particles catch and scatter the light from the LED, creating the incandescent effect. White and iridescent glitter work best as they reflect all wavelengths of light.
The Illumination and Assembly
-
Small LED Tea Light or Puck Light: Safety is paramount. You must use a battery-operated LED light. Traditional tea lights generate heat and are a fire hazard when enclosed or placed near flammable materials like glue and wood. LED lights remain cool to the touch and are perfectly safe. A puck light often provides a broader, brighter base of illumination.
-
Super Glue (Cyanoacrylate): This is used to permanently seal the lid to the jar, ensuring your creation remains leak-proof and stable for years to come.
-
Spoon or Craft Stirring Sticks: For mixing and shaping.
-
A Small Bowl: For mixing the glue solution.
A Step-by-Step Guide to Building Your Volcano
Now, with our materials assembled and our scientific context in mind, let us begin the creative process. Follow these steps carefully for a flawless result.
Step 1: Crafting the Volcanic Cone
Begin by ensuring your glass jar is clean and completely dry. Any moisture or residue will affect the adhesion of the paint.
Squeeze a generous amount of black or dark brown paint directly into the center of the jar’s base. A two-inch diameter pool is a good starting point. Now, for the texture, sprinkle in about a tablespoon of baking soda and a pinch of dark glitter. Use a stirring stick or the back of a spoon to vigorously mix the ingredients directly on the jar’s base. You are aiming for a thick, paste-like consistency with a pronounced gritty texture.
Once mixed, use your tool to sculpt the paste into a conical volcano shape. Build up the sides and create a small crater at the top. Do not worry about making it perfectly smooth; the rough, uneven texture is what will make it look authentic. This step requires patience. Let the volcano dry completely. Depending on the thickness, this could take several hours or even overnight. A fully dried base is critical before proceeding to the next step.
Step 2: Painting the Lava Streams
With your volcano cone solid and dry, it is time to bring it to life with color. This is where your artistic flair comes into play.
Using your yellow, orange, and red liquid watercolors or food coloring, begin to paint “rivers” of lava flowing from the crater down the sides of the cone. Think about how real lava moves; it follows paths of least resistance. Start with the yellow color, painting the thinnest, central lines of the streams to represent the hottest lava. Then, use the orange to widen the streams around the yellow core. Finally, use the red color along the very edges and in larger pools at the base of the volcano to simulate the cooler, crusting lava.
A pro technique for a more natural blend is to work while the colors are still wet. Apply them close together and allow them to bleed into one another slightly. This creates soft transitions that are far more realistic than hard, painted lines. You can let this layer dry fully, or move to the next step while it is still slightly tacky for a different effect.
Step 3: Preparing the Luminous Magma Medium
This step creates the environment in which your volcano will glow. In your separate bowl, combine clear glue and warm water. A reliable ratio is two parts clear glue to one part warm water. The warm water thins the glue just enough to make it pourable while still retaining its ability to suspend glitter.
Stir the mixture gently until it is uniform. Now, add your fine white or iridescent glitter. Do not be shy; you will need more than you think for a strong glowing effect. Stir until the glitter is evenly distributed throughout the liquid. This mixture represents the superheated magma chamber that feeds the eruption above.
Step 4: The Final Assembly and Sealing
This is the most delicate part of the process. You need to pour the glitter mixture into the jar without disturbing your carefully painted volcano.
Tilt the jar slightly and slowly pour the glitter solution down the side, encircling the volcano. Continue pouring until the liquid reaches about half an inch to an inch from the very top of the jar. Leaving this air gap is not optional; it is essential. This pocket of air allows the light from the LED to refract and bounce around the entire jar, creating an even, all-encompassing glow. If you fill the jar completely, the light will only illuminate from the bottom.
Once filled, clean the rim of the jar thoroughly to ensure a perfect seal. Apply a continuous bead of super glue around the inner lip of the jar’s lid. Carefully screw the lid on tightly and securely. Wipe away any excess glue that seeps out immediately. Allow the super glue to cure completely according to the package directions, typically 5-10 minutes.
Step 5: The Grand Revelation: Illumination
Your volcanic masterpiece is complete. Find a dark or dimly lit room. Place your sealed Glowing Volcano Jar directly on top of your LED tea light or puck light. Turn on the light, and witness the transformation.
The once-static model is now a vibrant, glowing spectacle. The glitter shimmers and dances like molten rock, the colored lava streams appear to pulse with heat, and the textured cone casts subtle shadows, adding depth and realism. The volcano that was dormant in the light is now in a state of perpetual, brilliant eruption.
Troubleshooting and Advanced Customization
Even the best-laid plans can encounter hiccups. Here are some common issues and their solutions.
-
Cloudy Glue Medium: If your clear glue mixture dries cloudy, it was likely agitated or shaken during the drying process, introducing tiny air bubbles. To avoid this, mix and pour gently. The cloudiness may diminish over time as bubbles rise and pop.
-
Bleeding Colors: If your lava streams bled significantly into the clear medium, the paint was not fully dry. Ensure each layer is completely cured before applying the next or adding the liquid.
-
Weak Glow: If the glow is not bright enough, you may not have used enough glitter, your LED light may be weak, or you may have filled the jar too much. Ensure a generous air gap and use a bright, fresh-battery LED light.
For those looking to take their project further, consider these advanced ideas:
-
Create a Landscape: Use modeling clay to create smaller hills or rock formations around the base of the volcano before you pour in the glitter mixture.
-
Multi-Color Glow: Use multiple colors of fine glitter in your medium. A mix of gold, orange, and red can create a more complex, fiery effect.
-
Themed Jars: Adapt this concept to other scenes. A blue and green glitter mixture with a clay “island” can create a beautiful oceanic diorama.
Conclusion: A Monument to Creative Exploration
The Glowing Baking Soda Volcano Jar is a testament to the power of hands-on creation. It transcends the boundary between a simple craft and a scientific demonstration, providing a tangible connection to the powerful geological forces that shape our planet. This project teaches principles of geology, the physics of light, and the joy of artistic expression, all contained within a simple glass jar.
Whether you build it for fun, for learning, or for decoration, the final product is a captivating piece of art that serves as a constant reminder of the beauty and power that can be found when science and creativity erupt together. So gather your materials, channel your inner geologist and artist, and create a volcanic wonder that will light up your room and your imagination.