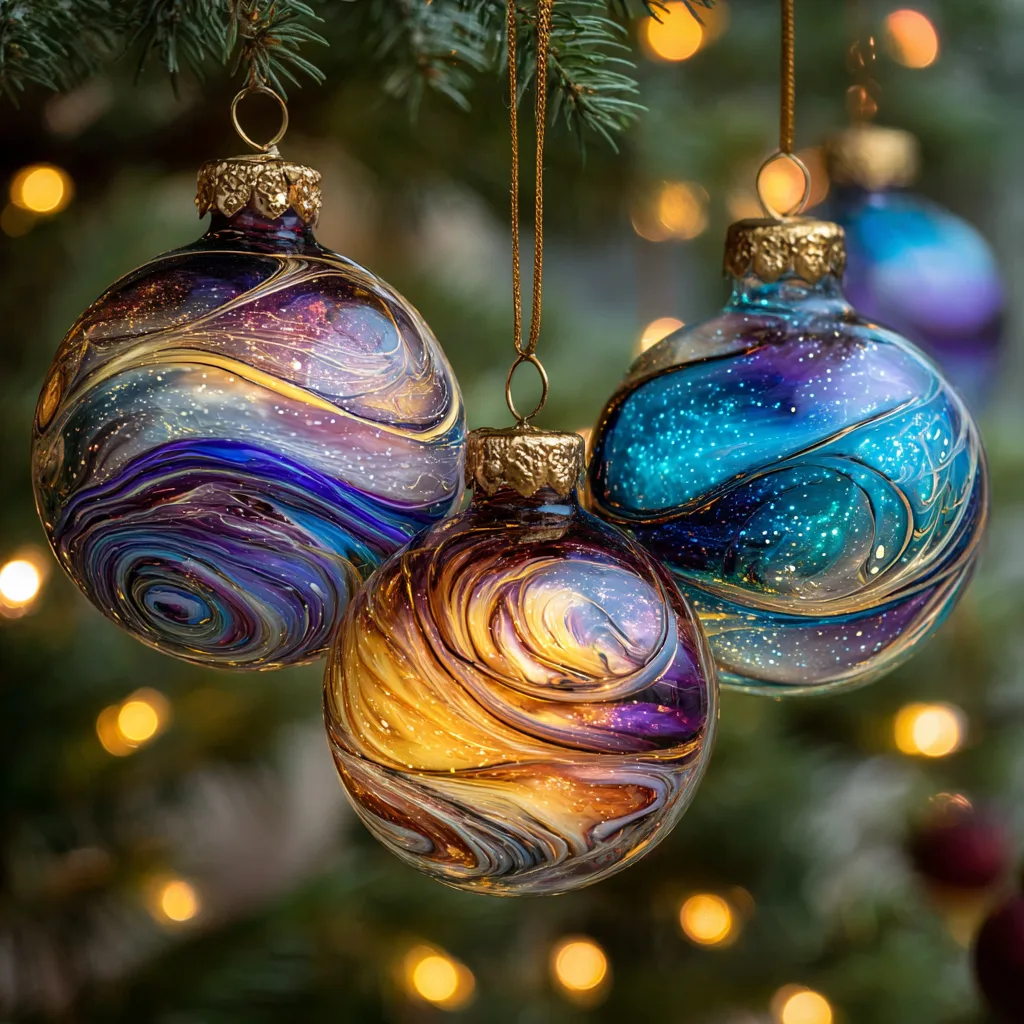
Introduction to Cosmic Swirl Glass Ornaments
Welcome to the enchanting world of Cosmic Swirl Glass Ornaments! If you’re looking for a fun and creative way to add a touch of magic to your holiday décor, you’ve come to the right place. This DIY project is not only simple but also incredibly rewarding. I remember the joy of crafting these ornaments with my kids, their laughter filling the air as we mixed colors and created our own little galaxies. With just a few materials and a sprinkle of imagination, you can create stunning ornaments that will brighten your home and make perfect gifts!
Why You’ll Love This Cosmic Swirl Glass Ornaments
Creating Cosmic Swirl Glass Ornaments is a delightful way to bond with your kids while unleashing your creativity. This project is not only easy and affordable, but it also offers a relaxing escape from the hustle and bustle of daily life. Watching the colors swirl together is mesmerizing, and the joy of hanging your unique creations on the tree is simply magical. Plus, they make heartfelt gifts that friends and family will cherish!
Materials and Tools Needed for Cosmic Swirl Glass Ornaments
To create your stunning Cosmic Swirl Glass Ornaments, you’ll need a few essential materials. First, grab some clear glass ornaments; they’re the canvas for your creativity! Next, acrylic paints in various colors will bring your cosmic designs to life. I love using vibrant hues like blues, purples, and pinks for that galaxy effect. Don’t forget paintbrushes for swirling the colors around!
If you want to add a little sparkle, glitter is optional but highly recommended. A clear sealant spray is crucial to protect your masterpiece once it’s dry. Lastly, have some string or ribbon on hand for hanging your beautiful creations. You can find these materials at craft stores or even repurpose items you already have at home for an eco-friendly twist!
How to Make Cosmic Swirl Glass Ornaments
Creating your own Cosmic Swirl Glass Ornaments is not just a craft; it’s a delightful journey into the world of color and creativity! I remember the first time I made these with my kids. The excitement in their eyes as they swirled the paint was priceless. Let’s dive into the steps to make these stunning ornaments that will add a touch of magic to your holiday décor!
Step 1: Prepare Your Workspace
Before we get our hands messy, let’s set the stage! Find a clean, well-ventilated area to work in. I like to lay down some newspaper or an old tablecloth to catch any drips. Remember, safety first! Make sure to have your acrylic paints and sealant ready, and keep the kids away from the spray sealant. It’s best to do this part when they’re busy with another activity!
Step 2: Remove the Metal Cap
Now, let’s get to the fun part! Carefully remove the metal cap from your glass ornament. I usually twist it gently to avoid any breakage. This step is crucial because it allows us to fill the ornament with our colorful paints. Just be cautious—those glass ornaments can be a bit slippery!
Step 3: Add Acrylic Paint
Time to unleash your inner artist! Pour a small amount of acrylic paint into the ornament. You don’t need much—just enough to coat the inside. I love using vibrant colors like deep blues and purples for a cosmic feel. If you’re feeling adventurous, try a mix of colors! Swirl the paint around by tilting the ornament in different directions. It’s like a mini galaxy in your hands!
Step 4: Create the Cosmic Effect
Here’s where the magic happens! To achieve that stunning cosmic effect, use multiple colors. I often layer them, starting with a darker shade and adding lighter ones on top. The key is to keep swirling until you’re happy with the design. Don’t be afraid to experiment—each ornament will turn out unique, just like a real galaxy!
Step 5: Add Glitter (Optional)
If you want to add a little extra sparkle, now’s the time! Sprinkle some glitter inside the ornament. I like to use silver or gold for a twinkling effect. Just a pinch will do! The glitter catches the light beautifully and makes your cosmic swirl even more enchanting.
Step 6: Let It Dry
Patience is a virtue, especially in crafting! Set your ornament aside and let it dry completely. This usually takes about an hour, but I recommend waiting a bit longer to ensure everything is set. You can use this time to clean up your workspace or start on another ornament!
Step 7: Seal the Design
Once your ornament is dry, it’s time to protect your masterpiece. Grab your clear sealant spray and give the inside a light coat. This step is essential to keep the paint from chipping. Remember to do this in a well-ventilated area! The soft shimmer of the sealant adds a lovely finish to your cosmic creation.
Step 8: Reattach the Cap and Hang
Finally, let’s put the finishing touches on your ornament! Carefully reattach the metal cap. I like to tie a pretty ribbon or string for hanging. You can choose festive colors that match your holiday décor. Now, your Cosmic Swirl Glass Ornament is ready to shine on your tree or be gifted to someone special!
Tips for Best Results
- Experiment with different color combinations to create unique cosmic effects.
- If the paint isn’t swirling well, use a straw to help guide it inside the ornament.
- For a more vibrant look, try layering the colors instead of mixing them all at once.
- Always work in a well-ventilated area, especially when using spray sealant.
- Don’t rush the drying process; it’s worth the wait for a flawless finish!
Theme and Design Variations
- For a winter wonderland theme, use icy blues, whites, and silvers to create a frosty effect.
- Try a festive red and green color scheme for a classic Christmas vibe.
- For a more whimsical look, use pastel colors like pink, lavender, and mint green.
- Encourage kids to create their own designs by using their favorite colors or even adding stickers inside the ornaments!
- Consider seasonal themes, like orange and black for Halloween or vibrant colors for spring celebrations.
Display and Use Ideas
- Hang your Cosmic Swirl Glass Ornaments on your holiday tree for a dazzling display that catches the light beautifully.
- Use them as unique table centerpieces by placing them in decorative bowls or glass cloches.
- Gift them to friends and family as heartfelt, handmade treasures that showcase your creativity.
- Incorporate them into school crafts by having students create their own designs for a fun classroom project.
- String them together to create a festive garland for your mantel or window!
FAQs about Cosmic Swirl Glass Ornaments
1. Can I use other types of paint for my Cosmic Swirl Glass Ornaments?
While acrylic paints work best for this project due to their vibrant colors and quick drying time, you can experiment with other types of paint. Just make sure they adhere well to glass and are non-toxic, especially if kids are involved!
2. How do I clean up if I spill paint?
Accidents happen! If you spill paint, quickly wipe it up with a damp cloth or paper towel. For dried paint, you may need to use a little rubbing alcohol or a glass cleaner. Always act fast to prevent stains!
3. Can I make these ornaments with younger children?
Absolutely! Cosmic Swirl Glass Ornaments are great for kids aged 10 and up, but younger children can join in with adult supervision. Just be cautious with the glass ornaments and spray sealant. You can also simplify the process by letting them choose colors and swirl the paint!
4. How do I store my Cosmic Swirl Glass Ornaments after the holidays?
To keep your ornaments safe, store them in a padded box or wrap them in tissue paper. Avoid stacking them directly on top of each other to prevent scratches or breakage. They’ll be ready to shine again next holiday season!
5. Can I sell my Cosmic Swirl Glass Ornaments at craft fairs?
Yes! These ornaments make fantastic handmade gifts and can be sold at craft fairs. Just ensure you follow any local regulations regarding selling handmade items. Your unique designs will surely attract attention!
Final Thoughts
Creating Cosmic Swirl Glass Ornaments is not just about crafting; it’s about making memories and adding a sprinkle of magic to your holiday season. The joy of watching colors blend and swirl is truly satisfying, and the end result is a beautiful ornament that reflects your creativity. I encourage you to gather your loved ones, dive into this fun project, and let your imaginations run wild! Don’t forget to share your stunning creations with friends and family. I can’t wait to see the unique cosmic designs you come up with!
Final Thoughts
Creating Cosmic Swirl Glass Ornaments is more than just a craft; it’s a joyful experience that brings families together and sparks creativity. The satisfaction of watching your unique designs come to life is truly magical. I encourage you to gather your loved ones, dive into this fun project, and let your imaginations soar! Don’t forget to share your stunning creations with friends and family—there’s nothing quite like the joy of gifting something handmade. So, grab your supplies and start swirling those colors; your holiday décor will shine brighter than ever!
Print
Cosmic Swirl Glass Ornaments: Create Stunning Holiday Décor Today!
Description
Create beautiful cosmic swirl glass ornaments that will add a touch of magic to your holiday décor. These ornaments are perfect for hanging on your tree or giving as gifts.
Instructions
- Start by removing the metal cap from the glass ornament.
- Pour a small amount of acrylic paint into the ornament.
- Swirl the paint around inside the ornament to create a cosmic effect. You can use multiple colors for a more vibrant look.
- If desired, sprinkle glitter inside the ornament for added sparkle.
- Once you are satisfied with the design, let the ornament dry completely.
- After drying, spray a clear sealant inside the ornament to protect the paint.
- Reattach the metal cap and tie a string or ribbon for hanging.
- Category: Holiday Decor
Keywords: Cosmic Swirl Glass Ornaments, Holiday Decor, DIY Ornaments, Christmas Crafts