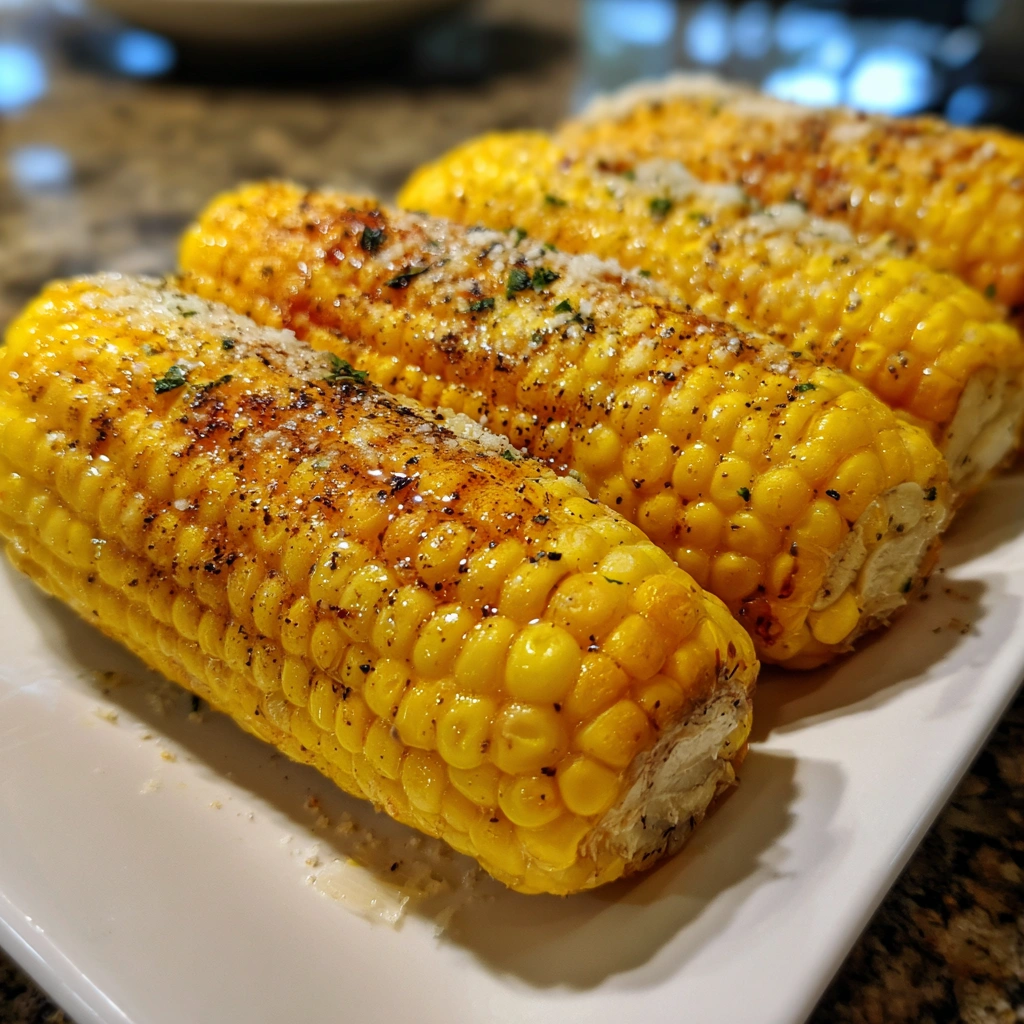
Corn on the Cob in the Oven: Juicy, Buttery Perfection!
Sensory-Rich Introduction with Immediate Craving
Imagine biting into a perfectly roasted ear of corn, the sweet kernels bursting with flavor as they meet your taste buds. The aroma of buttery goodness wafts through the air, mingling with a hint of smokiness that only an oven can provide. This is not just any corn on the cob; it’s a celebration of summer, a nostalgic reminder of backyard barbecues and family gatherings. Picture yourself at a picnic, laughter echoing around you, as you savor each juicy bite of this delightful side dish. Whether it’s a casual weeknight dinner or a festive holiday feast, corn on the cob in the oven is the perfect accompaniment that brings joy to any occasion.
Why You’ll Love This Corn on the Cob in the Oven
- Texture Contrast: The outer layer of the corn is slightly charred, while the inside remains tender and juicy, creating a delightful contrast in every bite.
- Flavor Balance: The combination of buttery richness, a sprinkle of salt, and a hint of garlic powder elevates the natural sweetness of the corn, making it irresistible.
- Versatility: This dish pairs beautifully with a variety of main courses, from grilled meats to vegetarian options, making it a go-to side for any meal.
- Ease of Preparation: With minimal ingredients and straightforward steps, this recipe is perfect for both novice cooks and seasoned chefs.
- Universal Appeal: Loved by kids and adults alike, corn on the cob is a classic that never goes out of style, making it a crowd-pleaser at any gathering.
Essential Tools & Preparation Strategy
- Oven: The heart of this recipe, essential for achieving that perfect roasted texture.
- Aluminum Foil: Key for wrapping the corn to lock in moisture and flavor during baking.
- Mixing Bowl: Necessary for combining the butter and seasonings evenly.
- Butter Knife: Ideal for spreading the butter mixture smoothly over the corn.
- Measuring Spoons: Important for accurately measuring seasonings to ensure balanced flavor.
- Oven Mitts: Essential for safely handling hot items when removing the corn from the oven.
- Baking Sheet (optional): Can be used to catch any drips from the corn while it bakes.
- Corn Peeler (optional): Helpful for quickly husking the corn if you prefer a tool over manual husking.
Ingredients & Their Roles in This Corn on the Cob in the Oven
- Fresh Corn on the Cob: The star ingredient, providing sweetness and crunch.
- Unsalted Butter: Adds richness and moisture, enhancing the overall flavor.
- Salt: Essential for seasoning, bringing out the natural sweetness of the corn.
- Black Pepper: Adds a subtle kick and depth to the flavor profile.
- Garlic Powder: Introduces a savory note that complements the sweetness of the corn.
- Parmesan Cheese (optional): Offers a savory, umami flavor that elevates the dish, perfect for cheese lovers.
Substitutions & Preparation Notes
- Butter: For a dairy-free option, substitute with olive oil or vegan butter.
- Parmesan Cheese: Can be omitted or replaced with nutritional yeast for a vegan alternative.
Step-by-Step Guide to Perfect Corn on the Cob in the Oven
- Preheat your oven to 400°F (200°C) to ensure even cooking.
- Husk the corn and remove all silk strands to avoid a gritty texture.
- Mix the butter: In a small bowl, combine softened butter, salt, black pepper, and garlic powder until well blended.
- Spread the butter mixture evenly over each ear of corn, ensuring every kernel is coated.
- Wrap each ear of corn tightly in aluminum foil to retain moisture during baking.
- Place the wrapped corn directly on the oven rack and bake for 25-30 minutes, allowing the flavors to meld.
- Remove from the oven and carefully unwrap the foil, being cautious of the steam.
- Optional: Sprinkle with grated Parmesan cheese before serving for an extra layer of flavor.
Chef’s Notes & Pro Tips for Flawless Results
- Make-ahead instructions: Prepare the corn and store it wrapped in foil in the refrigerator for up to 24 hours before baking.
- Storage: Leftover corn can be stored in an airtight container in the refrigerator for up to 3 days.
- Equipment recommendations: A corn peeler can make husking easier, and a baking sheet can catch any drips.
- Customization options: Experiment with different seasonings, such as chili powder or smoked paprika, for a unique twist.
Avoid These Common Cooking Mistakes
- Not removing all the silk: This can lead to a gritty texture; ensure all silk is removed before cooking.
- Overcooking the corn: This can make it mushy; stick to the recommended baking time.
- Using cold butter: This makes it hard to spread; always use softened butter for easy application.
- Not wrapping the corn tightly: This can cause it to dry out; ensure the foil is sealed well.
- Skipping seasoning: This can lead to bland corn; always season generously.
- Using old corn: This can result in tough kernels; always choose fresh corn for the best flavor.
- Not preheating the oven: This can affect cooking time and texture; always preheat for even cooking.
Creative Variations & Customizations
- Spicy Corn: Add cayenne pepper or chili powder to the butter mixture for a kick.
- Herb-Infused Corn: Mix in fresh herbs like basil or thyme for a fragrant twist.
- Cheesy Corn: Use a blend of different cheeses, such as cheddar or feta, for a rich flavor.
- Sweet Corn: Drizzle with honey or maple syrup before serving for a sweet contrast.
- Seasonal Corn: Top with seasonal ingredients like roasted red peppers or jalapeños for a festive touch.
Perfect Pairings: What to Serve With Corn on the Cob in the Oven
- Grilled Chicken: The smoky flavor complements the sweetness of the corn.
- Steak: A classic pairing that enhances the hearty flavors of both dishes.
- Vegetarian Burgers: A great option for a meatless meal that still feels satisfying.
- Creamy Coleslaw: The crunch and creaminess provide a refreshing contrast.
- Baked Beans: A hearty side that pairs well with the sweetness of the corn.
- Lemonade: A chilled glass of lemonade balances the richness of the butter.
- Light Salad: A fresh salad adds a healthy touch to your meal.
- Fish Tacos: The corn adds a sweet crunch to the savory flavors of the tacos.
Storage & Meal Prep Instructions
- Fridge Storage: Store leftover corn in an airtight container in the refrigerator for up to 3 days.
- Freezer Storage: Wrap individual ears in plastic wrap and then foil, storing in the freezer for up to 3 months.
- Reheating Methods: Reheat in the oven at 350°F (175°C) for about 10-15 minutes or in the microwave for 1-2 minutes until heated through.
Nutrition Facts & Health Insights
| Nutrient | Amount per Serving (1 ear of corn) |
|---|---|
| Calories | 150 |
| Sugar | 6 grams |
| Sodium | 200 milligrams |
| Fat | 10 grams |
| Saturated Fat | 6 grams |
| Unsaturated Fat | 4 grams |
| Trans Fat | 0 grams |
| Carbohydrates | 15 grams |
| Fiber | 2 grams |
| Protein | 3 grams |
| Cholesterol | 20 milligrams |
Health Benefits of Key Ingredients
- Corn: Rich in fiber and antioxidants, promoting digestive health.
- Butter: Provides essential fatty acids and vitamins A and D.
- Garlic: Known for its immune-boosting properties and heart health benefits.
Frequently Asked Questions
- Can I use frozen corn?: Yes, but fresh corn yields the best flavor and texture.
- How do I know when the corn is done?: The kernels should be tender and easily pierced with a fork.
- Can I grill the corn instead?: Absolutely! Grilling is a great alternative for a smoky flavor.
- What if I don’t have aluminum foil?: You can use a baking dish with a lid or parchment paper as an alternative.
- Can I add other seasonings?: Yes, feel free to experiment with your favorite spices and herbs.
- Is this recipe gluten-free?: Yes, all ingredients are naturally gluten-free.
- How can I make this dish spicier?: Add hot sauce or chili powder to the butter mixture.
- Can I make this in advance?: Yes, prepare the corn and store it in the fridge for up to 24 hours before baking.
Final Inspiration & Kitchen Confidence
As you prepare this delicious corn on the cob in the oven, remember that cooking is not just about following a recipe; it’s about creating memories and sharing joy with those you love. Celebrate your culinary achievements, no matter how small, and embrace the confidence that comes with each dish you create. So gather your ingredients, preheat that oven, and get ready to enjoy a taste of summer that will leave everyone asking for seconds!
Print
Corn on the Cob in the Oven: Juicy, Buttery Perfection!
- Total Time: 40 minutes
- Yield: 4 servings
- Diet: Vegetarian
Description
Experience the sweet, succulent crunch of corn on the cob, perfectly roasted in the oven. Each bite bursts with buttery flavor, complemented by a hint of smokiness from the roasting process, creating a delightful texture that is both tender and satisfying.
Ingredients
- Fresh Corn on the Cob – 4 ears, husked and cleaned
- Unsalted Butter – 1/2 cup, softened
- Salt – 1 teaspoon, to taste
- Black Pepper – 1/2 teaspoon, freshly ground
- Garlic Powder – 1/2 teaspoon
- Parmesan Cheese – 1/4 cup, grated (optional)
Instructions
- Preheat your oven to 400°F (200°C).
- Husk the corn and remove all silk strands.
- In a small bowl, mix the softened butter, salt, black pepper, and garlic powder until well combined.
- Spread the butter mixture evenly over each ear of corn.
- Wrap each ear of corn in aluminum foil, sealing tightly.
- Place the wrapped corn directly on the oven rack and bake for 25-30 minutes.
- Remove from the oven and carefully unwrap the foil (watch out for steam!).
- If desired, sprinkle with grated Parmesan cheese before serving.
Notes
- This dish can be made ahead of time; simply prepare the corn and store it wrapped in foil in the refrigerator for up to 24 hours before baking.
- Leftover corn can be stored in an airtight container in the refrigerator for up to 3 days.
- For a dairy-free option, substitute the butter with olive oil or a vegan butter alternative.
- Prep Time: 10 minutes
- Cook Time: 30 minutes
- Category: Side Dish
- Method: Baking
- Cuisine: American
Nutrition
- Serving Size: 1 ear of corn
- Calories: 150
- Sugar: 6 grams
- Sodium: 200 milligrams
- Fat: 10 grams
- Saturated Fat: 6 grams
- Unsaturated Fat: 4 grams
- Trans Fat: 0 grams
- Carbohydrates: 15 grams
- Fiber: 2 grams
- Protein: 3 grams
- Cholesterol: 20 milligrams
Keywords: Corn on the Cob in the Oven, roasted corn, oven-baked corn, summer side dish, easy corn recipe, buttery corn, corn recipes, corn on the cob, vegetable side dish, healthy corn, corn cooking methods, corn preparation, sweet corn, corn with butter, corn with cheese