
Introduction to Cloud in a Jar Science Experiment
Welcome to the whimsical world of science with our Cloud in a Jar Science Experiment! This delightful DIY project is not only a fantastic way to bond with your kids but also a simple and rewarding exploration of how clouds form. Imagine the joy on their faces as they witness a mini cloud swirling inside a jar! It’s a perfect blend of creativity and learning, making it an ideal activity for curious minds. Plus, it’s quick to set up and uses materials you probably already have at home. Let’s dive into this enchanting experience together!
Why You’ll Love This Cloud in a Jar Science Experiment
This Cloud in a Jar Science Experiment is a delightful way to spark creativity and curiosity in your home! It’s incredibly easy to set up, making it perfect for busy moms and teachers alike. Plus, it’s budget-friendly, using simple household items. Watching the cloud form is not only relaxing but also a fantastic bonding experience with your kids. You’ll create lasting memories while exploring the wonders of science together!
Materials and Tools Needed for Cloud in a Jar Science Experiment
To embark on this exciting Cloud in a Jar Science Experiment, you’ll need a few simple materials that are likely already in your home. Here’s what you’ll need:
- Glass jar with a lid: This is your cloud chamber! A clear jar allows you to see the magic unfold inside.
- Hot water: Essential for creating warm air, which is crucial for cloud formation. Just make sure it’s hot, but not boiling!
- Ice cubes: These cool the air inside the jar, helping the warm moisture condense into a cloud.
- Aerosol spray (like hair spray): This acts as condensation nuclei, giving the water vapor something to cling to. You can also use an eco-friendly spray if you prefer!
- Food coloring (optional): For a fun twist, add some color to your cloud! It’s a great way to engage kids and make the experiment visually exciting.
These materials are not only easy to find but also budget-friendly, making this experiment a perfect choice for family-friendly crafts. Let’s get crafting!
How to Make Cloud in a Jar Science Experiment
Now that we have our materials ready, let’s jump into the fun part—making our very own cloud in a jar! This Cloud in a Jar Science Experiment is not only a fantastic way to learn about science, but it’s also a great opportunity to bond with your kids. So, roll up your sleeves, and let’s get started!
Step 1: Prepare Your Jar
First, take your glass jar and fill it with about an inch of hot water. The hot water is crucial because it creates the warm air that will help form our cloud. As the water heats up, it releases moisture into the air, setting the stage for our mini weather system. Just remember to handle the hot water with care—safety first! You want to create a cozy environment for your cloud to form.
Step 2: Warm Up the Air
Next, cover the jar with its lid and let it sit for a few minutes. This step is essential! By allowing the air inside to warm up, you’re creating the perfect environment for condensation to occur. It’s like giving your jar a warm hug, preparing it for the magic that’s about to unfold. You’ll feel the excitement building as you wait for the next step!
Step 3: Create Condensation Nuclei
Now comes the fun part! Remove the lid and quickly spray a small amount of aerosol spray into the jar. This spray acts as condensation nuclei—tiny particles that water vapor clings to, forming droplets. Think of it as the spark that ignites the cloud-making process! You might be surprised at how quickly things start to change. Just a little spray goes a long way, so don’t overdo it!
Step 4: Cool the Air
Immediately after spraying, place ice cubes on top of the lid. This cooling action is vital because it lowers the temperature of the air inside the jar. As the warm, moist air rises and meets the cold air, it condenses into tiny water droplets, forming a cloud. It’s like watching a weather phenomenon unfold right before your eyes! The contrast between the hot and cold is what makes this experiment so fascinating. Just be sure to keep an eye on the ice cubes—they’ll melt quickly!
Step 5: Watch the Magic Happen
Now, sit back and watch as a cloud forms inside your jar! It’s truly mesmerizing. If you want to add a splash of color, feel free to drop in some food coloring. The soft shimmer of the colored cloud against the glass feels magical, and it’s a great way to engage kids’ imaginations. You might even hear gasps of wonder as they see their very own cloud in action! This is the moment where science meets art, and it’s sure to be a hit with everyone involved.
And there you have it! Your very own Cloud in a Jar Science Experiment is complete. This project not only teaches kids about condensation and cloud formation but also provides a wonderful opportunity for creativity and exploration. So, gather your family, and let the cloud-making fun begin!
Tips for Best Results
- Always use hot water, but ensure it’s not boiling to prevent burns.
- If your cloud doesn’t form, try adding a bit more aerosol spray for better condensation nuclei.
- Conduct the experiment in a well-ventilated area to avoid inhaling aerosol fumes.
- For a fun twist, experiment with different jar sizes to see how it affects cloud formation.
- Don’t forget to supervise younger children during the process for safety!
Theme and Design Variations
Get creative with your Cloud in a Jar Science Experiment by trying out these fun themes and design variations:
- Seasonal Colors: Use pastel colors for spring, vibrant hues for summer, warm tones for fall, and cool blues and whites for winter clouds.
- Glow-in-the-Dark: Add glow-in-the-dark paint to the water for a magical nighttime effect!
- Holiday Themes: Incorporate festive colors like red and green for Christmas or orange and black for Halloween.
- Kid-Friendly Versions: Let kids choose their favorite colors and even add glitter for a sparkly cloud!
These variations not only make the experiment visually exciting but also allow for endless creativity and fun!
Display and Use Ideas
Once you’ve created your stunning Cloud in a Jar Science Experiment, there are plenty of ways to showcase your masterpiece or share it with others!
- Home Decor: Place your cloud jar on a shelf or table as a whimsical decoration that sparks conversation.
- School Projects: Use it as a fun science demonstration in the classroom to teach about weather and clouds.
- Gift Idea: Wrap it up as a unique gift for friends or family, especially for those who love science or crafts!
FAQs about Cloud in a Jar Science Experiment
Q: What happens if my cloud doesn’t form?
A: If your cloud doesn’t appear, don’t worry! It might be due to not enough aerosol spray acting as condensation nuclei. Try adding a bit more spray and ensure the air inside the jar is warm enough. Sometimes, a little extra patience is all you need!
Q: Can I use other types of jars for this experiment?
A: Absolutely! You can experiment with different sizes and shapes of jars. Just remember that a clear jar works best for visibility. Larger jars may create bigger clouds, while smaller ones can produce a more concentrated effect!
Q: Is this experiment safe for young children?
A: Yes, but adult supervision is essential! Make sure to handle the hot water carefully and explain the process to your kids. This way, they can enjoy the fun while staying safe!
Q: How long will the cloud last in the jar?
A: The cloud will typically last for a few minutes before dissipating. However, you can repeat the process as many times as you like! Just refresh the hot water and ice cubes to create new clouds.
Q: Can I add other fun elements to the cloud?
A: Definitely! You can add glitter for a sparkly effect or even small figurines to create a mini scene inside your cloud jar. Let your creativity run wild and make it a unique masterpiece!
Final Thoughts
Creating your very own Cloud in a Jar Science Experiment is not just a fun activity; it’s a delightful journey into the world of science and creativity! Watching the cloud form inside the jar brings a sense of wonder and satisfaction that’s hard to beat. I encourage you to gather your family, dive into this project, and let your imaginations soar. Don’t forget to share your results and any creative twists you come up with! Together, let’s inspire curiosity and joy in the world of science!
Print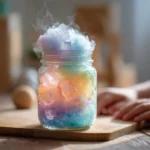
Cloud in a Jar Science Experiment: Unleash Fun with Easy Steps!
Description
Create a mini cloud in a jar using simple household materials to explore the science of condensation and cloud formation.
Instructions
- Fill the glass jar with about an inch of hot water.
- Cover the jar with the lid and let it sit for a few minutes to warm up the air inside.
- Remove the lid and quickly spray a small amount of aerosol spray into the jar. This acts as condensation nuclei.
- Immediately place ice cubes on top of the lid to cool the air inside the jar.
- Watch as a cloud forms inside the jar! You can add food coloring for a fun effect.
- Category: Science Experiment
Keywords: Cloud in a Jar, Science Experiment, Kids Craft, Condensation, Cloud Formation


