Christmas Chocolate Caramel Cups: Irresistibly Creamy Bliss!
Sensory-Rich Introduction with Immediate Craving
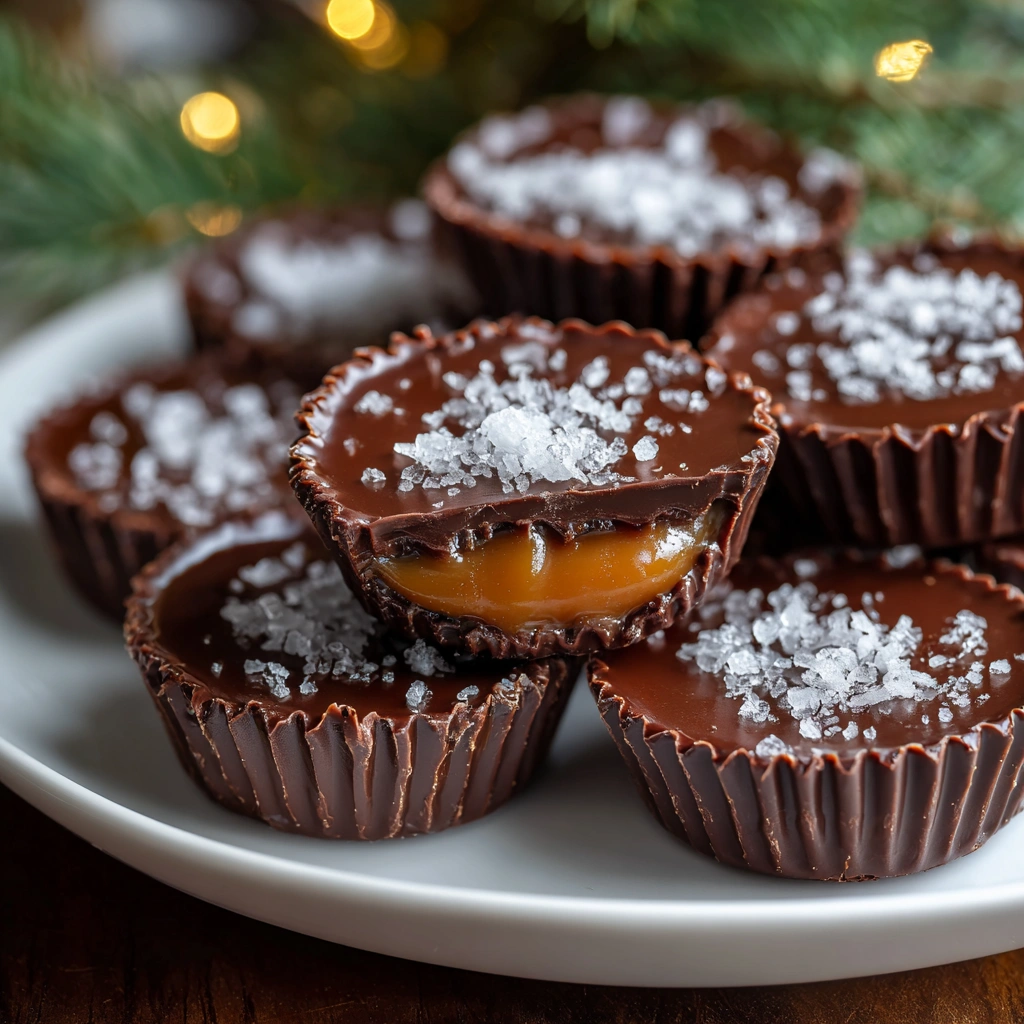
Imagine the moment you unwrap a delicate chocolate cup, the rich aroma of cocoa wafting through the air, teasing your senses. As you take your first bite, the smooth chocolate shell gives way to a warm, gooey caramel center that oozes with buttery sweetness. This delightful treat, the Christmas Chocolate Caramel Cup, is not just a dessert; it’s a celebration of flavors and textures that evoke the warmth of the holiday season. I remember the first time I made these cups for a family gathering; the joy on my loved ones’ faces as they savored each bite was priceless. Perfect for holiday parties, cozy nights by the fire, or as a thoughtful gift, these cups are sure to create lasting memories and cravings that linger long after the last bite.
Why You’ll Love This Christmas Chocolate Caramel Cups
- Texture Contrast: The combination of a crisp chocolate shell and a soft, gooey caramel filling creates a delightful mouthfeel that keeps you coming back for more.
- Flavor Balance: The sweetness of the chocolate and caramel is perfectly complemented by a hint of sea salt, making each bite a harmonious blend of flavors.
- Versatility: These cups can be enjoyed as a festive dessert, a sweet snack, or even as a homemade gift, making them suitable for various occasions.
- Ease of Preparation: With simple ingredients and straightforward steps, these cups are easy to whip up, even for novice bakers.
- Universal Appeal: Loved by both chocolate and caramel enthusiasts, these treats are sure to please guests of all ages during the holiday season.
Essential Tools & Preparation Strategy
- Microwave-safe Bowl: Essential for melting chocolate evenly without burning, ensuring a smooth texture.
- Mini Muffin Tin: Perfect for shaping the chocolate cups; consider using silicone for easy removal.
- Silicone Spatula: Ideal for mixing and scraping down the sides of the bowl, ensuring no chocolate is wasted.
- Saucepan: Necessary for cooking the caramel mixture over medium heat, allowing for even cooking.
- Whisk: Useful for ensuring the caramel is smooth and well combined, preventing lumps.
- Refrigerator: Important for setting the chocolate and caramel layers properly, ensuring a clean finish.
- Parchment Paper: Optional, but can be used to line the muffin tin for easier cleanup.
- Candy Thermometer: Optional for those who want to ensure perfect caramel consistency.
Ingredients & Their Roles in This Christmas Chocolate Caramel Cups
Chocolate Shell
- 1 cup semi-sweet chocolate chips: Provides the rich chocolate flavor and forms the outer shell.
Caramel Filling
- 1/2 cup granulated sugar: The base for the caramel, providing sweetness and structure.
- 1/4 cup unsalted butter: Adds richness and creaminess to the caramel.
- 1/4 cup heavy cream: Contributes to the smooth texture of the caramel filling.
- 1/2 teaspoon sea salt: Enhances the flavor and balances the sweetness.
Substitutions
- Dark chocolate: For a richer flavor profile.
- Milk chocolate: For a sweeter, creamier taste.
- Coconut cream: Can be used instead of heavy cream for a dairy-free option.
Step-by-Step Guide to Perfect Christmas Chocolate Caramel Cups
- Melt the Chocolate: In a microwave-safe bowl, melt the chocolate chips in 30-second intervals, stirring in between until smooth and fully melted.
- Coat the Muffin Tin: Using a spoon, coat the bottom and sides of a mini muffin tin with the melted chocolate, creating a shell. Place in the refrigerator for 10 minutes to set.
- Prepare the Caramel: In a saucepan over medium heat, combine the granulated sugar and butter. Stir until the mixture turns a golden brown color, about 5-7 minutes.
- Add Cream and Salt: Carefully add the heavy cream and sea salt to the caramel mixture, stirring continuously until smooth. Remove from heat and let cool for 5 minutes.
- Fill the Chocolate Shells: Remove the chocolate shells from the refrigerator and fill each cup with the caramel mixture, leaving a little space at the top.
- Seal with Chocolate: Pour the remaining melted chocolate over the caramel to seal the cups. Refrigerate for an additional 15 minutes until fully set.
- Remove and Serve: Once set, gently pop the cups out of the muffin tin and serve.
Chef’s Notes & Pro Tips for Flawless Results
- Make-ahead: These cups can be made up to a week in advance and stored in an airtight container in the refrigerator.
- Storage: Keep in a cool, dry place or refrigerate to maintain freshness.
- Equipment Recommendations: Use a non-stick or silicone muffin tin for easy removal.
- Customization Options: Add a sprinkle of sea salt on top for an extra flavor boost or drizzle with white chocolate for a festive touch.
Avoid These Common Cooking Mistakes
- Overheating the Chocolate: This can cause it to seize. Solution: Melt in short intervals and stir frequently.
- Not Letting the Chocolate Set Properly: This can lead to a messy filling. Solution: Ensure each layer is fully chilled before adding the next.
- Burning the Sugar While Making Caramel: This results in a bitter taste. Solution: Stir constantly and watch closely as it changes color.
- Using Cold Cream in Caramel: This can cause the mixture to seize. Solution: Warm the cream slightly before adding it to the caramel.
- Filling the Cups Too Full: This can cause overflow. Solution: Leave a small gap at the top of each cup.
- Not Using Enough Salt in the Caramel: This can make it taste overly sweet. Solution: Adjust the salt to your taste preference.
- Not Using a Non-Stick Muffin Tin: This can make removal difficult. Solution: Use silicone or grease the tin well.
Creative Variations & Customizations
- Nutty Delight: Add crushed nuts (like pecans or almonds) to the caramel for added crunch.
- Peppermint Twist: Incorporate crushed peppermint candies into the chocolate for a festive flavor.
- Spiced Caramel: Add a pinch of cinnamon or nutmeg to the caramel for a warm, holiday spice.
- Fruit Infusion: Mix in a bit of fruit puree (like raspberry or orange) into the caramel for a fruity twist.
- Vegan Version: Use dairy-free chocolate and coconut cream for a vegan-friendly treat.
Perfect Pairings: What to Serve With Christmas Chocolate Caramel Cups
- Sprinkle of Sea Salt: Enhances the flavor contrast and adds a gourmet touch.
- Cold Milk: Balances the sweetness and complements the chocolate.
- Warm Coffee or Hot Chocolate: Creates a cozy pairing for chilly evenings.
- Holiday Parties: Serve as a stunning dessert to impress guests.
- Gift Boxes: Include in homemade gift boxes for friends and family during the holiday season.
- Fresh Berries: Serve alongside for a tart contrast to the sweet cups.
- Vanilla Ice Cream: Pairs beautifully for an indulgent dessert experience.
- Topping for Cakes or Brownies: Use as a decadent topping for added flavor.
Storage & Meal Prep Instructions
- Fridge Storage: Store in an airtight container in the refrigerator for up to a week.
- Freezer Storage: For longer storage, freeze the cups in a single layer, then transfer to a freezer-safe container for up to a month.
- Reheating Methods: Allow to thaw in the refrigerator before serving; do not microwave as it may alter the texture.
Nutrition Facts & Health Insights
| Nutrient | Per Serving (1 cup) |
|---|---|
| Calories | 120 |
| Sugar | 10 grams |
| Sodium | 50 milligrams |
| Fat | 7 grams |
| Saturated Fat | 4 grams |
| Unsaturated Fat | 2 grams |
| Trans Fat | 0 grams |
| Carbohydrates | 15 grams |
| Fiber | 0 grams |
| Protein | 1 gram |
| Cholesterol | 10 milligrams |
Health Benefits of Key Ingredients
- Dark Chocolate: Rich in antioxidants and may improve heart health.
- Sea Salt: Enhances flavor and can help balance electrolytes.
- Butter: Provides essential fats and vitamins when consumed in moderation.
Frequently Asked Questions
- Can I use different types of chocolate?Yes, you can use dark or milk chocolate based on your preference.
- How long do these cups last?They can be stored in the refrigerator for up to a week.
- Can I make these cups dairy-free?Absolutely! Use dairy-free chocolate and coconut cream for the caramel.
- What if my caramel seizes?If this happens, gently reheat and stir until smooth.
- Can I add flavors to the chocolate?Yes, you can infuse the chocolate with extracts like vanilla or almond.
- How do I prevent the chocolate from cracking?Ensure the chocolate is melted properly and set in the refrigerator for the right amount of time.
- Can I use a different sweetener for the caramel?Yes, alternatives like honey or maple syrup can be used, but they may alter the flavor.
- What if I don’t have a mini muffin tin?You can use silicone molds or even ice cube trays as an alternative.
Final Inspiration & Kitchen Confidence
As you embark on making these Christmas Chocolate Caramel Cups, remember that the kitchen is a place of creativity and joy. Celebrate your achievements, whether it’s your first attempt or your hundredth. Each cup you create is a testament to your culinary skills and a gift of love to those you share them with. So gather your ingredients, put on your favorite holiday music, and let the magic of baking fill your home. You’ve got this!
Print
Christmas Chocolate Caramel Cups: Irresistibly Creamy Bliss!
- Total Time: 45 minutes
- Yield: 24 cups 1x
- Diet: Vegetarian
Description
These Christmas Chocolate Caramel Cups are a delightful treat that combines a smooth, rich chocolate shell with a gooey, buttery caramel center. Each bite melts in your mouth, offering a perfect balance of sweetness and a hint of salt that will leave you craving more.
Ingredients
- Chocolate Shell:
- 1 cup semi-sweet chocolate chips
- Caramel Filling:
- 1/2 cup granulated sugar
- 1/4 cup unsalted butter
- 1/4 cup heavy cream
- 1/2 teaspoon sea salt
Instructions
- In a microwave-safe bowl, melt the chocolate chips in 30-second intervals, stirring in between until smooth and fully melted.
- Using a spoon, coat the bottom and sides of a mini muffin tin with the melted chocolate, creating a shell. Place in the refrigerator for 10 minutes to set.
- In a saucepan over medium heat, combine the granulated sugar and butter. Stir until the mixture turns a golden brown color, about 5-7 minutes.
- Carefully add the heavy cream and sea salt to the caramel mixture, stirring continuously until smooth. Remove from heat and let cool for 5 minutes.
- Remove the chocolate shells from the refrigerator and fill each cup with the caramel mixture, leaving a little space at the top.
- Pour the remaining melted chocolate over the caramel to seal the cups. Refrigerate for an additional 15 minutes until fully set.
- Once set, gently pop the cups out of the muffin tin and serve.
Notes
- Make-ahead: These cups can be made up to a week in advance and stored in an airtight container in the refrigerator.
- Storage: Keep in a cool, dry place or refrigerate to maintain freshness.
- Substitutions: Use dark chocolate for a richer flavor or milk chocolate for a sweeter taste.
- Prep Time: 30 minutes
- Cook Time: 15 minutes
- Category: desserts
- Method: baking
- Cuisine: American
Nutrition
- Serving Size: 1 chocolate caramel cup
- Calories: 120
- Sugar: 10 grams
- Sodium: 50 milligrams
- Fat: 7 grams
- Saturated Fat: 4 grams
- Unsaturated Fat: 2 grams
- Trans Fat: 0 grams
- Carbohydrates: 15 grams
- Fiber: 0 grams
- Protein: 1 gram
- Cholesterol: 10 milligrams
Keywords: Christmas Chocolate Caramel Cups, chocolate cups, caramel dessert, holiday treats, sweet snacks, homemade candy, festive desserts, easy chocolate recipes, Christmas sweets, dessert recipes, chocolate lovers, caramel lovers, holiday baking, vegetarian desserts