Introduction to Chocolate Spider Web Cookies
Welcome to the delightful world of Chocolate Spider Web Cookies! These spooky treats are not just a feast for the taste buds; they’re a fantastic way to bring the family together during the Halloween season. I remember the first time I made these cookies with my kids; the kitchen was filled with laughter and the sweet aroma of chocolate wafting through the air. This DIY project is simple, fun, and oh-so-rewarding, making it perfect for busy moms and creative hobbyists alike. So, grab your aprons, and let’s create some magical memories with these delicious cookies!
Why You’ll Love This Chocolate Spider Web Cookies
These Chocolate Spider Web Cookies are the perfect blend of fun and flavor! Not only are they easy to make, but they also provide a wonderful opportunity to bond with your kids. Imagine the joy on their faces as they decorate their spooky treats! Plus, this affordable Halloween DIY craft allows for endless creativity, making it a relaxing and enjoyable experience for everyone involved. You’ll cherish these moments long after the cookies are gone!
Materials and Tools Needed for Chocolate Spider Web Cookies
To whip up these delightful Chocolate Spider Web Cookies, you’ll need a few essential materials and tools. First, unsalted butter and a mix of granulated and brown sugars create that perfect sweet base. Eggs and vanilla extract add richness and flavor, while all-purpose flour and cocoa powder give the cookies their delightful texture and chocolatey goodness.
Don’t forget the baking soda and salt, which are crucial for that perfect rise! Chocolate chips are a must for those gooey pockets of chocolate. For decorating, white chocolate and black icing or edible markers will help you create those spooky spider webs and details.
As for tools, a mixing bowl, whisk, spatula, and baking sheets lined with parchment paper are essential. If you’re looking for eco-friendly options, consider using reusable silicone baking mats instead of parchment paper. These materials not only make the process easier but also ensure your cookies turn out perfectly every time!
How to Make Chocolate Spider Web Cookies
Now that you’re all set with your materials, let’s dive into the fun part—making these delightful Chocolate Spider Web Cookies! This process is not just about baking; it’s about creating memories with your loved ones. I remember the first time I made these cookies with my kids; the kitchen was filled with laughter and the sweet aroma of chocolate. So, roll up your sleeves, and let’s get started!
Step 1: Preheat and Prepare
First things first, preheat your oven to 350°F (175°C). This step is crucial because a properly heated oven ensures that your cookies bake evenly. While the oven warms up, line your baking sheets with parchment paper. This not only prevents sticking but also makes cleanup a breeze—trust me, your future self will thank you!
Step 2: Cream the Butter and Sugars
In a large mixing bowl, cream together the softened butter, granulated sugar, and brown sugar until the mixture is light and fluffy. This step is like magic; the transformation from solid butter to a creamy blend is so satisfying! I love using a hand mixer for this, but a good old-fashioned whisk works just as well if you’re feeling strong!
Step 3: Add Eggs and Vanilla
Next, it’s time to add the eggs—one at a time. Mix well after each addition to ensure they’re fully incorporated. Then, stir in the vanilla extract. The sweet scent of vanilla wafting through the air is one of my favorite parts of baking. It’s like a warm hug for your senses!
Step 4: Combine Dry Ingredients
In another bowl, whisk together the flour, cocoa powder, baking soda, and salt. This step is essential for evenly distributing the leavening agent and ensuring your cookies rise perfectly. Plus, the rich cocoa powder adds a deep, chocolatey flavor that’s simply irresistible!
Step 5: Mix Wet and Dry Ingredients
Now, gradually add the dry ingredients to the wet mixture. Mix until just combined—overmixing can lead to tough cookies, and nobody wants that! Once combined, gently fold in the chocolate chips. This is where the magic happens; those little morsels will melt into gooey pockets of chocolate goodness!
Step 6: Shape the Cookies
Using a spoon or cookie scoop, drop spoonfuls of dough onto the prepared baking sheets, spacing them about 2 inches apart. This spacing is important because the cookies will spread as they bake. I like to imagine each cookie as a little chocolate treasure waiting to be discovered!
Step 7: Bake the Cookies
Pop the baking sheets into the oven and bake for 10-12 minutes, or until the edges are set. The center might look a little soft, but don’t worry; they’ll firm up as they cool. Let them cool on the baking sheets for a few minutes before transferring them to wire racks. The anticipation of waiting for them to cool is almost as sweet as the cookies themselves!
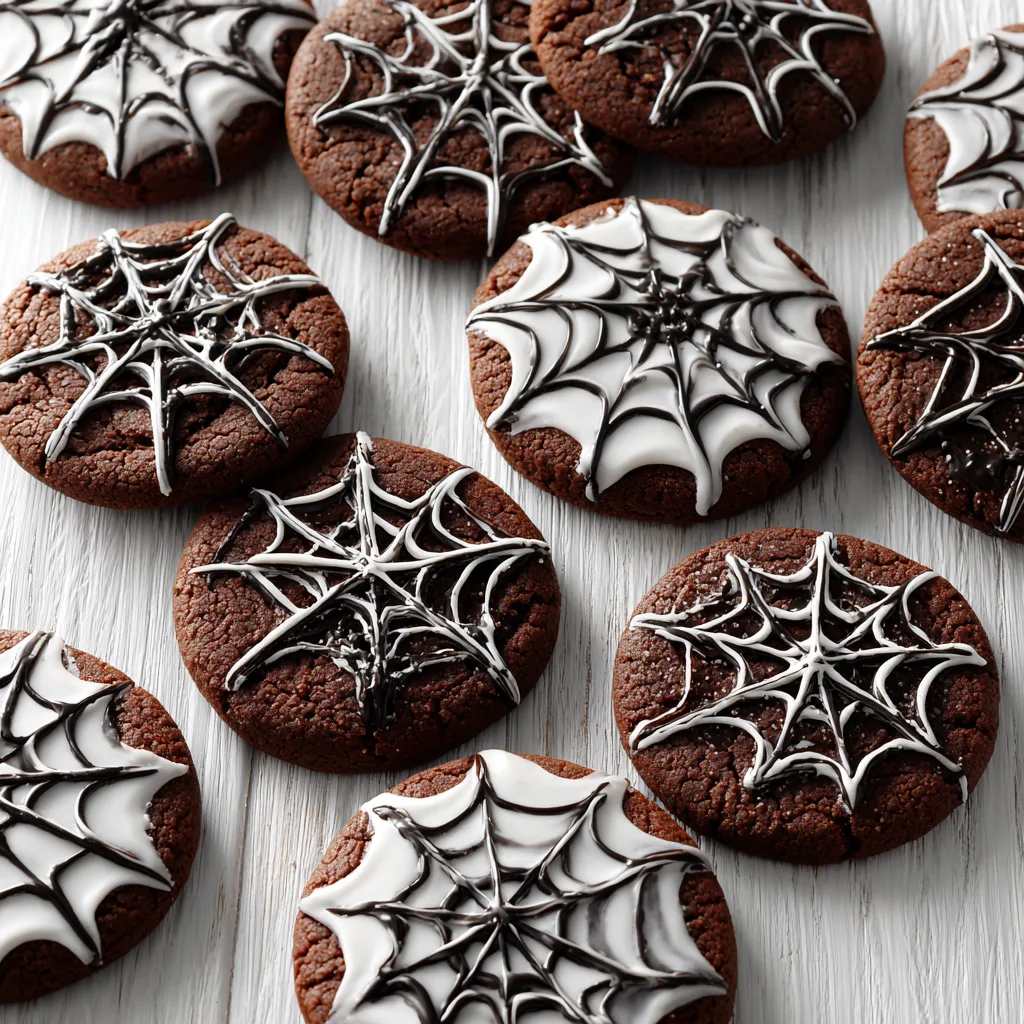
Step 8: Decorate with Spider Webs
Once your cookies are completely cool, it’s time to unleash your creativity! Melt the white chocolate and use it to create spider web designs on top of the cookies. I like to use a piping bag for this, but a zip-top bag with a corner snipped off works just as well. Then, grab your black icing or edible marker to add those spooky spider details. Watching the transformation from simple cookies to spooky treats is pure joy!
And there you have it—your very own Chocolate Spider Web Cookies! Not only are they delicious, but they also make for a fun family activity. I can’t wait to see how your cookies turn out!
Tips for Best Results
- For a richer chocolate flavor, opt for dark cocoa powder instead of regular cocoa.
- If your dough feels too sticky, chill it in the fridge for about 30 minutes before shaping.
- Always let the cookies cool completely before decorating to prevent the chocolate from melting.
- For added fun, try using gummy spiders or edible glitter to enhance your spooky designs!
- Remember to supervise younger kids around hot baking sheets and melted chocolate for safety.
Theme and Design Variations
- For a classic Halloween look, use orange and black icing to create vibrant spider webs.
- Try adding edible glitter to the white chocolate webs for a magical sparkle effect!
- Make mini versions of the cookies for a fun party treat that kids can easily grab.
- Incorporate seasonal flavors by adding a pinch of cinnamon or nutmeg to the dough for a fall twist.
- For a spooky twist, use green and purple icing to create a monster-themed cookie design!
Display and Use Ideas
- Arrange your Chocolate Spider Web Cookies on a spooky-themed platter for a festive centerpiece at your Halloween party.
- Package them in clear cellophane bags tied with orange ribbons for a delightful homemade gift for friends and neighbors.
- Use them as fun classroom treats during Halloween celebrations, sparking joy among students.
- Incorporate them into your fall decor by placing them in a decorative bowl on your kitchen counter.
FAQs about Chocolate Spider Web Cookies
Can I use a different type of chocolate for the spider web decoration?
Absolutely! While white chocolate creates a classic look, you can use milk chocolate or even colored candy melts for a fun twist. Just melt them down and pipe your designs as you would with white chocolate!
How do I store my Chocolate Spider Web Cookies?
To keep your cookies fresh, store them in an airtight container at room temperature. They should stay delicious for about a week. If you want to keep them longer, consider freezing them!
Can I make these cookies ahead of time?
Yes! You can bake the cookies a day or two in advance. Just wait until they’re completely cool before decorating. This way, you can enjoy the fun of decorating closer to your Halloween festivities!
What if my cookies spread too much while baking?
If your cookies spread too much, it could be due to warm dough or not enough flour. Make sure to chill the dough for about 30 minutes before baking, and double-check your measurements for accuracy!
Are these cookies suitable for kids to help make?
Definitely! These Chocolate Spider Web Cookies are a fantastic family-friendly craft. Just be sure to supervise younger children, especially around hot baking sheets and melted chocolate. It’s a great way to bond and create spooky treats together!
Final Thoughts
Creating Chocolate Spider Web Cookies is not just about baking; it’s about making memories that will last a lifetime. The joy of decorating these spooky treats with your loved ones is truly magical, and the satisfaction of seeing your delicious creations come to life is unmatched. I encourage you to gather your family, roll up your sleeves, and dive into this fun Halloween DIY craft. Don’t forget to share your cookie masterpieces with me—I can’t wait to see how your spooky treats turn out! Happy baking, and may your Halloween be filled with sweetness and creativity!
Print
Chocolate Spider Web Cookies: A Spooky Treat for Halloween Fun!
Description
Create delicious and spooky Chocolate Spider Web Cookies that are perfect for Halloween festivities. These cookies are not only tasty but also fun to decorate!
Instructions
- Preheat your oven to 350°F (175°C) and line baking sheets with parchment paper.
- In a large mixing bowl, cream together the softened butter, granulated sugar, and brown sugar until light and fluffy.
- Add the eggs one at a time, mixing well after each addition, then stir in the vanilla extract.
- In another bowl, whisk together the flour, cocoa powder, baking soda, and salt.
- Gradually add the dry ingredients to the wet mixture, mixing until just combined. Fold in the chocolate chips.
- Drop spoonfuls of dough onto the prepared baking sheets, spacing them about 2 inches apart.
- Bake for 10-12 minutes, or until the edges are set. Let them cool on the baking sheets for a few minutes before transferring to wire racks to cool completely.
- Once cooled, melt the white chocolate and use it to create spider web designs on top of the cookies.
- Use black icing or an edible marker to add spider details to the web.
- Category: Baking
Keywords: Chocolate Spider Web Cookies, Halloween cookies, spooky treats, chocolate cookies, Halloween baking