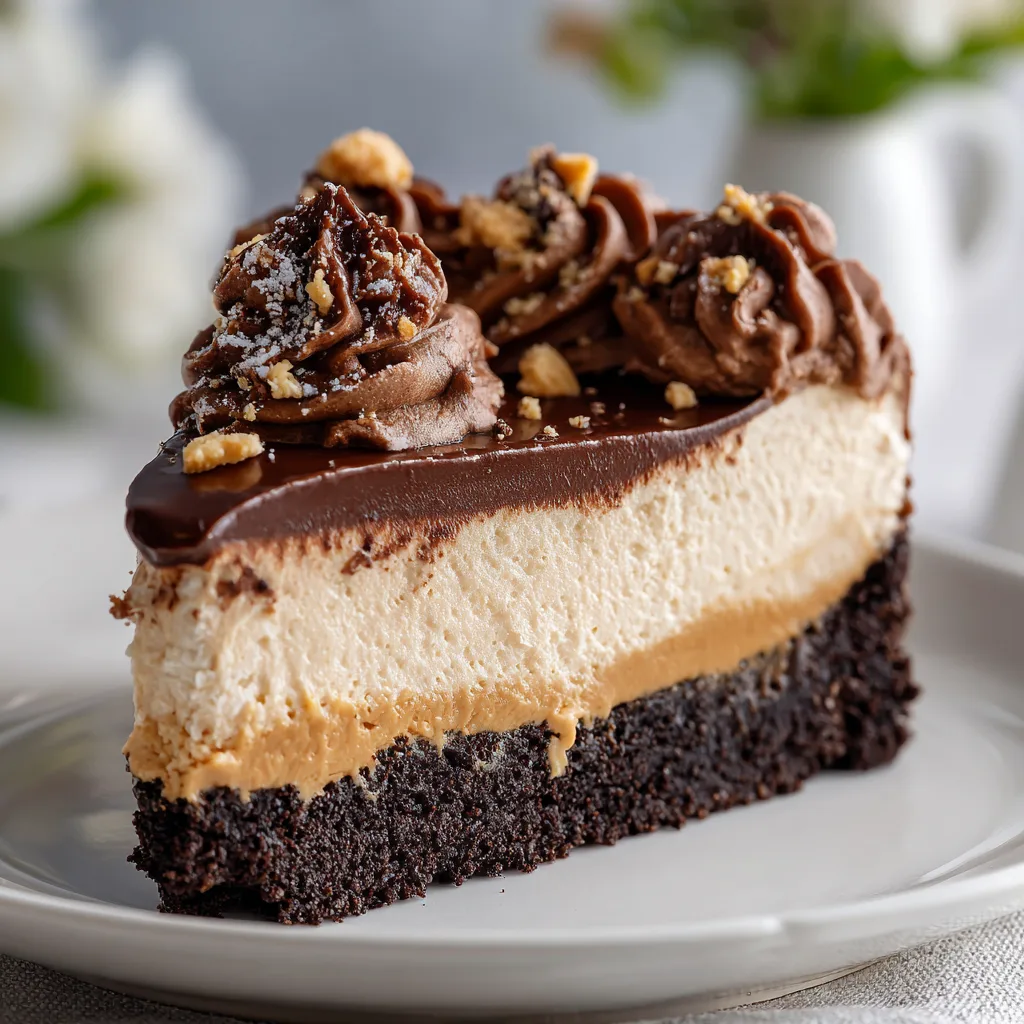
Introduction to Chocolate Peanut Butter Mousse Cake
As a busy mom, I know how precious time can be, especially when it comes to whipping up something special for my family. That’s why I absolutely adore this Chocolate Peanut Butter Mousse Cake! It’s a rich and creamy dessert that feels indulgent yet is surprisingly easy to make. Whether you’re celebrating a birthday, hosting a gathering, or just treating yourself after a long day, this no-bake cake is the perfect solution. Trust me, your loved ones will be begging for seconds, and you’ll love how little time it takes to create this decadent delight!
Why You’ll Love This Chocolate Peanut Butter Mousse Cake
This Chocolate Peanut Butter Mousse Cake is a dream come true for busy moms and professionals alike. It’s incredibly easy to whip up, requiring no baking at all! The combination of rich chocolate and creamy peanut butter creates a flavor explosion that will leave your taste buds dancing. Plus, it’s a showstopper that impresses guests without demanding hours in the kitchen. What’s not to love about a dessert that’s both simple and sensational?
Ingredients for Chocolate Peanut Butter Mousse Cake
Gathering the right ingredients is the first step to creating this delightful Chocolate Peanut Butter Mousse Cake. Here’s what you’ll need:
- Chocolate cookie crumbs: These form the base of your cake, providing a rich, chocolatey flavor. You can use store-bought crumbs or crush your favorite chocolate cookies at home.
- Unsalted butter: Melted butter helps bind the cookie crumbs together, creating a firm crust. Unsalted is best to control the overall saltiness of the dessert.
- Creamy peanut butter: This is the star of the show! It adds a luscious, nutty flavor that pairs perfectly with chocolate. Feel free to use natural or conventional peanut butter based on your preference.
- Powdered sugar: This sweetens the mousse and gives it a smooth texture. It dissolves easily, making it perfect for no-bake desserts.
- Heavy cream: Whipping cream is essential for achieving that light, airy texture in the mousse. It adds richness and creaminess that balances the flavors beautifully.
- Cream cheese: Softened cream cheese adds a tangy richness to the mousse. Make sure it’s at room temperature for easy mixing.
- Semi-sweet chocolate chips: These provide a deep chocolate flavor. You can swap them for dark chocolate chips if you prefer a more intense taste.
- Vanilla extract: A splash of vanilla enhances the overall flavor profile, making the mousse even more delicious.
For exact measurements, check the bottom of the article where you can find everything listed for easy printing. Happy baking!
How to Make Chocolate Peanut Butter Mousse Cake
Now that you have all your ingredients ready, let’s dive into the fun part—making this Chocolate Peanut Butter Mousse Cake! Follow these simple steps, and you’ll have a dessert that’s sure to impress.
Step 1: Preheat the Oven
Even though this is a no-bake cake, preheating the oven is essential for the crust if you decide to bake it. It helps the butter melt evenly, ensuring a well-combined mixture. Set your oven to 350°F (175°C) and let it warm up while you prepare the crust.
Step 2: Prepare the Crust
In a mixing bowl, combine your chocolate cookie crumbs with the melted butter. Stir until the crumbs are fully coated. This mixture should resemble wet sand. Now, press it firmly into the bottom of your springform pan. This step is crucial! A well-pressed crust will hold together beautifully when you slice into the cake.
Step 3: Make the Peanut Butter Mixture
In a separate bowl, beat the softened cream cheese and creamy peanut butter together until smooth. This is where the magic begins! Achieving a silky texture is key, as it sets the foundation for your mousse. You want it to be lump-free and creamy, so take your time with this step.
Step 4: Add Sweetness and Flavor
Next, add the powdered sugar and vanilla extract to the peanut butter mixture. Mix until everything is well combined. The powdered sugar not only sweetens the mousse but also helps create that velvety texture we all love. The vanilla adds a lovely depth of flavor, making each bite even more delightful.
Step 5: Whip the Cream
In another bowl, whip the heavy cream until stiff peaks form. This is a crucial step! Stiff peaks mean your mousse will be light and airy. If you’re unsure, just whip until the cream holds its shape when you lift the whisk. It should look fluffy and billowy, like a cloud of deliciousness!
Step 6: Combine the Mixtures
Now, gently fold the whipped cream into the peanut butter mixture. Use a spatula and be careful not to deflate the whipped cream. This folding technique is essential for keeping the mousse light and fluffy. You want to see swirls of cream and peanut butter, not a uniform color.
Step 7: Melt the Chocolate
In a microwave-safe bowl, melt the semi-sweet chocolate chips in short bursts, stirring in between. Once melted, let it cool slightly before folding it into the mousse. This step adds a rich chocolate flavor that perfectly complements the peanut butter. Just be sure it’s not too hot, or it might melt the whipped cream!
Step 8: Assemble the Cake
Pour the luscious mousse over the prepared crust in your springform pan. Use a spatula to spread it evenly, ensuring every corner is filled. This is where the magic happens! The layers of chocolate and peanut butter will create a stunning dessert that looks as good as it tastes.
Step 9: Refrigerate
Finally, cover the cake with plastic wrap and refrigerate for at least 4 hours, or until set. Chilling is vital for the mousse to firm up and hold its shape. Patience is key here! While you wait, you can dream about that first heavenly bite.
Tips for Success
- Make sure your cream cheese is at room temperature for easy mixing.
- Use a rubber spatula for folding; it helps maintain the mousse’s light texture.
- Chill your mixing bowls and beaters before whipping the cream for better results.
- Don’t rush the melting chocolate; go slow to avoid burning it.
- For a fun twist, add crushed peanuts on top before serving!
Equipment Needed
- Springform pan: Essential for easy removal. If you don’t have one, a regular cake pan works too, but be careful when serving.
- Mixing bowls: Use a variety of sizes for different steps. Glass or stainless steel are great options.
- Electric mixer: A hand mixer is perfect for whipping cream. A whisk can work too, but it’ll take longer.
- Spatula: A rubber spatula is ideal for folding ingredients without deflating the mousse.
Variations
- Nut-Free Option: Substitute creamy peanut butter with sunflower seed butter for a nut-free version that’s just as delicious.
- Vegan Twist: Use coconut cream instead of heavy cream and a vegan cream cheese alternative. Swap the chocolate chips for dairy-free ones.
- Gluten-Free Delight: Use gluten-free chocolate cookie crumbs to make this dessert suitable for gluten-sensitive friends and family.
- Flavor Infusion: Add a pinch of sea salt to the mousse for a delightful sweet-salty contrast that enhances the flavors.
- Fruit Layer: Incorporate a layer of fresh raspberries or strawberries between the crust and mousse for a fruity twist!
Serving Suggestions
- Pair with a dollop of whipped cream on top for extra creaminess.
- Serve alongside fresh berries for a pop of color and tartness.
- Drizzle with chocolate sauce for an indulgent touch.
- Enjoy with a cup of coffee or a glass of milk to balance the sweetness.
- Garnish with crushed peanuts for added texture and flavor.
FAQs about Chocolate Peanut Butter Mousse Cake
Can I make this Chocolate Peanut Butter Mousse Cake ahead of time?
Absolutely! This no-bake cake is perfect for making ahead. Just prepare it the day before and let it chill overnight. It will be even more delicious the next day!
How do I store leftovers?
Store any leftovers in the refrigerator, covered with plastic wrap or in an airtight container. It should stay fresh for up to 3 days, but trust me, it won’t last that long!
Can I use natural peanut butter?
Yes, you can! Just keep in mind that natural peanut butter may have a different texture. Stir it well before using to ensure it mixes smoothly into the mousse.
What can I substitute for heavy cream?
If you’re looking for a lighter option, you can use whipped coconut cream. It will give a similar texture and a hint of coconut flavor, making it a delightful alternative!
Is this dessert suitable for kids?
Definitely! Kids love the combination of chocolate and peanut butter. Just be cautious if there are any nut allergies in the group. Otherwise, it’s a fun and tasty treat for all ages!
Final Thoughts
Creating this Chocolate Peanut Butter Mousse Cake is more than just baking; it’s about sharing joy with those you love. The rich, creamy layers of chocolate and peanut butter come together to create a dessert that feels like a warm hug. Whether it’s a special occasion or a simple family dinner, this cake brings smiles and satisfied sighs. Plus, the ease of preparation means you can focus on what truly matters—making memories with your loved ones. So, roll up your sleeves, dive into this delightful recipe, and let the sweet moments unfold!
Print
Chocolate Peanut Butter Mousse Cake: A Decadent Delight!
- Total Time: 4 hours 30 minutes
- Yield: 8 servings 1x
- Diet: Vegetarian
Description
A rich and creamy chocolate peanut butter mousse cake that is perfect for any dessert lover.
Ingredients
- 1 cup chocolate cookie crumbs
- 1/2 cup unsalted butter, melted
- 1 cup creamy peanut butter
- 1 cup powdered sugar
- 1 cup heavy cream
- 8 oz cream cheese, softened
- 1 cup semi-sweet chocolate chips
- 1 tsp vanilla extract
Instructions
- Preheat the oven to 350°F (175°C).
- In a bowl, mix chocolate cookie crumbs and melted butter until combined.
- Press the mixture into the bottom of a springform pan to form the crust.
- In a separate bowl, beat the cream cheese and peanut butter until smooth.
- Add powdered sugar and vanilla extract, mixing until well combined.
- In another bowl, whip the heavy cream until stiff peaks form.
- Gently fold the whipped cream into the peanut butter mixture.
- Melt the chocolate chips and let cool slightly, then fold into the mousse mixture.
- Pour the mousse over the crust in the springform pan.
- Refrigerate for at least 4 hours or until set.
- Serve chilled and enjoy!
Notes
- For a richer flavor, use dark chocolate chips.
- Make sure the cream cheese is at room temperature for easier mixing.
- Top with additional whipped cream or chocolate shavings if desired.
- Prep Time: 30 minutes
- Cook Time: 0 minutes
- Category: Dessert
- Method: No-bake
- Cuisine: American
Nutrition
- Serving Size: 1 slice
- Calories: 450
- Sugar: 30g
- Sodium: 200mg
- Fat: 30g
- Saturated Fat: 15g
- Unsaturated Fat: 10g
- Trans Fat: 0g
- Carbohydrates: 40g
- Fiber: 2g
- Protein: 6g
- Cholesterol: 50mg
Keywords: Chocolate Peanut Butter Mousse Cake, dessert, no-bake cake, chocolate cake, peanut butter dessert