Introduction to Candy Sushi Rolls
Welcome to the whimsical world of Candy Sushi Rolls! If you’re looking for a fun and easy way to create edible art with your kids, you’ve come to the right place. This delightful DIY project is not only a treat for the taste buds but also a fantastic way to bond with your little ones. I remember the joy on my kids’ faces as we rolled up colorful fruit and candy, transforming simple ingredients into a playful masterpiece. So, grab your supplies, and let’s dive into this sweet adventure that’s perfect for any occasion!
Why You’ll Love This Candy Sushi Rolls
There’s something truly magical about making Candy Sushi Rolls with your kids. Not only is it an affordable and easy craft, but it also sparks creativity and imagination. As we roll and create, I find that it’s a wonderful way to relax and bond. Plus, the joy of seeing their faces light up when they taste their creations is priceless. It’s a sweet experience that brings families together!
Materials and Tools Needed for Candy Sushi Rolls
Before we embark on our candy sushi adventure, let’s gather our materials and tools! Here’s what you’ll need:
- Fruit roll-ups: These colorful sheets are the star of the show! They provide a sweet and chewy base for your sushi rolls. Choose a variety of flavors to make your creations even more vibrant.
- Rice Krispies or puffed rice cereal: This crunchy layer mimics the rice in traditional sushi and adds a delightful texture. Plus, it’s a fun way to incorporate some cereal into your treats!
- Gummy candies: Think gummy worms, fish, or any of your favorite candies! They add a burst of color and flavor, making each bite a delightful surprise.
- Chocolate syrup or melted chocolate: This is the cherry on top! A drizzle of chocolate enhances the flavor and makes your candy sushi rolls look even more tempting.
- Plastic wrap: Essential for keeping your workspace clean and helping you roll the sushi without sticking. It’s a simple tool that makes a big difference!
- Sharp knife: You’ll need this for slicing your rolls into bite-sized pieces. Just be sure to supervise the little ones during this step!
- Cutting board: A sturdy surface for cutting your sushi rolls. It protects your countertops and makes the process easier.
Gathering these materials is part of the fun! Plus, many of these items are budget-friendly and can be found at your local grocery store. Let’s get ready to create some delicious edible art!
How to Make Candy Sushi Rolls
Creating Candy Sushi Rolls is not just a fun activity; it’s a delightful way to unleash your creativity and bond with your kids. I remember the first time I made these colorful treats with my little ones. The kitchen was filled with laughter, and the soft shimmer of the fruit roll-ups felt magical as we transformed them into edible art. Let’s dive into the step-by-step process of making these delicious rolls!
Step 1: Prepare Your Workspace
Start by laying a sheet of plastic wrap on a clean surface. This will be your canvas for the candy sushi rolls. The plastic wrap not only keeps things tidy but also helps in rolling the sushi without sticking. Trust me, a clean workspace makes all the difference!
Step 2: Lay Down the Fruit Roll-Up
Next, place a fruit roll-up on the plastic wrap, smoothing it out for an even base. Choose your favorite flavor—strawberry, grape, or even tropical! The vibrant colors will make your sushi rolls pop, and the sweet aroma will get everyone excited.
Step 3: Add Rice Krispies
Now, spread a thin layer of Rice Krispies over the fruit roll-up, leaving a small border around the edges. This crunchy layer adds texture and mimics the rice in traditional sushi. Plus, it’s a great way to sneak in some fun while keeping it simple!
Step 4: Place the Gummy Candies
Here comes the fun part! Add gummy candies in a line across the center of the Rice Krispies. You can use gummy worms, fish, or any candy that tickles your fancy. The colorful candies will create a delightful surprise when you take a bite!
Step 5: Roll It Up
Carefully roll the fruit roll-up tightly from one end to the other, using the plastic wrap to help shape it. This is where the magic happens! As you roll, feel free to channel your inner sushi chef. Just remember to keep it tight but not too tight—nobody wants a squished sushi roll!
Step 6: Chill to Set
Once rolled, wrap the sushi roll in the plastic wrap and refrigerate for about 10 minutes to set. This step is crucial as it helps the roll hold its shape. While you wait, you can clean up your workspace or even sneak a gummy candy or two!
Step 7: Slice and Serve
Remove from the fridge, unwrap, and slice into bite-sized pieces with a sharp knife. The anticipation builds as you reveal the colorful insides! Each slice is like a little piece of art, and I guarantee your kids will be thrilled to see their creations.
Step 8: Drizzle with Chocolate
Finally, drizzle with chocolate syrup for added flavor and presentation. This step is optional, but who can resist a little chocolate? It adds a rich touch that complements the sweetness of the candy sushi rolls beautifully. Now, you’re ready to serve these delightful treats!
Tips for Best Results
- Experiment with different types of candies for unique flavors and textures. Try adding chocolate-covered pretzels for a salty-sweet twist!
- Use a variety of fruit roll-up flavors for colorful sushi. Mixing tropical and berry flavors can create a vibrant rainbow effect!
- For a healthier option, consider using dried fruits instead of gummy candies. Dried apricots or mango slices can add a chewy texture.
- Make it a fun activity by letting kids create their own combinations! Encourage them to think outside the box and come up with wild flavor pairings.
Theme and Design Variations
- Seasonal Themes: Get festive by using red and green fruit roll-ups for Christmas, or pastel colors for Easter. You can even create spooky versions with orange and black for Halloween!
- Colorful Combinations: Mix and match different fruit roll-up flavors for a vibrant look. Think tropical mango with berry blast for a fun flavor explosion!
- Kid-Friendly Versions: Let kids choose their favorite candies to personalize their sushi rolls. This way, they can create their own unique masterpieces that reflect their tastes!
Display and Use Ideas
Once you’ve created your delightful Candy Sushi Rolls, the fun doesn’t stop there! Here are some creative ways to use, display, or gift your edible art:
- Serve at birthday parties: These colorful treats make a fun and interactive dessert that kids will love!
- Use as a creative snack: Pack them in school lunches for a surprise that will brighten your child’s day.
- Gift in a decorative box: Present them as a unique treat for friends or family, perfect for any occasion.
- Display on a colorful platter: Arrange them for festive occasions, adding a pop of color to your table setting.
FAQs about Candy Sushi Rolls
As you embark on your candy sushi adventure, you might have a few questions. Don’t worry; I’ve got you covered! Here are some common queries about making these delightful treats:
- Can I use other types of candy?
Absolutely! Feel free to experiment with different gummy candies or even chocolate pieces. The more creative you get, the more fun your candy sushi rolls will be! - How long do they last?
Candy sushi rolls are best enjoyed fresh, but they can be stored in the fridge for a couple of days. Just make sure to keep them wrapped to maintain their deliciousness! - Is this a safe activity for kids?
Yes, it’s a safe and fun activity! However, adult supervision is recommended, especially when using sharp knives for slicing. Safety first, but fun is a close second! - Can I make these ahead of time?
Yes! You can prepare the rolls in advance and store them in the fridge. Just remember to slice them right before serving for the best presentation! - What if I don’t have fruit roll-ups?
No worries! You can substitute with other chewy candies like taffy or even thin sheets of marshmallow. Get creative with what you have on hand!
Final Thoughts
Making Candy Sushi Rolls is not just about creating a tasty treat; it’s about the joy of crafting together and the laughter shared in the kitchen. I can still hear my kids giggling as they rolled their creations, and the satisfaction of seeing their colorful sushi rolls come to life was priceless. I encourage you to gather your supplies and dive into this fun project with your family. Don’t forget to share your delicious results! I can’t wait to see the unique combinations you come up with. Happy crafting and enjoy your edible art adventure!
Print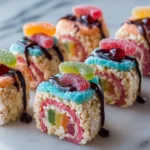
Candy Sushi Rolls: Discover Fun and Easy Ways to Create Edible Art!
Description
Create delicious and colorful candy sushi rolls that are not only fun to make but also a treat to eat! Perfect for parties or a fun family activity.
Instructions
- Lay a sheet of plastic wrap on a clean surface.
- Place a fruit roll-up on the plastic wrap, smoothing it out.
- Spread a thin layer of Rice Krispies over the fruit roll-up, leaving a small border around the edges.
- Add gummy candies in a line across the center of the Rice Krispies.
- Carefully roll the fruit roll-up tightly from one end to the other, using the plastic wrap to help shape it.
- Once rolled, wrap the sushi roll in the plastic wrap and refrigerate for about 10 minutes to set.
- Remove from the fridge, unwrap, and slice into bite-sized pieces with a sharp knife.
- Drizzle with chocolate syrup for added flavor and presentation.
- Category: Food Craft
Keywords: Candy Sushi, Edible Art, Kids Craft, Fun Food, DIY Candy