Burnt Basque Cheesecake: Creamy, Caramelized Bliss Awaits!
Sensory-Rich Introduction with Immediate Craving
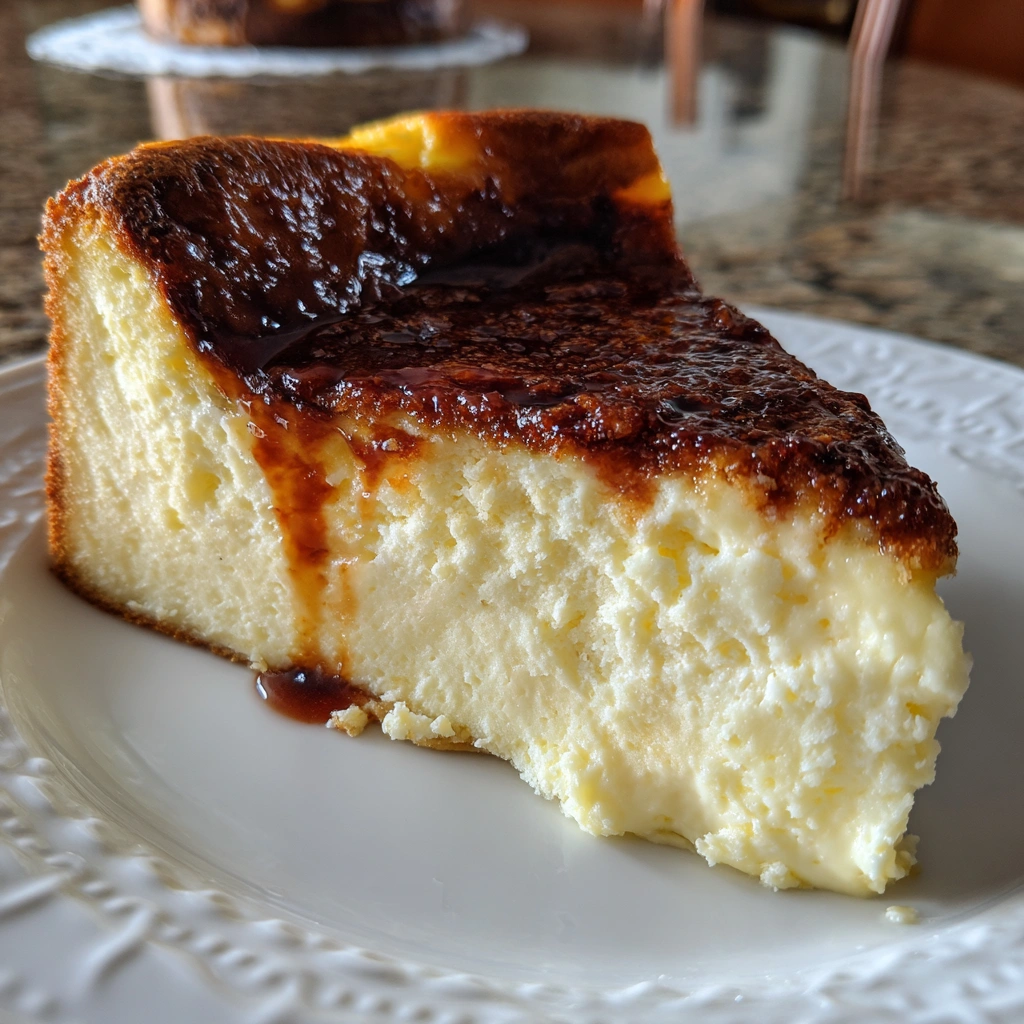
Imagine slicing into a Burnt Basque Cheesecake, the knife gliding effortlessly through its velvety, creamy center. As you lift a piece onto your plate, the rich aroma of caramelized sugar wafts through the air, teasing your senses. The top, a deep mahogany hue, hints at the delightful bitterness that perfectly balances the sweetness of the filling. This dessert is not just a treat; it’s an experience that evokes memories of sun-soaked Spanish afternoons, where every bite transports you to a quaint café in San Sebastián. Whether celebrating a special occasion or simply indulging on a quiet evening, this cheesecake is the perfect companion, promising to impress your guests and satisfy your cravings.
Why You’ll Love This Burnt Basque Cheesecake
- Texture Contrast: The creamy interior juxtaposed with the slightly charred top creates a delightful mouthfeel that keeps each bite interesting.
- Flavor Balance: The sweetness of the cheesecake is beautifully offset by the caramelized bitterness of the crust, making it a complex yet harmonious dessert.
- Versatility: This cheesecake can be served plain or dressed up with various toppings, making it suitable for any occasion.
- Ease of Preparation: With minimal ingredients and no crust to worry about, this recipe is straightforward and beginner-friendly.
- Universal Appeal: Its rich flavor and creamy texture make it a crowd-pleaser, appealing to both cheesecake lovers and those new to this classic dessert.
Essential Tools & Preparation Strategy
- 9-inch Springform Pan: Essential for easy removal and presentation of the cheesecake.
- Mixing Bowls: Needed for combining ingredients smoothly; opt for glass or stainless steel for durability.
- Electric Mixer: Ensures a creamy texture without lumps; a hand mixer works just as well if you don’t have a stand mixer.
- Parchment Paper: Helps prevent sticking and simplifies cleanup; use it generously to line the pan.
- Spatula: Useful for scraping down the sides of the bowl and smoothing the batter into the pan.
- Oven Thermometer: Ensures accurate baking temperatures, crucial for achieving the perfect burnt top.
- Cooling Rack: Allows the cheesecake to cool evenly, preventing cracks and ensuring a smooth texture.
- Measuring Cups and Spoons: Accurate measurements are key to achieving the right balance of flavors.
Ingredients & Their Roles in This Burnt Basque Cheesecake
Cheese Filling
- Cream Cheese (2 cups): The base of the cheesecake, providing creaminess and richness.
- Heavy Cream (1 cup): Adds a luxurious texture and enhances the cheesecake’s richness.
- Granulated Sugar (3/4 cup): Sweetens the filling and contributes to the caramelization of the top.
- Eggs (3 large): Bind the ingredients together and provide structure.
- Vanilla Extract (1 teaspoon): Adds depth of flavor and enhances the overall taste.
- All-Purpose Flour (1 tablespoon): Aids in stabilizing the filling; can be substituted with gluten-free flour for a gluten-free option.
No Crust Needed
This cheesecake is unique in that it requires no crust, allowing the creamy filling to shine.
Step-by-Step Guide to Perfect Burnt Basque Cheesecake
- Preheat the Oven: Set your oven to 400°F (200°C) to ensure it’s hot enough for the cheesecake to bake evenly.
- Mix the Cream Cheese: In a large mixing bowl, beat the softened cream cheese until smooth and creamy, ensuring there are no lumps.
- Combine Ingredients: Add the heavy cream, sugar, eggs, vanilla extract, and flour, mixing until fully combined and smooth.
- Prepare the Pan: Line a 9-inch springform pan with parchment paper, ensuring it extends above the rim for easy removal.
- Pour the Batter: Carefully pour the cheesecake batter into the prepared pan, smoothing the top with a spatula.
- Bake: Place the pan in the preheated oven and bake for 50-60 minutes, or until the top is deeply browned and the center is slightly jiggly.
- Cool: Remove from the oven and let it cool at room temperature for at least 1 hour before refrigerating for at least 4 hours or overnight.
- Serve: Once chilled, carefully remove the cheesecake from the springform pan and slice to serve.
Chef’s Notes & Pro Tips for Flawless Results
- Make-Ahead Instructions: This cheesecake can be made up to 2 days in advance; store it covered in the refrigerator.
- Storage: Leftovers can be stored in an airtight container in the fridge for up to 5 days.
- Equipment Recommendations: A high-quality electric mixer will yield the best texture; consider investing in one if you bake often.
- Customization Options: Feel free to experiment with flavorings, such as lemon zest or almond extract, to personalize your cheesecake.
Avoid These Common Cooking Mistakes
- Overmixing the Batter: Can lead to a dense cheesecake; mix just until combined.
- Baking at Too High a Temperature: Can burn the top too quickly; stick to the recommended temperature.
- Not Letting It Cool Properly: Can result in cracks; allow it to cool at room temperature first.
- Skipping the Refrigeration Step: Affects the texture; always chill for at least 4 hours.
- Using Cold Ingredients: Can lead to lumps; ensure all ingredients are at room temperature.
- Not Lining the Pan Properly: Can cause sticking; use parchment paper generously.
- Cutting Into It Too Soon: Can affect the structure; wait until fully chilled.
Creative Variations & Customizations
- Gluten-Free Option: Substitute all-purpose flour with a gluten-free alternative.
- Chocolate Swirl: Add melted chocolate to the batter for a rich chocolate version.
- Fruit Topping: Top with fresh berries or a berry compote for a refreshing contrast.
- Nutty Flavor: Incorporate ground nuts into the batter for added texture and flavor.
- Seasonal Spices: Add cinnamon or nutmeg for a warm, spiced version during the holidays.
Perfect Pairings: What to Serve With Burnt Basque Cheesecake
- Caramel Sauce: A drizzle adds sweetness and enhances the caramelized flavor.
- Fresh Berries: Raspberries or strawberries provide a tart contrast to the rich cheesecake.
- Whipped Cream: A dollop adds extra creaminess and lightens the dessert.
- Espresso: The bitterness of coffee balances the richness of the cheesecake.
- Vanilla Ice Cream: A scoop adds a delightful creaminess and temperature contrast.
- Sea Salt: A sprinkle enhances the flavors and adds a gourmet touch.
- Dessert Wine: A glass of sweet dessert wine elevates the dining experience.
- Chocolate Sauce: For chocolate lovers, this pairing is a match made in heaven.
Storage & Meal Prep Instructions
- Refrigeration: Store the cheesecake in an airtight container in the fridge for up to 5 days.
- Freezing: For longer storage, wrap the cheesecake tightly in plastic wrap and foil, then freeze for up to 2 months. Thaw in the refrigerator before serving.
- Reheating: Serve chilled; if desired, let it sit at room temperature for 30 minutes before serving for optimal texture.
Nutrition Facts & Health Insights
| Nutrient | Amount per Serving (1 slice) |
|---|---|
| Calories | 450 |
| Sugar | 30 grams |
| Sodium | 300 milligrams |
| Fat | 35 grams |
| Saturated Fat | 20 grams |
| Unsaturated Fat | 10 grams |
| Trans Fat | 0 grams |
| Carbohydrates | 30 grams |
| Fiber | 0 grams |
| Protein | 6 grams |
| Cholesterol | 150 milligrams |
Health Insights: The cream cheese and heavy cream provide calcium and protein, while the absence of a crust reduces unnecessary carbohydrates, making this a rich yet satisfying dessert.
Frequently Asked Questions
- Can I use low-fat cream cheese?: While you can, it may affect the texture and richness of the cheesecake.
- How do I know when the cheesecake is done?: The top should be deeply browned, and the center should be slightly jiggly.
- Can I make this cheesecake dairy-free?: Substitute cream cheese and heavy cream with dairy-free alternatives, but results may vary.
- What if I don’t have a springform pan?: You can use a regular cake pan, but be cautious when removing the cheesecake.
- How long can I store leftovers?: In an airtight container, it can last up to 5 days in the fridge.
- Can I freeze the cheesecake?: Yes, wrap it tightly and freeze for up to 2 months.
- What’s the best way to cut the cheesecake?: Use a hot knife for clean slices; dip it in hot water and wipe it dry before cutting.
- Can I add flavors to the cheesecake?: Absolutely! Experiment with citrus zest or extracts for a unique twist.
Final Inspiration & Kitchen Confidence
As you embark on your journey to create the perfect Burnt Basque Cheesecake, remember that every great chef started as a beginner. Embrace the process, celebrate your successes, and don’t be afraid to make it your own. Each cheesecake you bake is a step towards mastering this delightful dessert. So gather your ingredients, preheat that oven, and let the creamy, caramelized bliss of Burnt Basque Cheesecake inspire your culinary adventures!
Print
Burnt Basque Cheesecake: Creamy, Caramelized Bliss Awaits!
- Total Time: 80 minutes plus chilling time
- Yield: 8 servings 1x
- Diet: Vegetarian
Description
Indulge in the rich, creamy texture of Burnt Basque Cheesecake, where the velvety filling contrasts beautifully with the slightly charred, caramelized top. Each bite offers a delightful balance of sweetness and a hint of bitterness, creating a unique flavor experience that lingers on the palate.
Ingredients
- Cheese Filling:
- 2 cups cream cheese, softened
- 1 cup heavy cream
- 3/4 cup granulated sugar
- 3 large eggs
- 1 teaspoon vanilla extract
- 1 tablespoon all-purpose flour
- For the Crust:
- No crust needed for this recipe!
Instructions
- Preheat your oven to 400°F (200°C).
- In a large mixing bowl, beat the softened cream cheese until smooth and creamy.
- Add the heavy cream, sugar, eggs, vanilla extract, and flour, mixing until fully combined and smooth.
- Line a 9-inch springform pan with parchment paper, ensuring it extends above the rim.
- Pour the cheesecake batter into the prepared pan.
- Bake in the preheated oven for 50-60 minutes, or until the top is deeply browned and the center is slightly jiggly.
- Remove from the oven and let it cool at room temperature for at least 1 hour before refrigerating for at least 4 hours or overnight.
Notes
- This cheesecake can be made up to 2 days in advance; store it covered in the refrigerator.
- For a gluten-free option, ensure the flour is replaced with a gluten-free alternative.
- Leftovers can be stored in an airtight container in the fridge for up to 5 days.
- Prep Time: 20 minutes
- Cook Time: 60 minutes
- Category: desserts
- Method: baking
- Cuisine: Spanish
Nutrition
- Serving Size: 1 slice (1/8 of the cheesecake)
- Calories: 450
- Sugar: 30 grams
- Sodium: 300 milligrams
- Fat: 35 grams
- Saturated Fat: 20 grams
- Unsaturated Fat: 10 grams
- Trans Fat: 0 grams
- Carbohydrates: 30 grams
- Fiber: 0 grams
- Protein: 6 grams
- Cholesterol: 150 milligrams
Keywords: Burnt Basque Cheesecake, creamy cheesecake, Spanish dessert, easy cheesecake recipe, no crust cheesecake, caramelized cheesecake, rich dessert, homemade cheesecake, decadent dessert, cheesecake with berries, dessert wine pairing, gluten-free cheesecake option