
Introduction to Bubble Wrap Painting
Welcome to the whimsical world of bubble wrap painting! This delightful DIY craft is not only a fantastic way to unleash your creativity, but it also brings a splash of color and joy to your day. Whether you’re a busy mom looking for a fun activity with the kids or a teacher seeking engaging classroom projects, bubble wrap painting is the perfect solution. It’s simple, safe, and oh-so-rewarding! Imagine the thrill of watching vibrant colors pop onto the canvas, creating unique textures that are as fun to make as they are to admire. Let’s dive into this colorful adventure together!
Why You’ll Love This Bubble Wrap Painting
Bubble wrap painting is a delightful blend of creativity and fun that everyone can enjoy! It’s incredibly easy to set up, making it a perfect choice for busy moms and teachers alike. Plus, it’s budget-friendly—who doesn’t love a craft that won’t break the bank? As you create, you’ll find relaxation in the process, and it’s a wonderful way to bond with your kids. Together, you’ll make memories that are as vibrant as your artwork!
Materials and Tools Needed for Bubble Wrap Painting
Before we jump into the fun of bubble wrap painting, let’s gather our materials! Here’s what you’ll need:
- Bubble wrap: This is the star of the show! It creates those delightful textures and patterns that make your artwork pop.
- Paint (acrylic or tempera): Choose vibrant colors that inspire you. Acrylics are great for their boldness, while tempera is perfect for kids due to its easy cleanup.
- Paintbrushes: A variety of brushes will help you apply paint in different ways. I love using both wide and fine brushes for unique effects!
- Paper or canvas: This is your canvas for creativity! Use thick paper for a sturdy base or canvas for a more professional look.
- Plate or palette for mixing paint: A simple plate works wonders for mixing colors. It’s all about getting those hues just right!
- Scissors: You’ll need these to cut your bubble wrap into fun shapes and sizes. Safety first—make sure to supervise little hands!
- Apron or old clothes: Protect your clothes from paint splatters. Trust me, you’ll want to keep your favorite outfit safe!
Gathering these materials is part of the fun! Plus, many of these items can be found around your home or at your local craft store without breaking the bank. Let’s get ready to create some vibrant art!
How to Make Bubble Wrap Painting
Now that you’re excited about bubble wrap painting, let’s dive into the fun part! This step-by-step guide will walk you through the process, ensuring you create vibrant art that’s bursting with personality. Grab your materials, and let’s get started!
Step 1: Prepare Your Materials
First things first, let’s set the stage for our creative adventure! Gather all your materials and find a clean, spacious area to work in. I like to lay down some old newspapers or a plastic tablecloth to catch any paint spills. Don your apron or old clothes—trust me, you’ll want to protect your favorite outfit from those sneaky splatters!
Step 2: Cut the Bubble Wrap
Next, take your bubble wrap and cut it to the size you want for your project. You can go for a classic rectangle or get creative with fun shapes like circles or stars. The size and shape of your bubble wrap will affect the texture of your artwork, so feel free to experiment! I love using different sizes to create a layered look. Remember, the more unique the shape, the more interesting your final piece will be!
Step 3: Apply Paint to the Bubble Wrap
Now comes the colorful part! Pour a few different colors of paint onto your plate or palette. Using a paintbrush, apply the paint directly onto the bubble wrap, making sure to cover it completely. The soft shimmer of the paint glistening on the bubbles is like a mini masterpiece waiting to happen! Don’t be shy—mix colors right on the bubble wrap for a marbled effect that’s sure to impress. This is where your creativity can really shine!
Step 4: Transfer the Paint
It’s time to transfer your vibrant creation! Press the painted bubble wrap onto your paper or canvas, applying even pressure. This step is crucial for getting the best results, so take your time. I like to think of it as giving the bubble wrap a gentle hug! Once you lift it off, you’ll be greeted with a stunning texture and pattern that feels like magic. If you notice any spots that didn’t transfer well, don’t worry—just touch them up with a brush!
Step 5: Reveal Your Artwork
Lift the bubble wrap to unveil your unique artwork! The excitement of seeing the design come to life is one of my favorite parts. Take a moment to admire your creation and feel proud of your artistic flair. If you’re crafting with kids, encourage them to share their thoughts and feelings about their artwork—it’s a great bonding experience! You might even inspire them to create their own stories around their art.
Step 6: Layering Techniques
Want to take your artwork to the next level? Repeat the process with different colors and bubble wrap shapes to create a layered effect. Overlapping designs can add depth and interest to your piece. I often find that the more I layer, the more vibrant and dynamic the final artwork becomes. Don’t hesitate to mix and match—let your creativity run wild! You can even try using different textures, like sponges or fabric, to see how they change the look.
Step 7: Drying and Displaying
Once you’re satisfied with your masterpiece, it’s time to let it dry completely. Patience is key here! I usually set my artwork aside for a couple of hours to ensure it’s fully dry before displaying or framing it. Once it’s ready, find a special spot in your home to showcase your vibrant art. You’ll be amazed at how a simple bubble wrap painting can brighten up a room! Plus, it’s a wonderful conversation starter when guests come over.
Tips for Best Results
- Experiment with different sizes and shapes of bubble wrap for varied textures. The more unique the shape, the more interesting your artwork will be!
- Try using sponges or brushes to apply paint for different effects. Each tool can create a distinct look that adds character to your piece.
- Mix colors on the bubble wrap for a marbled look. This technique can create stunning visual effects that are sure to impress!
- Use the project as a fun way to teach kids about color mixing and patterns. It’s a fantastic opportunity for learning while having fun!
Theme and Design Variations
One of the best parts of bubble wrap painting is how versatile it is! You can easily adapt your color schemes and themes to match the seasons or special occasions. Here are some fun ideas to inspire your next project:
- Bright colors for summer themes: Think sunny yellows, vibrant pinks, and ocean blues to capture the essence of summer fun!
- Earth tones for autumn-inspired art: Use warm oranges, deep reds, and rich browns to reflect the beauty of fall foliage.
- Pastel shades for spring designs: Soft pinks, light blues, and gentle greens can evoke the freshness of blooming flowers.
- Holiday-themed colors: Get festive with red and green for Christmas or orange and black for Halloween—perfect for seasonal decorations!
Feel free to mix and match these ideas to create your own unique designs. The possibilities are endless, and that’s what makes bubble wrap painting so exciting!
Display and Use Ideas
Now that you’ve created your stunning bubble wrap paintings, it’s time to showcase your vibrant masterpieces! Here are some fun and creative ways to display or use your artwork:
- Frame your artwork: Choose colorful frames to enhance your creations and create a lively wall display that brightens up any room.
- Use as unique greeting cards: Cut your artwork into card sizes and send them to friends and family for a personal touch that’s sure to delight!
- Create a gallery wall: Hang multiple pieces together to form a stunning gallery wall that showcases your artistic journey.
- Gift to teachers or loved ones: Wrap your artwork as a thoughtful gift, adding a personal touch that shows you care.
These ideas not only celebrate your creativity but also spread joy to those around you. Enjoy sharing your vibrant art with the world!
FAQs about Bubble Wrap Painting
As you embark on your bubble wrap painting adventure, you might have a few questions. Don’t worry—I’ve got you covered! Here are some common queries and their answers to help you make the most of this fun DIY craft.
What type of paint works best for bubble wrap painting?
Acrylic or tempera paints are ideal for vibrant colors and easy cleanup. They spread beautifully on the bubble wrap and create stunning effects on your paper or canvas!
Can I use other materials besides bubble wrap?
Absolutely! You can experiment with sponges, textured fabrics, or even leaves for different effects. Each material will give your artwork a unique twist!
Is this project safe for young children?
Yes, bubble wrap painting is a safe and enjoyable activity for kids! Just be sure to supervise them and use non-toxic paint to ensure their safety while they unleash their creativity.
How do I clean up after bubble wrap painting?
Cleaning up is a breeze! Just wash your brushes and palettes with soap and water. If you’ve used acrylic paint, make sure to do this before it dries. And don’t forget to roll up that bubble wrap for future projects!
Can I frame my bubble wrap paintings?
Definitely! Framing your artwork is a great way to showcase your creativity. Choose colorful frames that complement your designs, and you’ll have a beautiful display for your home!
Final Thoughts
As you wrap up your bubble wrap painting adventure, take a moment to bask in the joy of your vibrant creations! There’s something truly magical about transforming simple materials into stunning artwork that reflects your personality and creativity. I encourage you to gather your loved ones, dive into this fun project, and let your imaginations run wild. Don’t forget to share your results—whether it’s on social media or with friends and family. Your unique masterpieces deserve to be celebrated! Happy crafting, and may your days be filled with color and creativity!
Print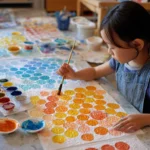
Bubble wrap painting: Discover fun techniques for vibrant art!
Description
Bubble wrap painting is a fun and creative art project that uses bubble wrap to create unique textures and patterns on paper or canvas. It’s perfect for kids and adults alike, making it a great way to explore color and design.
Instructions
- Cut a piece of bubble wrap to the desired size for your project.
- Pour different colors of paint onto a plate or palette.
- Use a paintbrush to apply paint directly onto the bubble wrap, covering it completely.
- Press the painted bubble wrap onto your paper or canvas, applying even pressure to transfer the paint.
- Lift the bubble wrap to reveal the unique texture and pattern created.
- Repeat the process with different colors and bubble wrap shapes to create a layered effect.
- Allow your artwork to dry completely before displaying or framing.
- Category: Art & Craft
Keywords: Bubble wrap painting, art project, kids craft, creative techniques, vibrant art


