Introduction to Bring the Storm to Life in a Jar
Welcome to a world of creativity where you can bring the storm to life in a jar! This enchanting DIY craft is not only simple but also a delightful way to spark imagination in both kids and adults. I remember the joy on my children’s faces as we created our very own stormy masterpiece, watching the colors swirl and dance like a real thunderstorm. It’s a rewarding project that combines science and art, making it perfect for family bonding or a fun classroom activity. Let’s dive into this magical experience together!
Why You’ll Love This Bring the Storm to Life in a Jar
This project is a fantastic way to unleash your creativity while spending quality time with your kids. It’s easy on the wallet, using materials you likely already have at home. Plus, the calming process of crafting can be a wonderful stress reliever. Watching the storm come to life in a jar is not just fun; it’s a magical experience that fosters imagination and brings smiles all around!
Materials and Tools Needed for Bring the Storm to Life in a Jar
To create your very own storm in a jar, you’ll need a few simple materials that are easy to find. Here’s what you’ll need:
- Clear glass jar with lid: This is the canvas for your storm, allowing you to see all the magical effects inside.
- Water: The base of your storm, it creates the perfect environment for the oil and colors to dance.
- Vegetable oil: This is crucial for creating that stunning separation between the water and oil, giving your storm its unique look.
- Food coloring (blue and white): These colors will bring your storm to life, representing the sky and clouds.
- Glitter (optional): A sprinkle of glitter adds a touch of sparkle, mimicking raindrops and enhancing the visual appeal.
- Small piece of cotton or sponge: This will act as your clouds, adding depth and realism to your storm.
- Small flashlight (optional): Use this to illuminate your creation for a magical effect in a dark room.
Most of these materials are budget-friendly and can often be found around the house or at your local craft store. If you’re looking for eco-friendly options, consider using a recycled jar and natural food coloring made from fruits or vegetables!
How to Make Bring the Storm to Life in a Jar
Creating your very own storm in a jar is not just a fun project; it’s a magical experience that brings a little bit of wonder into your home. I remember the first time I made this with my kids; their eyes lit up as they watched the colors swirl and dance. Let’s dive into the steps to bring the storm to life in a jar!
Step 1: Fill the Jar with Water
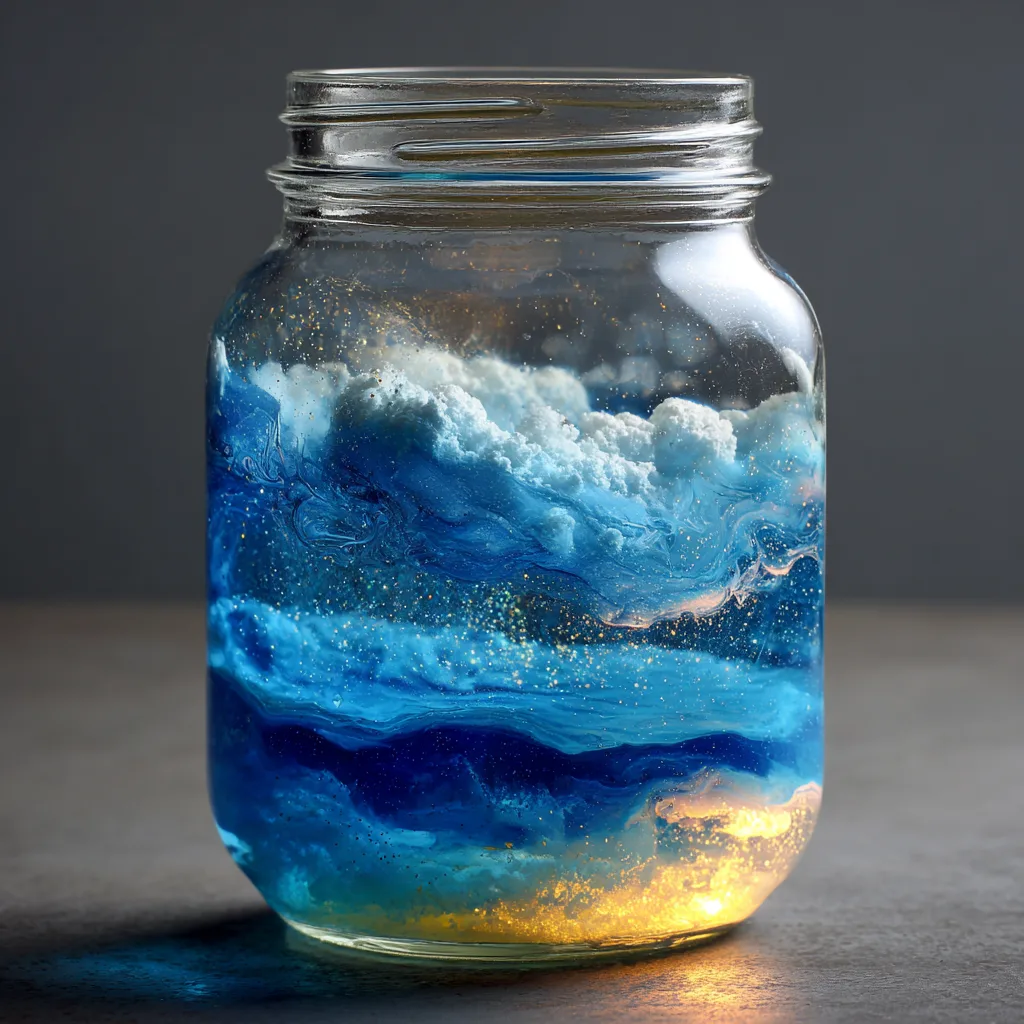
Start by filling your clear glass jar halfway with water. This is the foundation of your storm, and it’s essential for creating that mesmerizing effect. As you pour, notice how the water glistens in the light, setting the stage for the magic to come. Make sure to leave enough space for the oil later on!
Step 2: Add Vegetable Oil
Next, pour vegetable oil into the jar until it’s nearly full, leaving just a little room at the top. The oil will float on the water, creating a beautiful separation that’s key to our storm effect. It’s fascinating to see how the two liquids don’t mix, almost like they’re having a little dance of their own. This step is crucial for achieving that stormy look!
Step 3: Color the Water
Now, it’s time to add a few drops of blue food coloring to the water. As you drop it in, watch the color spread and swirl, creating a stunning visual effect. This is where the magic truly begins! The blue represents the stormy sky, and it’s so satisfying to see how it interacts with the water. You can even experiment with different shades to create your unique storm!
Step 4: Add Sparkle
If you want to take your storm to the next level, sprinkle in some glitter. This optional step adds a touch of sparkle that mimics the shimmering raindrops during a storm. As the glitter dances around in the jar, it enhances the overall visual appeal, making your storm in a jar even more enchanting. Trust me, it’s worth it!
Step 5: Create the Clouds
To represent clouds, take a small piece of cotton or sponge and gently place it on top of the oil layer. This fluffy addition gives your storm a realistic touch, making it look like clouds are floating above the water. It’s a simple yet effective way to add depth to your creation. Plus, it’s a fun way for kids to get involved!
Step 6: Seal and Shake
Now, seal the jar with the lid and give it a gentle shake. This is where the magic happens! As you shake, the colors will mix and swirl, creating a beautiful storm effect inside the jar. It’s like having a mini weather system right in your hands! Just be careful not to shake too hard; we want to keep that lovely separation between the oil and water.
Step 7: Illuminate the Magic
For an extra magical effect, shine a small flashlight through the jar in a dark room. The light will illuminate the swirling colors and glitter, creating a stunning display that feels almost otherworldly. It’s a perfect way to end your crafting session, and I guarantee your kids will be mesmerized by the glowing storm!
Tips for Best Results
- For a more vibrant storm, add extra drops of food coloring.
- If the oil and water mix, try shaking gently instead of vigorously.
- Supervise kids closely when using glass jars and food coloring.
- Experiment with different glitter types for unique effects.
- Consider adding essential oils to the water for a scented storm experience.
Theme and Design Variations
- Autumn Storm: Use orange and yellow food coloring to create a fall-themed storm, representing the changing leaves.
- Winter Wonderland: Add white food coloring and silver glitter for a snowy effect, perfect for winter decor.
- Rainbow Storm: Experiment with multiple colors of food coloring to create a vibrant rainbow effect.
- Glow-in-the-Dark: Use glow-in-the-dark paint instead of food coloring for a spooky night-time display.
- Kid-Friendly Versions: Let kids choose their favorite colors and add fun decorations like small plastic animals or themed stickers inside the jar.
Display and Use Ideas
- Home Decor: Place your storm jar on a shelf or coffee table as a unique conversation piece.
- Night Light: Use it as a calming night light for kids by shining a flashlight through it.
- Gift Idea: Wrap it up as a thoughtful gift for friends or family, especially for those who love DIY crafts.
- Classroom Project: Use it as a fun science demonstration in the classroom to teach about density and weather.
FAQs about Bring the Storm to Life in a Jar
Can I use other types of oil for this project?
Absolutely! While vegetable oil works great, you can also try using baby oil or canola oil. Just remember that the key is to use a clear oil to maintain the visual effect of your storm in a jar.
Is this craft safe for young children?
Yes, it is generally safe for kids aged 5 and up, but adult supervision is recommended, especially when handling glass jars and food coloring. Just keep an eye on them to prevent any spills!
What if my colors don’t mix well?
If the colors aren’t mixing as you’d like, try shaking the jar gently instead of vigorously. This will help maintain the separation between the oil and water while still creating a beautiful storm effect.
Can I add scents to my storm jar?
Definitely! Adding a few drops of essential oils to the water can create a lovely scented experience. Just make sure to choose scents that are safe for kids, like lavender or citrus.
How can I clean up if there’s a spill?
If you happen to spill any food coloring, act quickly! Blot the area with a damp cloth and use soap if needed. It’s always a good idea to cover your workspace with newspaper or a plastic tablecloth to make cleanup easier.
Final Thoughts
Bringing the storm to life in a jar is not just a craft; it’s a delightful journey filled with creativity and wonder. I can’t tell you how satisfying it is to watch the colors swirl and the glitter dance, creating a magical display right before your eyes. I encourage you to gather your materials, invite your kids or friends, and dive into this enchanting project. Don’t forget to share your results and experiences! I’d love to see how your storms turn out, so let’s keep the creativity flowing this Halloween season!
Print
Bring the Storm to Life in a Jar: Create a Magical Craft!
Description
Create a mesmerizing storm in a jar using simple materials to bring a touch of magic to your home decor.
Instructions
- Fill the jar halfway with water.
- Pour vegetable oil into the jar until it is nearly full, leaving some space at the top.
- Add a few drops of blue food coloring to the water and watch it create a beautiful effect.
- If desired, sprinkle in some glitter for added sparkle.
- Take a small piece of cotton or sponge and place it on top of the oil layer to represent clouds.
- Seal the jar with the lid and shake gently to mix the contents.
- For an extra magical effect, shine a small flashlight through the jar in a dark room.
- Category: Home Decor
Keywords: storm in a jar, DIY craft, home decor, kids activity, magical craft


