Introduction to Blue Crayon Flower Suncatchers
Welcome to the colorful world of Blue Crayon Flower Suncatchers! This delightful DIY craft is not only simple but also a fantastic way to brighten your home with vibrant hues. I remember the first time I made these with my kids; the joy on their faces as they watched the crayons melt was priceless. Crafting together is a wonderful bonding experience, and these suncatchers are perfect for all ages. Plus, they make for safe Halloween decorations or cheerful home decor year-round. Let’s get started on this fun and rewarding project that will surely add a pop of color to your windows!
Why You’ll Love This Blue Crayon Flower Suncatchers
Creating Blue Crayon Flower Suncatchers is a delightful way to unleash your creativity while spending quality time with your kids. This easy and affordable craft allows everyone to express themselves artistically without the mess of traditional painting. Plus, the satisfaction of seeing your colorful creations dance in the sunlight is truly rewarding. It’s a perfect project for relaxing afternoons, making memories, and brightening up your home with cheerful vibes!
Materials and Tools Needed for Blue Crayon Flower Suncatchers
Gathering your materials is the first step to crafting these beautiful Blue Crayon Flower Suncatchers! Here’s what you’ll need:
- Blue crayons: The star of the show! Choose your favorite shades of blue to create vibrant suncatchers. You can also use broken crayons to save money and reduce waste.
- Wax paper: This acts as the canvas for your crayon masterpiece. It’s essential for melting the crayon shavings without making a mess.
- Iron: A household staple that will help fuse the wax paper and crayon shavings together. Just be sure to use it with adult supervision!
- Scissors: You’ll need these to cut out your flower shapes. A good pair of scissors makes the process smooth and easy.
- Pencil: Handy for sketching out your flower designs if you choose to use a template.
- Flower template (optional): If you want uniform shapes, a template can guide your cutting. You can easily find printable templates online.
- String or ribbon (for hanging): This will allow you to display your suncatchers in style. Choose a color that complements your flowers!
These materials are not only easy to find but also budget-friendly, making this craft accessible for everyone. Let’s get crafting!
How to Make Blue Crayon Flower Suncatchers
Creating your own Blue Crayon Flower Suncatchers is not just a fun craft; it’s a delightful way to bring a splash of color into your home! I remember the first time I made these with my kids; the excitement in their eyes as they watched the crayons melt was simply magical. Let’s dive into the steps to make these beautiful suncatchers together!
Step 1: Prepare Your Crayons
Start by shaving or grating your blue crayons into small pieces. You can use a pencil sharpener for a quick and easy option, or a grater if you want to get a bit more hands-on. Just be careful—those little shavings can fly everywhere! I like to do this part outside or over a large sheet of paper to catch the mess. Plus, it’s a great way for kids to practice their fine motor skills!
Step 2: Cut the Wax Paper
Next, cut two pieces of wax paper to your desired size for the suncatcher. Think about where you want to hang it—if it’s a big window, you might want larger pieces! The wax paper acts as a canvas for your crayon masterpiece, so make sure it’s big enough to showcase those vibrant colors. I usually go for a size that’s about the same as a standard sheet of paper.
Step 3: Assemble the Suncatcher
Now comes the fun part! Place the crayon shavings between the two pieces of wax paper. You can sprinkle them randomly for a more abstract look or arrange them in a pattern for a more structured design. I love to let my kids get creative here; sometimes they even mix in other colors for a unique twist. Just remember, the more shavings you use, the more vibrant your suncatcher will be!
Step 4: Ironing the Suncatcher
Before you start ironing, cover the wax paper with a thin cloth to protect it. This step is crucial! Set your iron to a low setting and gently press over the cloth. Watch as the crayon melts and fuses the wax paper together—it’s like a mini science experiment! Just be sure to keep an eye on the kids during this step, as the iron can get hot. I always remind my little ones to stay back and let the grown-ups handle this part.
Step 5: Cut Out Flower Shapes
Once everything has cooled down, it’s time to cut out your flower shapes! You can use scissors to create freehand designs or a flower template for more uniform shapes. I love to make a variety of flowers—some big, some small, and even some with fun petal shapes. This is where your creativity can really shine!
Step 6: Add a Hanging Mechanism
To finish off your suncatcher, punch a hole at the top of the flower and thread a string or ribbon through for hanging. You can use any color of string to match your decor or even a sparkly ribbon for a touch of glam! I like to hang mine in the kitchen window, where the sunlight can catch them just right.
Step 7: Display Your Creation
Finally, find a sunny window to display your suncatchers and enjoy the colorful light reflections they create! Watching the sunlight dance through the blue hues is such a joy. It’s a simple yet effective way to brighten up your home and make it feel more inviting. Plus, every time I see them, I’m reminded of the fun we had making them together!
Tips for Best Results
- Experiment with different colors of crayons for a variety of suncatchers. Mixing shades can create stunning effects!
- Use a heavier cloth when ironing to ensure even melting. This helps prevent any accidental burns on the wax paper.
- Make multiple flowers to create a beautiful display. A cluster of suncatchers can really brighten up a room!
- Consider adding glitter for extra sparkle! A little shimmer can make your suncatchers truly magical.
Theme and Design Variations
- Create a rainbow of suncatchers using various crayon colors. Each color can represent a different flower, making your window a vibrant display!
- Make seasonal flowers for spring, summer, fall, and winter. Think pastel colors for spring blooms or warm tones for autumn leaves!
- Use templates for different flower shapes like daisies, tulips, or sunflowers. This can help kids learn about different types of flowers while crafting!
- Incorporate glitter or stickers for added decoration. A sprinkle of glitter can turn your suncatchers into sparkling treasures!
Display and Use Ideas
Once you’ve crafted your stunning Blue Crayon Flower Suncatchers, it’s time to showcase them! Here are some fun and creative ways to display or use your beautiful creations:
- Hang in windows to catch sunlight and create colorful reflections that brighten up any room.
- Use as a cheerful decoration for birthday parties or celebrations, adding a splash of color to your festivities.
- Gift to friends or family as a handmade present, sharing the joy of your crafting experience.
- Create a mobile by hanging multiple suncatchers together, turning your space into a whimsical art display!
FAQs about Blue Crayon Flower Suncatchers
As you embark on your crafting journey with Blue Crayon Flower Suncatchers, you might have a few questions. Here are some common queries and their answers to help you along the way!
- Can I use other colors of crayons? Absolutely! Feel free to experiment with any crayon colors you like. Mixing different shades can create stunning effects in your suncatchers!
- Is this project safe for kids? Yes, this project is generally safe for kids, but adult supervision is recommended when using the iron. It’s a great opportunity to teach them about safety while crafting!
- How do I clean up crayon shavings? Cleaning up crayon shavings is easy! Just use a damp cloth to wipe down surfaces after crafting. This will help keep your workspace tidy and ready for your next creative adventure.
- Can I make these suncatchers without an iron? While an iron is the easiest way to fuse the wax paper and crayon shavings, you can also try using a hairdryer on a low setting. Just be patient, as it may take a bit longer!
- What if my suncatcher doesn’t melt evenly? If you notice uneven melting, don’t worry! You can always re-iron it, making sure to cover it with the cloth again. Just be careful not to overheat it!
Final Thoughts
Creating Blue Crayon Flower Suncatchers is not just a craft; it’s a joyful experience filled with laughter and creativity. I hope you feel inspired to gather your materials and dive into this colorful project with your family or friends. The satisfaction of seeing your beautiful suncatchers catch the sunlight and fill your home with vibrant reflections is truly rewarding. Don’t forget to share your creations and any unique twists you add along the way! Let’s spread the joy of crafting and brighten up our spaces together!
Print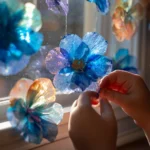
Blue Crayon Flower Suncatchers: Brighten Your Home with Easy Crafts!
Description
Create beautiful blue crayon flower suncatchers that will add a pop of color to your windows and brighten up your home.
Instructions
- Shave or grate blue crayons into small pieces using a pencil sharpener or grater.
- Cut two pieces of wax paper to your desired size for the suncatcher.
- Place the crayon shavings between the two pieces of wax paper.
- Cover the wax paper with a thin cloth to protect it.
- Carefully iron over the cloth on a low setting until the crayon melts and fuses the wax paper together.
- Let it cool, then cut out flower shapes using scissors or use a flower template for guidance.
- Punch a hole at the top of the flower and thread a string or ribbon through for hanging.
- Display your suncatchers in a sunny window and enjoy the colorful light reflections!
- Category: Crafts
Keywords: Blue Crayon Flower Suncatchers, DIY crafts, suncatchers, home decor, kids crafts