Introduction to Balloon Weather Station Activity
In today’s fast-paced world, finding time for creativity can be a challenge, especially for busy moms and professionals like us. I often find myself wishing for a moment to pause and engage in something fun and educational with my kids. That’s where the Balloon Weather Station Activity comes in! This delightful DIY project is not only a fantastic way to bond with your children but also an opportunity to teach them about weather patterns in a hands-on manner.
When I first introduced this activity to my kids, I was amazed at how quickly their curiosity sparked. We transformed simple materials into a colorful weather station that not only looked great but also served as a unique home decoration. It’s incredible how a few balloons and a plastic bottle can inspire such wonder about the natural world!
As we crafted together, I noticed how the Balloon Weather Station Activity encouraged my children to ask questions about the weather. They were eager to learn how temperature changes and wind direction affect our daily lives. It was a joy to see their faces light up with excitement as they observed the balloons moving in the breeze, and I felt proud knowing we were creating lasting memories while learning together.
So, if you’re looking for a fun and educational way to spend quality time with your children, I wholeheartedly encourage you to dive into this project. Let’s explore the world of weather through creativity and hands-on fun!
Why You’ll Love This Balloon Weather Station Activity
As a busy mom, I’m always on the lookout for activities that are not only fun but also educational. The Balloon Weather Station Activity checks all the boxes! It’s incredibly affordable, using materials that I often have lying around the house. I remember the first time we gathered our supplies; it felt like a mini adventure right in our living room!
This project is simple to make, which is a huge plus for those of us with tight schedules. In just about 30 minutes, we transformed a few balloons and a plastic bottle into a vibrant weather station. I loved watching my kids’ faces light up as they saw their creation come to life. It’s amazing how something so straightforward can spark such joy and creativity!
What I appreciate most about the Balloon Weather Station Activity is how it provides an interactive learning experience. My children were not just crafting; they were also learning about weather phenomena. We discussed how the balloons could represent sunny, rainy, or windy days, and it opened up a world of questions and curiosity. I found myself answering questions I hadn’t thought about in years, and it was a wonderful reminder of how much we can learn from each other.
Moreover, this activity is a fantastic way to spend quality time together. I cherish those moments when we can put aside our busy lives and focus on something creative. Whether it’s laughing at our balloon mishaps or celebrating our successes, the Balloon Weather Station Activity has become a cherished family tradition. I encourage you to give it a try; you might just find it becomes a favorite in your home too!
Materials Needed for Balloon Weather Station Activity
To get started on your Balloon Weather Station Activity, gather the following materials. I remember the excitement of collecting these items with my kids; it felt like we were preparing for a mini science experiment!
- 3 Balloons (various colors): These will represent different weather conditions. I love using bright colors to make it visually appealing!
- 1 Plastic bottle: This will serve as the base of your weather station. We used an empty soda bottle, which was perfect!
- 1 Straw: Used to attach the balloons and measure wind direction. A simple straw can make a big difference in this project!
- 1 Thermometer: To measure temperature changes. It’s fascinating to see how the temperature fluctuates throughout the day.
- String: For securing the balloons to the straw. I found that using colorful string added an extra touch of fun!
- Scissors: To cut the plastic bottle. Just a little caution is needed here, especially with little hands around.
- Tape: To attach the straw to the bottle and secure the balloons. I always keep a roll of tape handy for our crafting adventures!
*For a printable full list of materials, see below.*
Tools Required for Balloon Weather Station Activity
To successfully complete the Balloon Weather Station Activity, you will need the following tools. I remember the first time we gathered our supplies; it felt like we were preparing for a fun little science project!
- Scissors: Essential for cutting the plastic bottle. I always remind my kids to be cautious while using them, especially since we want to keep our crafting safe and enjoyable.
- Tape: Used to secure the straw to the bottle and attach the balloons. I find that having a good quality tape makes the process smoother, and it’s always handy for our various crafting adventures!
*If you don’t have scissors, you can use a craft knife with adult supervision. Just make sure to keep safety in mind, especially with little ones around.*
How to Make Balloon Weather Station Activity
Creating your own Balloon Weather Station Activity is a delightful experience that I cherish every time I embark on it with my kids. The joy of transforming simple materials into a fun educational tool is truly rewarding. Here’s how you can make your very own weather station in just a few easy steps!
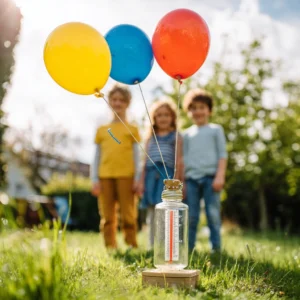
Step 1: Prepare the Plastic Bottle
Start by cutting the plastic bottle in half. I remember the first time we did this; my kids were so curious about what we were making! Discard the top half, as you will only need the bottom part for this project. It’s a great way to teach them about recycling too!
Step 2: Attach the Straw
Next, take the straw and attach it to the open end of the bottle using tape. Make sure it is secure and positioned horizontally. I found that using a good amount of tape helps keep it steady, especially when the wind starts blowing!
Step 3: Inflate the Balloons
Now comes the fun part! Inflate the three balloons and tie them off. Choose different colors to represent various weather conditions. I love letting my kids pick their favorite colors; it adds a personal touch to our weather station!
Step 4: Attach Balloons to the Straw
Use string to attach the balloons to the straw. Ensure they are spaced out evenly for better visibility. I remember the giggles we shared as we tried to get the balloons just right. It’s all about having fun and being creative!
Step 5: Insert the Thermometer
Place the thermometer inside the bottle to measure temperature. Make sure it is positioned correctly for accurate readings. This step is crucial, as it allows us to track temperature changes throughout the day, making it a real learning experience!
Step 6: Position Your Weather Station
Finally, place your weather station outside in an open area to observe wind direction and temperature changes throughout the day. I love watching my kids check the weather together; it’s a wonderful way to bond and learn about nature!
With these simple steps, you’ll have your very own Balloon Weather Station ready to go. I can’t wait for you to experience the joy and learning that comes with this fun project!
Tips for Best Results
As I’ve dived into the Balloon Weather Station Activity with my kids, I’ve learned a few tips that can really enhance the experience and ensure the best results. Here are some insights that I hope will help you as you embark on this fun project!
- Use different colored balloons to represent different weather conditions. I remember how excited my kids were to choose colors that matched their favorite weather types. Bright yellow for sunny days, deep gray for rainy ones, and vibrant red for windy conditions made our weather station visually appealing and educational!
- Make sure the weather station is placed in an open area for accurate readings. I learned this the hard way when we initially set ours up near some trees. The balloons didn’t move much, and we couldn’t get a good sense of the wind direction. Once we moved it to a clear spot in the yard, it was like magic watching the balloons dance in the breeze!
- Check the temperature at different times of the day for a better understanding of weather patterns. This has been one of the most rewarding parts of our project. We started checking the thermometer in the morning, afternoon, and evening, and it sparked wonderful discussions about how the sun affects temperature. It’s amazing how much we can learn just by observing!
By keeping these tips in mind, you’ll not only create a functional Balloon Weather Station but also foster a deeper understanding of weather phenomena with your children. Enjoy the process, and don’t forget to have fun along the way!
Project Variations
One of the most exciting aspects of the Balloon Weather Station Activity is the opportunity to get creative and make it your own! I love how this project can be easily adapted to reflect different styles, seasons, or even personal preferences. Here are some fun variations that I’ve tried and enjoyed, and I hope they inspire you too!
- Style Variations: Consider using patterned balloons or even painting the plastic bottle for a personalized touch. I remember one time we used balloons with fun designs like polka dots and stripes, which made our weather station look extra festive. It’s a great way to let your kids express their artistic flair!
- Color Changes: You can choose colors that represent your favorite seasons or weather types. For instance, we created a spring-themed weather station with pastel colors to symbolize blooming flowers and gentle breezes. It was a delightful way to celebrate the season while learning about weather!
- Seasonal Adaptations: Why not create a winter-themed weather station with snowflake decorations or a summer version with bright colors? I once made a winter station with white and blue balloons, and we added some cotton balls to mimic snow. It was a hit with my kids, and it sparked conversations about how weather changes with the seasons!
These variations not only make the Balloon Weather Station Activity more engaging but also allow for endless creativity. I encourage you to experiment and see what unique twists you can add to your project. The possibilities are truly limitless, and the joy of crafting together is what makes it all worthwhile!
Decoration and Usage Ideas
Once your Balloon Weather Station is complete, the fun doesn’t stop there! I’ve discovered several creative ways to use and display our weather station that not only enhance its functionality but also add a splash of color and excitement to our outdoor space. Here are some ideas that I hope inspire you!
- Outdoor Decor: One of my favorite ways to showcase our weather station is by placing it in the garden or on the patio. It adds a whimsical touch to our outdoor decor, and I love how it catches the eye of our neighbors. The vibrant balloons swaying in the breeze create a cheerful atmosphere, making it a delightful addition to our home!
- Educational Tool: The Balloon Weather Station serves as a fantastic teaching aid. I often use it to explain weather concepts to my children, turning our backyard into a mini classroom. We discuss how the balloons represent different weather conditions and how the thermometer tracks temperature changes. It’s a wonderful way to make learning interactive and fun!
- Family Activity: Encourage family members to check the weather together and discuss the changes throughout the day. I cherish those moments when we gather around the weather station, excitedly sharing our observations. It’s become a lovely family tradition to compare notes on the temperature and wind direction, fostering a sense of teamwork and curiosity about the world around us.
By incorporating these decoration and usage ideas, you’ll not only enhance the visual appeal of your Balloon Weather Station but also create meaningful experiences with your family. I can’t wait for you to enjoy the joy and learning that comes with this delightful project!
FAQs about Balloon Weather Station Activity
As I’ve shared my experiences with the Balloon Weather Station Activity, I often get questions from fellow moms and craft enthusiasts. Here are some frequently asked questions that I hope will help you as you embark on this fun project!
Q: How long does it take to make the Balloon Weather Station?
A: The total time for this project is approximately 30 minutes, including prep and craft time. I love how quick and easy it is, making it perfect for busy schedules!
Q: Is this activity safe for young children?
A: Yes, but be cautious with scissors and ensure that balloons are not a choking hazard. I always supervise my kids during the cutting process and remind them to handle the balloons carefully.
Q: Can I use other materials?
A: Absolutely! Feel free to get creative with materials you have at home. I’ve seen some amazing variations where people used different types of bottles or even added extra decorations to personalize their weather stations. The sky’s the limit!
These FAQs should help clarify any concerns you might have as you dive into the Balloon Weather Station Activity. I can’t wait for you to experience the joy and learning that comes with this delightful project!
Final Thoughts
The Balloon Weather Station Activity is not just a craft; it’s an opportunity to create lasting memories with your children while teaching them about the world around them. I can’t emphasize enough how rewarding it is to see my kids’ eyes light up with curiosity as we explore weather patterns together. This engaging project fosters creativity, curiosity, and a love for learning that I cherish deeply.
As we crafted our weather station, I was reminded of the importance of spending quality time with my children. In our busy lives, it’s easy to overlook these moments, but the joy of creating something together is truly priceless. I encourage you to gather your materials, set aside some time, and enjoy the process of crafting together. You’ll be amazed at how much fun you can have while exploring the wonders of weather!
So, whether you’re a seasoned crafter or just starting out, the Balloon Weather Station Activity is a perfect way to blend education with creativity. Embrace the messiness, the laughter, and the learning that comes with it. I can’t wait for you to experience the joy and connection that this project brings to your family!
Print
Balloon Weather Station Activity: Create Fun Home Crafts!
Description
The Balloon Weather Station Activity is a fun and educational DIY project that allows you to create a simple weather station using balloons to measure temperature and wind direction.
Instructions
- Cut the plastic bottle in half and discard the top half.
- Attach the straw to the open end of the bottle using tape.
- Inflate the balloons and tie them off.
- Attach the balloons to the straw using string.
- Place the thermometer inside the bottle to measure temperature.
- Position your weather station outside to observe wind direction and temperature changes.
Keywords: Balloon Weather Station, DIY Weather Station, Educational Craft, Kids Activity