
Introduction to Balloon Baking Soda Experiment
Welcome to the whimsical world of the Balloon Baking Soda Experiment! If you’re looking for a fun and educational way to engage your kids in science, you’ve come to the right place. This DIY project is not only simple but also incredibly rewarding as you watch the magic unfold right before your eyes. Imagine the joy on your little ones’ faces as they see a balloon inflate from a bubbly chemical reaction! It’s a delightful blend of learning and laughter, making it the perfect activity for family bonding or classroom fun. Let’s get started on this exciting adventure!
Why You’ll Love This Balloon Baking Soda Experiment
This Balloon Baking Soda Experiment is a fantastic way to blend fun and learning! It’s easy on the wallet, requiring just a few household items, making it perfect for busy moms and teachers alike. Plus, it sparks creativity and curiosity in kids, turning science into a playful adventure. Watching their eyes light up as the balloon inflates is priceless, creating cherished memories and bonding moments that you’ll both treasure forever!
Materials and Tools Needed for Balloon Baking Soda Experiment
To embark on this exciting Balloon Baking Soda Experiment, you’ll need a few simple materials that are likely already in your kitchen. Here’s what you’ll need:
- Balloon: This is the star of the show! It will inflate as a result of the chemical reaction.
- Plastic bottle: A small one works best to contain the vinegar and baking soda mixture.
- Baking soda: This is the key ingredient that reacts with vinegar to create carbon dioxide gas.
- Vinegar: The other half of our dynamic duo, it’s essential for the reaction.
- Funnel (optional): This handy tool helps you pour baking soda into the balloon without spills.
- Food coloring (optional): Add a splash of color for a more visually exciting experiment!
- Measuring spoons: These help ensure you’re using the right amounts of ingredients.
- Safety goggles: Protect your eyes from any splashes during the experiment.
These materials are not only easy to find but also budget-friendly. If you’re looking for eco-friendly alternatives, consider using a reusable bottle and natural food coloring. Let’s gather these supplies and get ready for some science fun!
How to Make Balloon Baking Soda Experiment
Now that you’re all set up, let’s dive into the fun part—the actual Balloon Baking Soda Experiment! This is where the magic happens, and I promise you, it’s going to be a blast! Gather your materials, and let’s get started with these easy-to-follow steps. Remember, this is not just a science project; it’s a chance to bond with your kids and spark their curiosity about the world around them!
Step 1: Prepare Your Workspace
First things first, let’s create a clean and safe area for our experiment. I like to lay down some old newspapers or a plastic tablecloth to catch any spills. Trust me, things can get a little messy, and that’s part of the fun! Don’t forget to put on your safety goggles to protect your eyes from any splashes. It’s all about safety while we explore the wonders of science!
Step 2: Fill the Balloon with Baking Soda
Next, it’s time to fill the balloon with baking soda. Grab your funnel (if you have one) and carefully add about two tablespoons of baking soda into the balloon. If you don’t have a funnel, you can use a rolled-up piece of paper as a makeshift one. Just be careful to avoid spills—no one wants a baking soda mess! Once the balloon is filled, set it aside for the next step.
Step 3: Prepare the Vinegar in the Bottle
Now, let’s prepare the vinegar in the plastic bottle. Pour in about half a cup of vinegar, and if you want to add a splash of color, this is the perfect time to drop in a few drops of food coloring. Watching the vibrant colors swirl in the vinegar is like a mini art project! It adds a fun twist to our science experiment and makes it even more exciting for the kids.
Step 4: Combine the Ingredients
Here comes the moment we’ve all been waiting for! Carefully stretch the opening of the balloon over the mouth of the bottle, making sure not to let the baking soda fall in just yet. Once it’s secure, lift the balloon to let the baking soda tumble into the vinegar. Hold your breath and watch as the chemical reaction begins! The fizzing and bubbling will inflate the balloon right before your eyes—it’s like a mini explosion of fun!
Step 5: Observe the Reaction
As the balloon inflates, take a moment to marvel at the science behind it. The reaction between baking soda and vinegar produces carbon dioxide gas, which fills the balloon. It’s a fantastic way to teach kids about chemical reactions in a hands-on way. Encourage them to ask questions and share their thoughts—this is where the learning truly happens!
Step 6: Clean Up
Once the excitement winds down, it’s time to clean up. Make sure to dispose of any leftover materials responsibly. Wipe down your workspace and wash your hands. Cleaning up together can be a great way to teach kids about responsibility and teamwork. Plus, it’s a nice way to wrap up a fun-filled science adventure!
Tips for Best Results
- Always wear safety goggles to protect your eyes from any splashes during the experiment.
- If the balloon doesn’t inflate, check that the baking soda is fully in the vinegar—sometimes it needs a little nudge!
- Experiment with different amounts of baking soda and vinegar to see how it affects the balloon size.
- Try using different colors of food coloring for a more visually appealing experiment.
- Conduct the experiment in an area that can get messy, as the reaction can overflow.
Theme and Design Variations
- Halloween Theme: Use orange and black food coloring to create spooky pumpkin-colored vinegar. Add Halloween stickers to the balloon for extra fun!
- Rainbow Experiment: Use multiple colors of food coloring in separate bottles to create a rainbow effect as the balloons inflate.
- Seasonal Colors: Match the colors to the seasons—pastels for spring, bright colors for summer, earthy tones for fall, and icy blues for winter.
- Glow-in-the-Dark: Add glow-in-the-dark paint to the balloon for a magical nighttime experiment!
- Kid-Friendly Versions: Let kids decorate their balloons with markers or stickers before starting the experiment for a personal touch.
Display and Use Ideas
Once you’ve completed the Balloon Baking Soda Experiment, there are plenty of fun ways to use or display your creations! Here are some ideas to inspire you:
- Home Decor: Use the inflated balloons as colorful centerpieces for a science-themed party or family gathering.
- School Crafts: Share the experiment with classmates, turning it into a fun science fair project!
- Holiday Displays: Incorporate the balloons into seasonal decorations, like spooky Halloween displays or festive holiday setups.
- Gift Ideas: Package the experiment materials in a fun kit to gift to friends or family for a creative science day!
FAQs about Balloon Baking Soda Experiment
Q: What happens if the balloon doesn’t inflate?
A: If the balloon doesn’t inflate, it might be because the baking soda didn’t fully mix with the vinegar. Make sure the balloon is securely on the bottle, and give it a little shake to help the reaction along!
Q: Can I use other liquids instead of vinegar?
A: While vinegar is the best choice for this Balloon Baking Soda Experiment, you can experiment with other acidic liquids like lemon juice. Just keep in mind that the reaction might not be as strong!
Q: Is this experiment safe for younger kids?
A: Yes! This experiment is safe for kids aged 5 and up, especially when supervised by an adult. Just remember to wear safety goggles to protect their eyes from any splashes.
Q: How can I make this experiment more educational?
A: To enhance the learning experience, discuss the science behind the reaction. Explain how baking soda (a base) reacts with vinegar (an acid) to produce carbon dioxide gas, which inflates the balloon!
Q: Can I repeat the experiment multiple times?
A: Absolutely! You can repeat the Balloon Baking Soda Experiment as many times as you like. Just make sure to clean your workspace and use fresh ingredients for the best results!
Final Thoughts
What a delightful journey we’ve had with the Balloon Baking Soda Experiment! Watching the balloon inflate and seeing the joy on your kids’ faces is truly a rewarding experience. This project not only teaches valuable science concepts but also creates lasting memories filled with laughter and curiosity. I encourage you to gather your materials, dive into this fun experiment, and let your creativity shine! Don’t forget to share your results and any variations you try—I’d love to hear about your adventures in science and crafting!
Print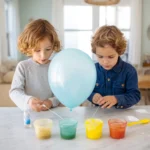
Balloon Baking Soda Experiment: Fun Science Craft for Kids!
Description
The Balloon Baking Soda Experiment is a fun and educational science project that demonstrates a chemical reaction between baking soda and vinegar, resulting in an inflated balloon. It’s a great way for kids to learn about gas production and chemical reactions while having fun.
Instructions
- Put on safety goggles to protect your eyes.
- Using the funnel, carefully add 2 tablespoons of baking soda into the balloon.
- In the plastic bottle, pour in 1/2 cup of vinegar.
- If desired, add a few drops of food coloring to the vinegar for a colorful effect.
- Carefully stretch the opening of the balloon over the mouth of the bottle without letting the baking soda fall in yet.
- Once the balloon is securely on the bottle, lift the balloon to let the baking soda fall into the vinegar.
- Watch as the chemical reaction occurs, producing carbon dioxide gas that inflates the balloon!
- Category: Science Experiment
Keywords: Balloon Baking Soda Experiment, science project, kids craft, chemical reaction, fun learning


