Introduction to Baking Soda Rainbow Crystal Forest
Creating a magical atmosphere in your home doesn’t always require expensive decor or elaborate designs. Sometimes, the simplest projects can bring the most joy, especially when they involve a bit of creativity and fun! The Baking Soda Rainbow Crystal Forest is a delightful DIY project that not only captivates the imagination but also serves as a beautiful decoration.
As a busy mom, I often find myself juggling work, family, and household responsibilities. However, I’ve discovered that taking a little time to craft can be incredibly rewarding. This project is perfect for those moments when you want to engage with your children or simply unwind after a long day. I remember the first time I introduced this craft to my kids; their eyes lit up with excitement as we mixed the ingredients together.
What I love most about the Baking Soda Rainbow Crystal Forest is how it transforms an ordinary afternoon into a colorful adventure. The anticipation of watching the crystals form over the next few days is like waiting for a surprise gift to unwrap. Each time I checked on our creations, I felt a rush of joy, reminiscent of my childhood days spent exploring nature.
So, let’s dive into this colorful adventure together! Whether you’re a seasoned crafter or just starting out, this project is sure to bring a smile to your face and a splash of color to your home.
Why You’ll Love This Baking Soda Rainbow Crystal Forest
This project is a fantastic way to unleash your creativity without breaking the bank. I can’t tell you how many times I’ve found myself searching for a fun and affordable craft to do with my kids, and the Baking Soda Rainbow Crystal Forest has become one of my go-to favorites. With just a few simple ingredients, you can create stunning, colorful crystals that will brighten up any space in your home.
What I love most about this project is its simplicity. As a busy mom, I often feel overwhelmed by the demands of daily life. However, this craft allows me to take a break and enjoy some quality time with my children. We gather around the kitchen table, mixing and creating together, and it feels like a mini celebration of creativity. The laughter and excitement as we watch the colors swirl and the fizzing reaction unfold is truly priceless.
Plus, the Baking Soda Rainbow Crystal Forest is a wonderful way to teach kids about science in a fun and engaging way. They get to see firsthand how the baking soda and vinegar react, creating a magical transformation right before their eyes. It’s like a little science experiment wrapped in a colorful craft project!
And let’s not forget about the end result! Once the crystals dry, they become beautiful decorations that can be displayed proudly around the house. I’ve even used them as centerpieces for family gatherings, and they never fail to impress. It’s a win-win for busy families looking to create lasting memories while adding a splash of color to their lives!
Materials Needed for Baking Soda Rainbow Crystal Forest
To create your own Baking Soda Rainbow Crystal Forest, gather the following materials:
- 1 cup baking soda: The main ingredient that forms the base of your crystals.
- 1/2 cup water: Helps to create a paste with the baking soda.
- 1/4 cup white vinegar: Initiates the fizzing reaction that forms the crystals.
- Food coloring (various colors): Adds vibrant hues to your crystal formations.
- Plastic cups or containers: Used to mix and shape your colored baking soda.
- Tray or baking sheet: To hold your creations while they dry.
As I gathered these materials for our first attempt, I felt a wave of excitement wash over me. It was amazing to see how such simple items could lead to something so beautiful! I remember my kids eagerly helping me measure out the baking soda and water, their little hands working together to create the perfect paste. It’s these moments that make crafting so special.
*For a printable full list of materials, see below!*
Tools Required for Baking Soda Rainbow Crystal Forest
You’ll need a few basic tools to get started on your Baking Soda Rainbow Crystal Forest. I remember the first time I gathered everything; it felt like preparing for a mini adventure in our kitchen!
- Mixing bowl: This is essential for combining the baking soda and water. I love using a large bowl so that my kids can help mix without worrying about spills.
- Spoon or stirrer: A sturdy spoon or stirrer is perfect for mixing the ingredients thoroughly. I often let my kids take turns stirring, and it’s a great way to keep them engaged!
- Measuring cups: Accurate measurements are key to a successful project. I always keep a set of measuring cups handy, and my kids enjoy helping to measure out the ingredients.
- Dropper (optional for food coloring): If you want to create intricate designs with your food coloring, a dropper can be a game-changer. I found that using a dropper allowed us to create beautiful patterns that made our crystal forest even more magical.
Having these tools ready not only makes the process smoother but also adds to the excitement of crafting together. I love how each tool plays a role in bringing our colorful creations to life. So, gather your tools, and let’s get ready to create some stunning rainbow crystals!
How to Make Baking Soda Rainbow Crystal Forest
Creating your own Baking Soda Rainbow Crystal Forest is a delightful journey filled with color and excitement! I remember the first time I followed these steps with my kids; it felt like we were embarking on a magical adventure right in our kitchen. Let me guide you through the process, step by step!
Step 1: Prepare the Mixture
In a mixing bowl, combine 1 cup of baking soda with 1/2 cup of water to create a thick paste. The texture should be similar to that of cookie dough. I love how satisfying it feels to mix the ingredients together, and my kids enjoy getting their hands in the bowl to help!
Step 2: Divide the Mixture
Spoon the paste into separate plastic cups or containers, depending on how many colors you want to use. This is where the fun begins! I often let my kids choose their favorite colors, and it’s amazing to see their creativity shine as they decide how to divide the mixture.
Step 3: Add Color
Add a few drops of different food coloring to each cup and mix well until the colors are vibrant and evenly distributed. Watching the colors swirl and blend is like painting a masterpiece! I remember my daughter giggling as she mixed her cup, creating a beautiful shade of purple that she was so proud of.
Step 4: Shape Your Crystals
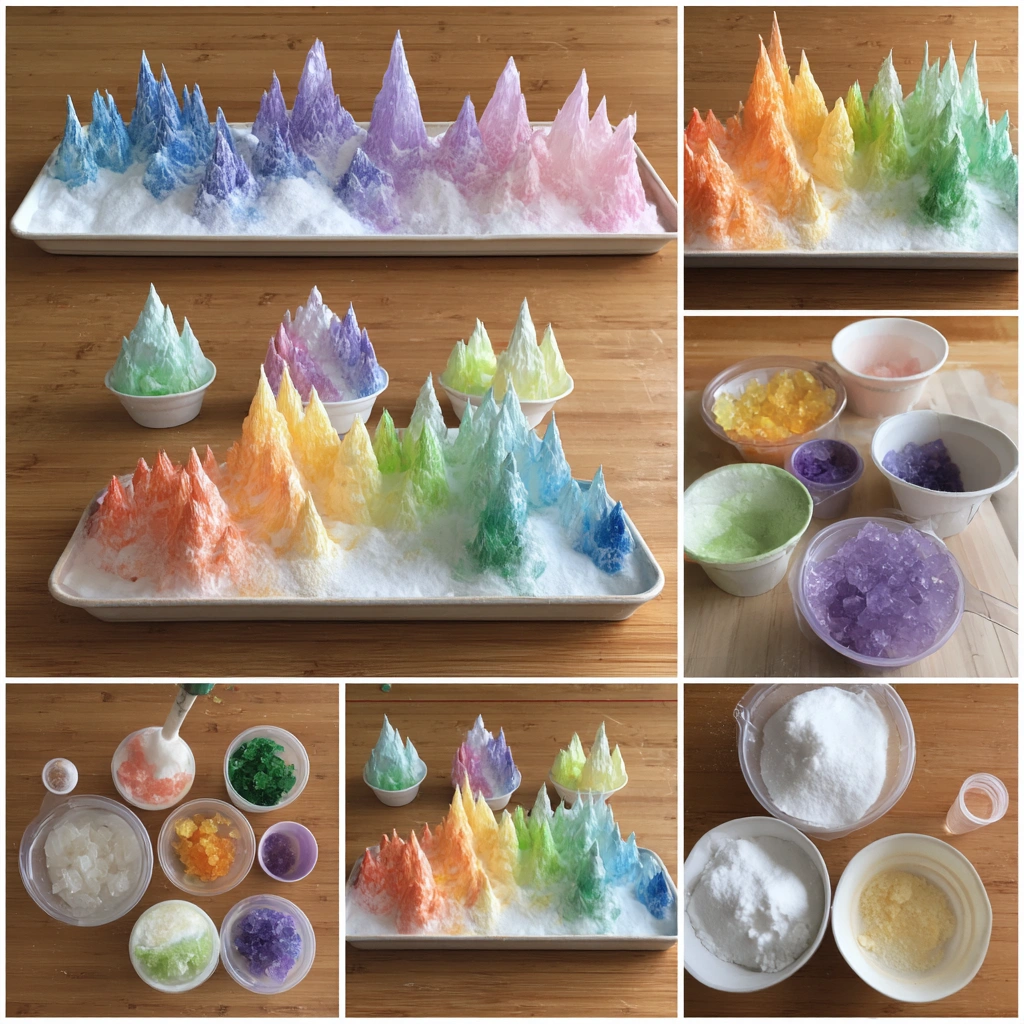
On a tray or baking sheet, spoon the colored baking soda mixture into different shapes or piles. Get creative with your designs! I encourage my kids to think outside the box—trees, flowers, or even little animals. The more imaginative, the better!
Step 5: Initiate the Reaction
Slowly drizzle 1/4 cup of white vinegar over the baking soda shapes. Watch as the mixture fizzes and bubbles, creating a magical reaction. This moment is always filled with squeals of delight from my kids as they see their creations come to life. It’s like a mini science experiment right in our home!
Step 6: Let It Dry
Allow the crystals to dry completely over the next few days. As they dry, they will form beautiful, colorful crystals that resemble a forest. I often find myself checking on our creations, eagerly anticipating the final result. It’s a wonderful reminder of the beauty that can come from simple ingredients and a little patience!
Tips for Best Results
To ensure your Baking Soda Rainbow Crystal Forest turns out beautifully, I’ve gathered some helpful tips from my own crafting experiences. These little nuggets of wisdom can make a big difference in your project!
- Experiment with different color combinations: Don’t be afraid to mix and match colors! I’ve found that creating a vibrant forest is all about layering hues. Try combining colors like blue and green for a lush look, or pink and purple for a whimsical feel. The possibilities are endless, and it’s a great way to let your creativity shine!
- Use a dropper for precise application: If you want to create intricate designs, a dropper can be a game-changer. I remember using one for the first time and being amazed at how it allowed us to add just the right amount of color to each shape. It’s perfect for those little details that make your crystal forest truly unique!
- Allow the crystals to dry completely: Patience is key! I’ve learned that letting the crystals dry fully is essential for achieving the best results. It can be tempting to check on them frequently, but giving them the time they need will ensure they form those stunning, colorful crystals we all love. Trust me, the wait is worth it!
Crafting is all about enjoying the process, and these tips can help you create a beautiful Baking Soda Rainbow Crystal Forest that you and your kids will cherish. So gather your materials, embrace your creativity, and let the magic unfold!
Project Variations
Get creative with your Baking Soda Rainbow Crystal Forest by trying out these fun variations! I love how this project can be adapted to fit different themes and seasons, making it a versatile craft that keeps the excitement alive.
- Style Variations: Use different shapes like trees, flowers, or animals to create a themed forest. I remember one year, my kids and I decided to make a magical fairy forest. We shaped our crystals into tiny mushrooms and whimsical flowers, and it turned out to be a delightful display that sparked our imaginations!
- Color Changes: Experiment with pastel colors for a softer look or neon colors for a more vibrant display. I’ve found that using pastel shades creates a dreamy effect, perfect for a serene atmosphere. On the other hand, neon colors can add a fun, energetic vibe that’s great for parties or celebrations!
- Seasonal Adaptations: Create a winter wonderland with icy blue and white crystals or a fall forest with warm oranges and browns. I love to switch up our crystal forest with the seasons. In winter, we make frosty blue and white crystals that resemble snowflakes, while in autumn, we use rich reds and oranges to mimic falling leaves. It’s a wonderful way to celebrate the changing seasons!
These variations not only keep the crafting experience fresh but also allow you to explore your creativity in new ways. I encourage you to let your imagination run wild and see where it takes you. Each variation can lead to a unique and beautiful creation that you and your family will cherish!
Decoration and Usage Ideas
Once your Baking Soda Rainbow Crystal Forest is complete, the fun doesn’t stop there! I love finding creative ways to display our colorful creations, and I’m excited to share some ideas that can brighten up your home and bring joy to your family.
- Table Centerpiece: Place your crystal formations in the center of your dining table for a stunning display. I remember hosting a family dinner and using our crystal forest as the centerpiece. It sparked conversations and added a magical touch to the evening. The vibrant colors caught everyone’s eye, and it felt like we were dining in a whimsical wonderland!
- Kids’ Room Decor: Brighten up your child’s room by placing the crystals on shelves or windowsills. My kids love showcasing their creations, and it gives their space a personal touch. We often arrange the crystals in fun patterns, and it’s heartwarming to see their faces light up every time they walk into their room.
- Gift Idea: Package your crystals in a decorative box as a unique gift for friends or family. I’ve found that these colorful creations make for thoughtful presents, especially for birthdays or special occasions. Adding a little note about the crafting process makes it even more special. It’s a wonderful way to share the joy of creativity with others!
These decoration and usage ideas not only showcase your beautiful Baking Soda Rainbow Crystal Forest but also create lasting memories with your loved ones. I encourage you to get creative with how you display your crystals and let your imagination shine. After all, crafting is all about sharing joy and beauty with the world around us!
FAQs about Baking Soda Rainbow Crystal Forest
As I embarked on my journey to create the Baking Soda Rainbow Crystal Forest, I found myself with a few questions along the way. I know many of you might have similar queries, so I’ve compiled some frequently asked questions to help guide you through this colorful adventure!
Q: How long does it take for the crystals to dry?
A: The crystals typically take 2-3 days to dry completely, depending on humidity levels. I remember checking on ours daily, eagerly anticipating the moment they transformed into beautiful, colorful formations. Patience is key, but the wait is absolutely worth it!
Q: Can I use other types of coloring?
A: Yes! You can experiment with liquid watercolors or even natural dyes for a different effect. I’ve tried using beet juice for a lovely pink hue and turmeric for a sunny yellow. It’s a fun way to explore colors while keeping things natural!
Q: Is this project safe for kids?
A: Yes, but ensure good ventilation when working with vinegar and supervise young children to avoid ingestion of materials. I always make sure to explain the process to my kids, emphasizing safety while we craft together. It’s a great opportunity to teach them about being responsible while having fun!
These FAQs should help ease any concerns you might have as you dive into creating your own magical crystal forest. Remember, crafting is all about exploration and creativity, so don’t hesitate to ask questions and enjoy the process!
Final Thoughts
Creating a Baking Soda Rainbow Crystal Forest is not just a fun craft; it’s an opportunity to bond with your children and unleash your creativity. I can still recall the joy on my kids’ faces as we mixed the ingredients together, their laughter echoing in the kitchen. This project is a beautiful reminder that simple ingredients can lead to stunning results, and it’s a wonderful way to make lasting memories.
As a busy mom, I often find myself caught up in the hustle and bustle of daily life. However, taking the time to craft with my children has become a cherished ritual. I love how this project allows us to step away from screens and engage in something tangible and colorful. Watching the crystals form over the days is like witnessing a little miracle unfold right before our eyes.
So gather your materials, invite your kids to join in, and let the magic of color and creativity fill your home. Remember, it’s okay if things don’t turn out perfectly. Crafting is all about the journey, not just the destination. Embrace the mess, enjoy the process, and most importantly, have fun! Happy crafting!
Print
Baking Soda Rainbow Crystal Forest: Create Colorful Wonders!
Description
Create a stunning Baking Soda Rainbow Crystal Forest using simple ingredients and a bit of patience. This project results in colorful, crystalline formations that resemble a magical forest.
Instructions
- In a mixing bowl, combine the baking soda and water to create a paste.
- Divide the paste into separate cups or containers.
- Add a few drops of different food coloring to each cup and mix well.
- On a tray or baking sheet, spoon the colored baking soda mixture into different shapes or piles.
- Slowly drizzle white vinegar over the baking soda shapes to initiate the reaction.
- Watch as the mixture fizzes and forms colorful crystals as it dries over the next few days.
Keywords: Baking Soda, Rainbow Crystals, Kids Craft, DIY Project, Colorful Decorations


