Introduction to BAKING SODA RAINBOW CRYSTAL FOREST
Welcome to the enchanting world of the BAKING SODA RAINBOW CRYSTAL FOREST! This delightful DIY project is not only a feast for the eyes but also a fantastic way to bond with your kids while exploring the wonders of science and creativity. Imagine the joy of watching vibrant colors transform into sparkling crystals right before your eyes! It’s simple, safe, and oh-so-rewarding. Whether you’re a busy mom looking for a fun afternoon activity or a teacher seeking an engaging classroom project, this craft is sure to bring smiles and spark imaginations. Let’s get started on this colorful adventure!
Why You’ll Love This BAKING SODA RAINBOW CRYSTAL FOREST
This BAKING SODA RAINBOW CRYSTAL FOREST project is a delightful blend of creativity and education, making it perfect for family bonding. It’s easy on the wallet, using simple ingredients you likely already have at home. Plus, the joy of watching your kids’ faces light up as they create their own colorful crystals is priceless! It’s a relaxing way to spend time together, fostering creativity and curiosity in a fun, hands-on way.
Materials and Tools Needed for BAKING SODA RAINBOW CRYSTAL FOREST
To embark on your colorful journey of creating a BAKING SODA RAINBOW CRYSTAL FOREST, you’ll need a few simple materials that are easy to find and budget-friendly. Here’s what you’ll need:
- Baking soda: This is the star of the show! It’s what forms the base of your crystals and is safe for kids to handle.
- Water: Essential for mixing with baking soda to create that magical paste.
- Food coloring: Choose a variety of colors to make your forest vibrant and eye-catching. You can even use natural dyes if you prefer an eco-friendly option!
- Small containers or cups: Perfect for mixing and holding your colorful concoctions. Recycled yogurt cups work great!
- Stirring sticks or spoons: These will help you mix the colors into your baking soda paste. Wooden sticks are a fun, rustic choice!
- Tray or baking sheet: This will catch any spills and provide a surface for shaping your crystals. A simple cookie sheet will do the trick!
Gather these materials, and you’re all set to create your dazzling crystal forest! Each item plays a vital role in bringing your colorful vision to life, making this project both fun and educational.
How to Make BAKING SODA RAINBOW CRYSTAL FOREST
Creating your very own BAKING SODA RAINBOW CRYSTAL FOREST is a delightful adventure that combines science and art! Let’s dive into the steps to bring your colorful vision to life. Each step is filled with opportunities for creativity, so grab your materials and let’s get started!
Step 1: Create the Base Mixture
First things first, we need to whip up our magical base mixture! In a bowl, combine baking soda and water to form a thick paste. I usually start with about two parts baking soda to one part water, but feel free to adjust until you find the perfect consistency. You want it thick enough to hold its shape, like a fluffy cloud. If it’s too runny, just add a bit more baking soda. The texture is so satisfying to mix, and it’s a great way to get the kids involved!
Step 2: Divide and Color
Now that you have your base ready, it’s time to divide the mixture into small containers. This is where the fun really begins! Pour equal amounts of the paste into each container. Then, add a few drops of food coloring to each one. I love using bright colors like electric blue, vibrant green, and sunny yellow. Encourage your kids to mix colors to create their own unique shades—maybe a lovely lavender or a fiery orange! Stir well until the colors are fully blended, and watch as the magic unfolds!
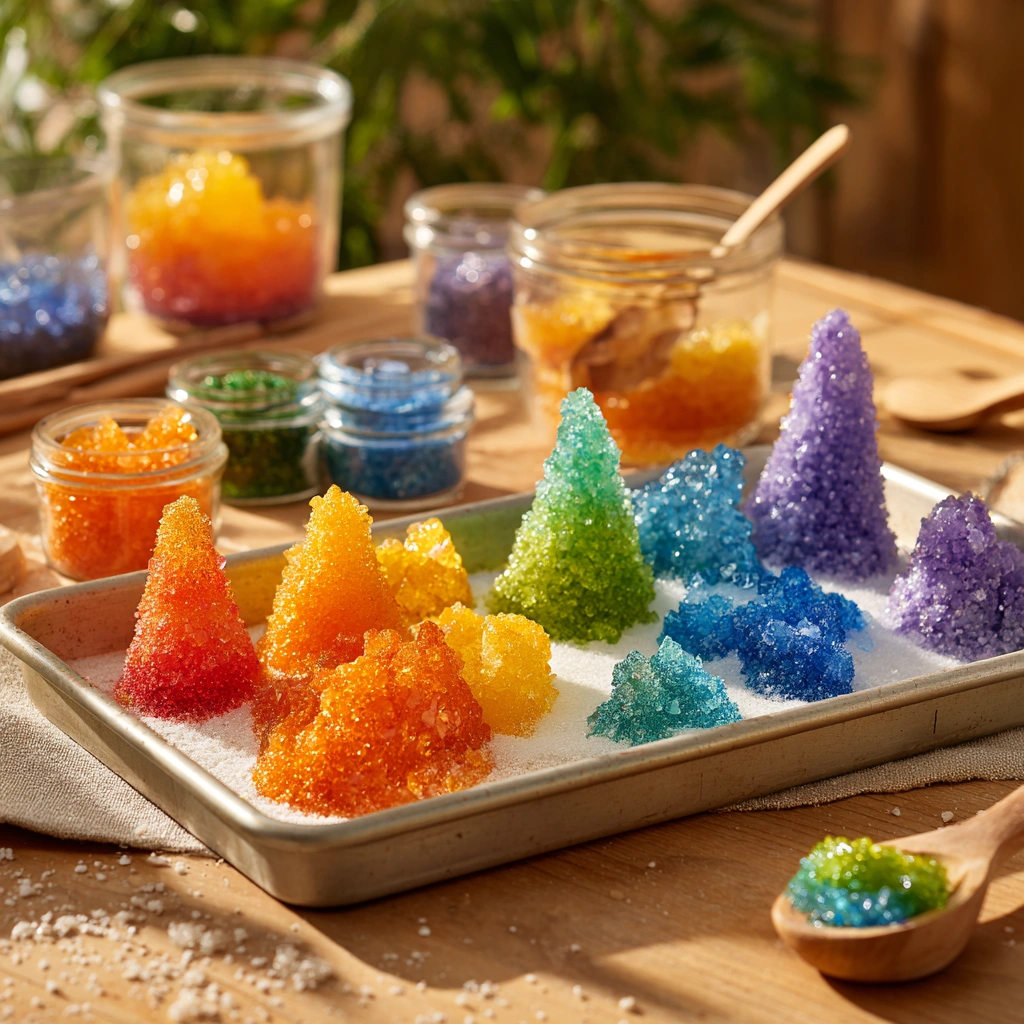
Step 3: Shape Your Crystals
Next, let’s get those colorful mixtures onto a tray or baking sheet. Pour each colored mixture onto the tray, spreading them out to form different shapes. You can create little mounds, swirls, or even abstract designs. The more creative you get, the more enchanting your crystal forest will be! Just imagine the soft shimmer of the colors blending together as they dry. If you want to add a little extra sparkle, consider sprinkling some glitter on top before they dry!
Step 4: Let Them Dry
Now comes the hardest part—waiting! Let your mixtures sit for 24 hours to dry and crystallize. This is when the real magic happens! I often find myself peeking at them, excited to see how they transform. The anticipation builds as you wonder what your colorful creations will look like. Trust me, the wait is worth it, and it’s a great opportunity to teach kids about patience and the science of crystal formation!
Step 5: Assemble Your Forest
Once your crystals are dry, it’s time to bring your rainbow crystal forest to life! Gently scrape the crystals off the tray. They should come off easily, revealing their sparkling beauty. Arrange them in a way that feels right to you—maybe in a whimsical pattern or clustered together like a real forest. You can even use small twigs or leaves to enhance the natural look. The final result is a stunning display that will make your heart sing! Plus, it’s a fantastic conversation starter for guests!
And there you have it! Your very own BAKING SODA RAINBOW CRYSTAL FOREST is ready to dazzle. This project not only teaches kids about crystal formation but also allows for endless creativity. So gather your materials, roll up your sleeves, and let the crafting magic begin!
Tips for Best Results
- For larger crystals, try using more baking soda in your mixture.
- If your mixture is too runny, add a bit more baking soda to thicken it up.
- Always supervise young children while crafting to ensure safety.
- Experiment with layering colors for a more dynamic look.
- Consider using natural food dyes for an eco-friendly twist!
Theme and Design Variations
Get creative with your BAKING SODA RAINBOW CRYSTAL FOREST by exploring different themes and color schemes! Here are some fun ideas to inspire your crafting:
- Seasonal Themes: Use autumn colors like orange, red, and brown for a fall forest, or pastel shades for a spring garden.
- Holiday Spirit: Create a winter wonderland with icy blues and whites, or vibrant reds and greens for a festive holiday display.
- Under the Sea: Use shades of blue, green, and purple to mimic ocean waves and coral reefs.
- Glow-in-the-Dark: Add glow-in-the-dark paint to your mixtures for a magical nighttime effect!
- Kid-Friendly Versions: Let kids choose their favorite colors and create themed forests based on their favorite stories or characters!
These variations will make your crystal forest even more special and personalized!
Display and Use Ideas
Your stunning BAKING SODA RAINBOW CRYSTAL FOREST isn’t just a beautiful craft; it can also brighten up your home or be a thoughtful gift! Here are some creative ways to display and use your colorful creations:
- Home Decor: Place your crystal forest on a windowsill or coffee table to add a pop of color to your space.
- School Crafts: Use them as a fun science project display in the classroom, showcasing the beauty of crystal formation.
- Gift Ideas: Package your crystals in a clear jar with a ribbon for a unique gift that friends and family will adore.
- Holiday Displays: Incorporate them into your seasonal decorations for a whimsical touch during celebrations.
FAQs about BAKING SODA RAINBOW CRYSTAL FOREST
Q: How long does it take for the crystals to dry?
A: The crystals need to dry for about 24 hours to fully crystallize. It’s the perfect time to build anticipation for the magical reveal!
Q: Can I use other types of coloring besides food coloring?
A: Absolutely! You can experiment with natural dyes or even watercolor paints. Just make sure they are safe for kids and won’t stain surfaces.
Q: What if my crystals don’t form properly?
A: If your crystals don’t turn out as expected, don’t worry! You can adjust the baking soda and water ratio for a thicker paste next time, or try letting them dry longer.
Q: Is this project safe for young children?
A: Yes, the BAKING SODA RAINBOW CRYSTAL FOREST is a safe and fun activity for kids aged 5 and up. Just be sure to supervise them while handling materials!
Q: How can I store my crystal creations?
A: To keep your crystals looking their best, store them in a cool, dry place away from direct sunlight. You can also display them in a jar to protect them from dust!
Final Thoughts
Creating your own BAKING SODA RAINBOW CRYSTAL FOREST is not just a craft; it’s a joyful experience filled with color, creativity, and a sprinkle of science! The satisfaction of watching those vibrant crystals come to life is truly magical. I encourage you to gather your materials, invite your kids to join in, and let your imaginations run wild. Don’t forget to share your beautiful creations with friends and family! I can’t wait to see the unique crystal forests you all create. Happy crafting, and may your days be filled with color and joy!
Print
BAKING SODA RAINBOW CRYSTAL FOREST: Create a Magical DIY Wonderland!
Description
Create a stunning rainbow crystal forest using baking soda and water. This colorful DIY project is perfect for kids and adults alike, providing a fun and educational experience in crystal formation.
Instructions
- In a bowl, mix 1 cup of baking soda with 1/2 cup of water until it forms a thick paste.
- Divide the mixture into small containers.
- Add a few drops of different food coloring to each container and stir well to create colorful mixtures.
- Pour the colored mixtures onto a tray or baking sheet, spreading them out to form different shapes.
- Let the mixtures sit for 24 hours to dry and crystallize.
- Once dry, gently scrape the crystals off the tray and arrange them to create your rainbow crystal forest.
- Category: Kids Craft
Keywords: Baking Soda, Rainbow Crystals, DIY Craft, Kids Activity, Crystal Formation


