Introduction to Baking Soda Ornaments
Welcome to the wonderful world of Baking Soda Ornaments! If you’re looking for a fun and creative way to celebrate the holiday season, you’ve come to the right place. This DIY project is not only simple but also a fantastic opportunity to bond with your kids or friends. I remember the joy of crafting these ornaments with my little ones, their eyes sparkling with excitement as we shaped and decorated each piece. Plus, they make for beautiful keepsakes that capture the spirit of the season. Let’s get started on this delightful journey of creativity!
Why You’ll Love This Baking Soda Ornaments
Creating Baking Soda Ornaments is a delightful way to unleash your creativity while spending quality time with loved ones. This project is not only easy on the wallet but also incredibly rewarding. I cherish the moments when my kids and I gather around the table, laughing and crafting together. Plus, these ornaments add a personal touch to your holiday decor, making your home feel warm and inviting. It’s a win-win!
Materials and Tools Needed for Baking Soda Ornaments
To create your own Baking Soda Ornaments, you’ll need a few simple materials that are easy to find and budget-friendly. Here’s what you’ll need:
- Baking soda: This is the star of the show! It gives your ornaments their unique texture and helps them hold their shape.
- Cornstarch: This ingredient adds a lovely smoothness to the dough, making it easier to work with.
- Water: Essential for mixing the ingredients together, creating the perfect dough consistency.
- Cookie cutters: These fun tools allow you to create various shapes, adding personality to your ornaments.
- Rolling pin: A must-have for rolling out the dough evenly, ensuring your ornaments are uniform in thickness.
- Parchment paper: This handy surface prevents sticking and makes cleanup a breeze.
- Straw: Use this to create holes for hanging your ornaments—don’t skip this step!
- Paint (optional): If you want to add a splash of color, non-toxic paint is a great choice for decorating.
- Ribbon or twine: Perfect for hanging your finished ornaments, adding a charming touch.
These materials are not only easy to gather but also safe for family-friendly crafts. You can often find them at your local grocery store or craft shop, making this project accessible for everyone!
How to Make Baking Soda Ornaments
Creating your own Baking Soda Ornaments is not just a craft; it’s a delightful experience that brings families together. I remember the first time I made these with my kids. The kitchen was filled with laughter, flour dust, and the sweet smell of creativity. Let’s dive into the steps to make these charming keepsakes!
Step 1: Prepare the Dough
Start by mixing your baking soda, cornstarch, and water in a saucepan over medium heat. Stir continuously as the mixture begins to thicken. It’s like watching a magic potion bubble and transform! Just be careful; the mixture can get hot, so keep little hands at a safe distance. Once it reaches a dough-like consistency, remove it from the heat and let it cool slightly.
Step 2: Knead the Dough
Once the dough is cool enough to handle, it’s time to knead! This step is crucial for achieving a smooth texture. I love the feeling of the warm dough in my hands, almost like a soft pillow. Knead it until it’s smooth and pliable, which will make cutting out shapes much easier.
Step 3: Roll Out the Dough
Now, roll out your dough on a piece of parchment paper. Aim for about 1/4 inch thick—this thickness helps the ornaments hold their shape while drying. Use a rolling pin, and don’t be afraid to get a little creative! If you find the dough sticking, sprinkle a bit of cornstarch on the surface. It’s like giving your dough a little dusting of magic!
Step 4: Cut Out Shapes
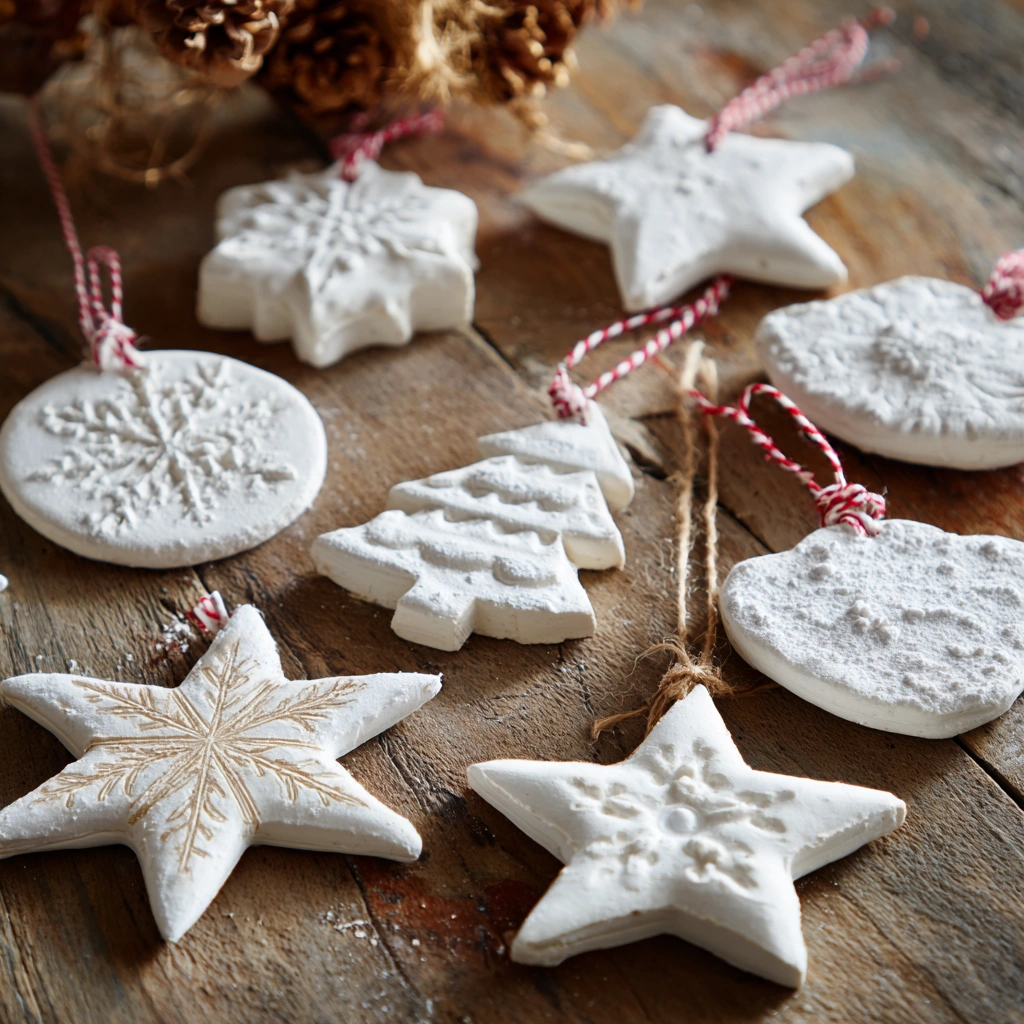
Here comes the fun part! Use cookie cutters to cut out various shapes for your ornaments. Think stars, hearts, or even festive trees! Each shape tells a story, and I love how my kids always choose the most whimsical designs. Remember, the more unique the shape, the more character your ornaments will have!
Step 5: Make Holes for Hanging
Before you let your creations dry, grab a straw and make a hole at the top of each ornament. This is where your ribbon or twine will go later. It’s a small but essential step—imagine trying to hang a beautiful ornament without a way to do so! I always remind my kids to be gentle with the straw to avoid any mishaps.
Step 6: Dry the Ornaments
Now it’s time to let your ornaments dry! You have two options: air dry them for 24-48 hours or bake them at a low temperature of 200°F for about 2 hours. I prefer the baking method because it speeds things up, and the anticipation of seeing the final product is just too exciting! Just keep an eye on them to prevent burning.
Step 7: Decorate Your Ornaments
Once your ornaments are dry, it’s time to unleash your creativity! You can paint them in vibrant colors, sprinkle them with glitter, or even add a few drops of essential oils for a lovely scent. I love how the soft shimmer of the paint under the lamp felt magical, transforming our simple creations into cherished holiday treasures.
Step 8: Hang and Enjoy
Finally, thread your ribbon or twine through the holes and hang your ornaments! Whether you choose to adorn your tree, decorate your home, or gift them to loved ones, these Baking Soda Ornaments are sure to bring joy. I often hang ours in the window, where they catch the light beautifully, reminding us of the fun we had making them.
Tips for Best Results
- For smoother dough, ensure you stir continuously while heating to avoid lumps.
- If your ornaments crack while drying, try rolling the dough a bit thicker next time.
- Always supervise young children, especially when using straws or paints.
- Experiment with different colors and scents to personalize your ornaments.
- Store any leftover dough in an airtight container to use later!
Theme and Design Variations
- Winter Wonderland: Use white and silver paint with glitter for a frosty look.
- Festive Colors: Choose red, green, and gold for a classic holiday theme.
- Kid-Friendly Fun: Let kids decorate with bright colors and fun stickers for a playful touch.
- Nature-Inspired: Use earthy tones like browns and greens, and add leaves or twigs for a rustic feel.
- Personalized Ornaments: Write names or dates on the ornaments for a special keepsake.
Display and Use Ideas
Once your Baking Soda Ornaments are complete, the fun doesn’t stop there! Here are some creative ways to use and display your beautiful creations:
- Hang them on your holiday tree for a personal touch that sparks joy.
- Use them as gift tags for presents, adding a unique flair to your gifts.
- Display them in a decorative bowl or on a mantelpiece for festive home decor.
- Incorporate them into classroom decorations for a fun and educational craft project.
- Gift them to friends and family as heartfelt keepsakes that celebrate the season.
FAQs about Baking Soda Ornaments
1. Can I use food coloring in my baking soda ornaments?
Absolutely! Adding food coloring is a fun way to personalize your Baking Soda Ornaments. Just mix it in while preparing the dough for vibrant colors that pop!
2. How do I store my ornaments once they are dry?
Once your ornaments are dry, store them in a cool, dry place. You can use a box or a cloth bag to keep them safe from dust and damage. They’ll be ready to hang year after year!
3. What if my ornaments crack while drying?
If your ornaments crack, don’t worry! This can happen if the dough is too thin. Next time, try rolling it a bit thicker, and remember to keep an eye on them while they dry.
4. Are these ornaments safe for kids to make?
Yes! Baking Soda Ornaments are a safe and fun craft for kids, especially with adult supervision. Just be cautious with hot mixtures and small items like straws.
5. Can I use these ornaments for other holidays?
Definitely! While they’re perfect for the winter holidays, you can create themed ornaments for any occasion. Think hearts for Valentine’s Day or stars for summer celebrations!
Final Thoughts
Creating Baking Soda Ornaments is not just about crafting; it’s about making memories that last a lifetime. I cherish the laughter and creativity that fills the air when my family gathers to make these delightful keepsakes. The satisfaction of seeing our unique creations hanging proudly in our home is truly heartwarming. I encourage you to dive into this fun project with your loved ones and let your imaginations run wild! Don’t forget to share your beautiful results; I can’t wait to see the magic you create!
PrintBaking Soda Ornaments: Create Unique Holiday Keepsakes Together!
Description
Create beautiful and unique holiday ornaments using baking soda and cornstarch. These DIY ornaments are perfect for decorating your home or giving as gifts.
Instructions
- In a saucepan, mix the baking soda, cornstarch, and water over medium heat.
- Stir continuously until the mixture thickens and forms a dough-like consistency.
- Remove from heat and let it cool slightly.
- Once cool enough to handle, knead the dough until smooth.
- Roll out the dough on a piece of parchment paper to about 1/4 inch thick.
- Use cookie cutters to cut out shapes for your ornaments.
- Use a straw to make a hole at the top of each ornament for hanging.
- Place the ornaments on a baking sheet and let them air dry for 24-48 hours, or bake them at a low temperature (200°F) for about 2 hours.
- Once dry, you can paint or decorate your ornaments as desired.
- Thread ribbon or twine through the holes and hang your ornaments!
- Category: Crafts
Keywords: Baking Soda Ornaments, DIY Holiday Crafts, Homemade Ornaments, Kids Crafts