Introduction to Baking Soda Growing Tree
Welcome to the whimsical world of the Baking Soda Growing Tree! This delightful DIY project is not just a fun science experiment; it’s a magical journey that transforms simple ingredients into a stunning display. Imagine the joy on your kids’ faces as they watch their creations fizz and grow right before their eyes! This craft is perfect for family bonding, sparking creativity, and learning basic chemistry concepts in a playful way. Plus, it’s simple and safe, making it an ideal choice for kids aged five and up. Let’s dive into this enchanting adventure together!
Why You’ll Love This Baking Soda Growing Tree
This Baking Soda Growing Tree is a delightful blend of fun and learning! It’s incredibly easy to set up, making it perfect for busy moms and teachers looking for quick, engaging activities. Plus, it’s budget-friendly, using common household items. Watching the fizzing magic unfold is a joy that brings families together, sparking creativity and laughter. It’s a wonderful way to relax and bond with your kids while exploring the wonders of science!
Materials and Tools Needed for Baking Soda Growing Tree
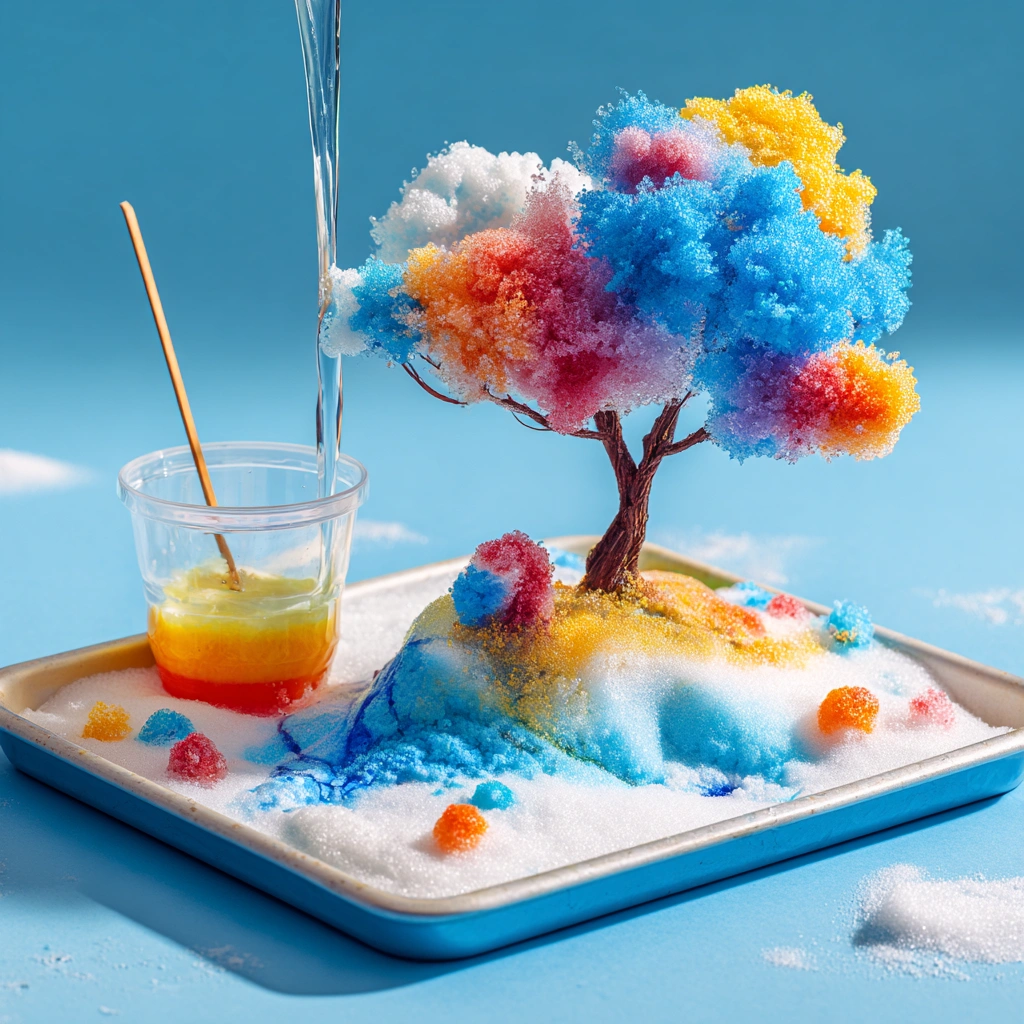
To create your magical Baking Soda Growing Tree, you’ll need a few simple materials that are easy to find around your home. Here’s what you’ll need:
- Baking soda: This is the star of the show! It’s what makes your tree grow and fizz.
- White vinegar: The secret ingredient that triggers the exciting reaction!
- Food coloring (optional): Add a splash of color to make your tree vibrant and eye-catching.
- Water: Helps to create the perfect paste for shaping your tree.
- Plastic cup or container: Ideal for mixing your ingredients without any mess.
- Tray or baking sheet: Essential for catching any overflow during the fizzing fun.
- Stirring stick or spoon: Perfect for mixing your concoction smoothly.
- Small tree branches or twigs: These will add a natural touch to your finished masterpiece!
All these materials are not only affordable but also eco-friendly, making this project a guilt-free way to have fun with your kids. Plus, you might already have most of them in your kitchen or craft supplies!
How to Make Baking Soda Growing Tree
Creating your Baking Soda Growing Tree is a delightful adventure that combines science and creativity! Follow these simple steps to watch your tree come to life. Let’s get started!
Step 1: Prepare the Baking Soda Mixture
First, let’s whip up our magical mixture! In a plastic cup, combine your baking soda with a few drops of food coloring. This is where the fun truly begins! As you stir, watch the colors swirl and blend, creating a vibrant paste that’s as exciting to make as it is to see. The texture should be thick and moldable, like a soft dough. This colorful concoction is the foundation of your tree, so take your time and enjoy the process!
Step 2: Shape Your Tree
Now comes the creative part! Transfer your colorful baking soda mixture onto a tray or baking sheet. With your hands or a spoon, shape it into a tree-like structure. Think about how a real tree looks—maybe it has a sturdy trunk and branches reaching out. You can even create a whimsical design that makes you smile! Encourage your kids to get involved; this is their chance to express their creativity. Remember, there’s no right or wrong way to shape your tree—just let your imagination run wild!
Step 3: Create the Vinegar Mixture
In a separate container, mix your white vinegar with a few drops of food coloring. This step is like preparing a magical potion! The anticipation builds as you watch the colors blend together. The vibrant mixture is not just pretty; it’s the key to the exciting reaction that’s about to happen. Make sure to mix it well, so the colors are evenly distributed. Get ready for the grand reveal—this is where the magic truly begins!
Step 4: Watch the Magic Happen
Here comes the moment you’ve been waiting for! Carefully pour the vinegar mixture over your baking soda tree and step back. The fizzing and bubbling will start almost immediately, creating a spectacular display that looks like your tree is coming to life! It’s a mesmerizing sight, and I promise you’ll be captivated by the transformation. The reaction is not only visually stunning but also a fantastic way to teach kids about chemical reactions in a fun and engaging way. Enjoy the moment and let the excitement fill the air!
Step 5: Add Finishing Touches
Once the fizzing has calmed down, it’s time to add those final touches. Decorate your tree with small twigs or branches to enhance its natural look. You can even sprinkle some glitter on top for a sparkling effect! This is where you can really personalize your creation. Each tree can be unique, just like the little artists who made them! Take a moment to admire your work and celebrate the creativity that brought it to life.
And there you have it! Your very own Baking Soda Growing Tree is complete. This project is not only a fantastic way to explore science but also a wonderful opportunity to create lasting memories with your family. So, gather your loved ones, and let the crafting begin!
Tips for Best Results
- For a more vibrant display, experiment with different colors of food coloring.
- If your mixture is too runny, add a bit more baking soda to thicken it up.
- Always supervise younger children when handling vinegar to ensure safety.
- Consider using biodegradable glitter for an eco-friendly sparkle!
- Make multiple trees of varying sizes for a fun mini garden display.
Theme and Design Variations
- Autumn Colors: Use warm shades like orange, red, and yellow to create a fall-themed tree.
- Winter Wonderland: Mix white baking soda with blue food coloring for a frosty effect, and add glitter for sparkle!
- Rainbow Tree: Create a multi-colored tree by using different colors for each layer of the tree.
- Halloween Spookiness: Use black and purple food coloring, and decorate with mini plastic spiders or ghosts.
- Spring Blossoms: Opt for pastel colors like pink and lavender, and add faux flowers for a blooming effect.
Display and Use Ideas
Your Baking Soda Growing Tree isn’t just a fun project; it can also be a charming addition to your home or a delightful gift! Here are some creative ways to showcase your masterpiece:
- Home Decor: Place your tree on a mantel or coffee table as a whimsical centerpiece.
- School Crafts: Use it as a fun science project to share with classmates during a science fair.
- Holiday Displays: Incorporate it into your seasonal decorations for a unique touch.
- Gift Idea: Wrap it up as a thoughtful gift for friends or family who love DIY projects!
FAQs about Baking Soda Growing Tree
1. Can I use other types of vinegar for this project?
Absolutely! While white vinegar is the most common choice, you can use apple cider vinegar or any other type. Just keep in mind that the color and scent might vary slightly, but the reaction will still be exciting!
2. How long does the fizzing reaction last?
The fizzing usually lasts a few minutes, depending on the amount of vinegar you use. It’s a good idea to watch closely, as the excitement is part of the fun! Once it stops bubbling, you can decorate your tree.
3. Is this project safe for younger children?
Yes, it’s safe for kids aged five and up! Just make sure to supervise younger children, especially when handling vinegar. It’s a great way to introduce them to basic chemistry concepts in a fun and engaging way!
4. Can I store the Baking Soda Growing Tree for later use?
Unfortunately, the reaction is a one-time event, so it’s best to enjoy it right after you make it. However, you can always create new trees whenever you want to experience the magic again!
5. What if my baking soda mixture is too runny?
If your mixture is too runny, simply add a bit more baking soda until it reaches a thick, moldable consistency. This will help your tree hold its shape better and create a more impressive display!
Final Thoughts
Creating your Baking Soda Growing Tree is not just a craft; it’s a joyful experience filled with laughter, learning, and creativity! Watching your tree come to life with vibrant colors and fizzy magic is truly satisfying. I hope you feel inspired to gather your family and dive into this enchanting project. Remember, every tree is unique, just like the memories you’ll create together. So, roll up your sleeves, unleash your imagination, and don’t forget to share your results! I can’t wait to see the magical creations you come up with!
Print
Baking Soda Growing Tree: Create a Magical DIY Garden Surprise!
Description
Create a magical baking soda growing tree that expands and transforms into a beautiful display, perfect for a fun science experiment or a unique garden decoration.
Instructions
- In a plastic cup, mix 1/2 cup of baking soda with a few drops of food coloring if desired.
- Slowly add 1/4 cup of water to the baking soda mixture and stir until it forms a thick paste.
- Transfer the mixture onto a tray or baking sheet, shaping it into a tree-like structure with branches.
- In a separate container, mix 1/2 cup of white vinegar with a few drops of food coloring.
- Pour the vinegar mixture over the baking soda tree and watch it grow and fizz!
- Let the reaction continue until it stops, then decorate with small twigs or branches to enhance the tree effect.
- Category: Science Experiment
Keywords: Baking Soda, Growing Tree, DIY Garden, Science Experiment, Kids Craft


