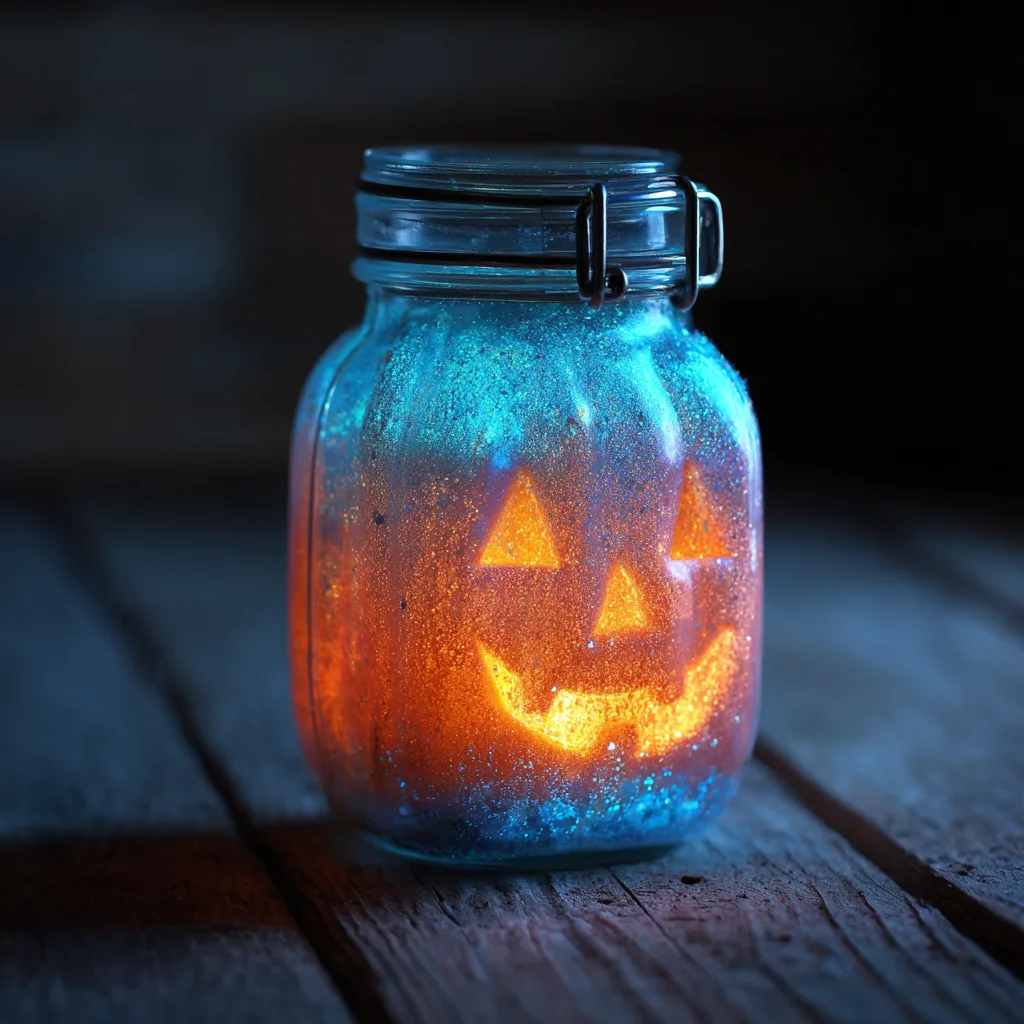
As the autumn leaves fall and the air turns crisp, the season for spooky, spectacular science arrives. Imagine capturing the eerie glow of a jack-o’-lantern not with a candle, but with a chemical reaction that fizzes and illuminates from within a sealed jar. This activity, the Baking Soda Glowing Pumpkin, is the perfect fusion of classic Halloween craft and thrilling STEM discovery. It offers a safe, mesmerizing alternative to traditional candles, creating a hauntingly beautiful decoration that demonstrates fascinating scientific principles right on your tabletop.
This project is designed to be accessible, using common household items to create a stunning visual effect. It encourages creativity in crafting the pumpkin while providing a hands-on lesson in chemistry and the properties of light. Below, you will find a complete guide to creating your own glowing pumpkin, a deep dive into the science that makes it work, and tips to ensure your experiment is both a visual and educational success.
Gathering Your Alchemist’s Toolkit: Complete Ingredients and Tools
The magic of this experiment lies in its simplicity. The ingredients are straightforward, but each plays a critical role in the final, glowing result.
Core Materials:
-
1 Clear Glass Jar with a Lid: This is your containment vessel and display case. A mason jar works perfectly, as its clarity allows for an unobstructed view of the reaction. The lid is crucial for sealing in the reaction.
-
1 Small Artificial Pumpkin: A hollow, plastic craft pumpkin is ideal. Alternatively, you can sculpt your own pumpkin from polymer clay or air-dry clay.
-
Craft Knife or Small Carving Tool: For carefully carving a face or designs into your pumpkin. Adult supervision is essential.
Chemical Reactants:
-
Baking Soda (2-3 tablespoons): This common kitchen staple will act as the base for our chemical reaction inside the pumpkin.
-
Vinegar (½ – ¾ cup): This is the key reactant that will interact with the baking soda.
-
Glow-in-the-Dark Paint or Glow Powder: This is the source of our eerie luminescence.
-
Water (optional): Can be used to thin glow paint if needed.
Helpful Tools:
-
Small bowl or measuring cup for vinegar
-
Spoon or scoop for baking soda
-
Tray or mat to protect work surface
-
Funnel (optional, for neat pouring)
-
Measuring spoons
The Creation Process: Carving, Preparing, and Reacting
This process is broken down into three distinct phases: the craft, the preparation, and the grand finale—the chemical reaction.
Phase One: Crafting Your Jack-o’-Lantern
-
Design Your Face: Using a marker, lightly sketch a classic jack-o’-lantern face or a simple design onto your artificial or clay pumpkin. Simple triangles for eyes and a jagged smile work well and are easier to cut.
-
Carve with Care: With adult assistance, use the craft knife or carving tool to carefully cut out the designed features. The goal is to create openings that will allow the glowing liquid to seep out dramatically. Ensure you have an opening at the top large enough to add the baking soda.
Phase Two: Preparing the Experiment
-
Prepare the Pumpkin: Place your carved pumpkin inside the clear glass jar. If using a real jar lid, you may need to ensure the pumpkin fits comfortably without touching the sides too much.
-
Add the Baking Soda: Carefully add 2-3 tablespoons of baking soda inside the pumpkin through the top opening. For an enhanced glow, you can mix glow powder with the baking soda at this stage.
-
Charge the Glow Material: Before starting the reaction, expose your glow paint or powder to a bright light source for several minutes. This “charging” process allows the phosphors in the paint to absorb light energy.
Phase Three: Creating the Chemical Reaction
-
Mix the Liquid: In a separate container, mix the vinegar with a generous amount of glow-in-the-dark paint. Stir until well combined. The vinegar will now carry the glowing particles.
-
Pour and Observe: Quickly but carefully pour the vinegar-glowing paint mixture into the pumpkin through the top opening, filling it about halfway.
-
Seal the Jar: Immediately secure the lid tightly on the jar.
-
Watch the Magic: Step back and observe as the chemical reaction begins. Bubbles of carbon dioxide gas will form, forcing the glowing liquid to seep out through the carved features of the pumpkin, creating an eerie, fizzing glow that illuminates the entire jar.
The Science Behind the Glow: A Lesson in Chemistry and Physics
This captivating experiment demonstrates several important scientific principles in action:
The Chemical Reaction: Acid-Base Reaction
When baking soda (a base, sodium bicarbonate) mixes with vinegar (an acid, acetic acid), they undergo an acid-base reaction. This produces carbon dioxide gas (the fizzing bubbles), water, and sodium acetate. The equation looks like this:
NaHCO₃ + CH₃COOH → CO₂ + H₂O + CH₃COONa
The carbon dioxide gas creates pressure inside the sealed pumpkin, forcing the liquid mixture out through the carved openings in a dramatic, bubbling flow.
The Physics of Light: Phosphorescence
The glow effect is due to phosphorescence, a process where certain materials absorb light energy and then slowly release it over time. The glow paint contains phosphors that get “charged” when exposed to light. When placed in the dark jar with the bubbling reaction, these phosphors emit the stored energy as a soft, eerie glow that appears to magically illuminate the bubbling liquid.
Additional Concepts:
-
Gas Pressure: The buildup of carbon dioxide gas demonstrates how gases expand and create pressure.
-
Fluid Dynamics: The movement of the glowing liquid through the pumpkin’s openings shows how fluids behave under pressure.
-
Solubility: The experiment shows how some substances (glow paint) can be suspended in liquids (vinegar) without dissolving.
Creative Variations and Safety Tips
Creative Variations:
-
Color Combinations: Experiment with different colored glow paints for multi-colored effects
-
Themed Designs: Create different carved patterns beyond traditional jack-o’-lantern faces
-
Multiple Pumpkins: Use several small pumpkins in one large jar for a pumpkin patch effect
-
Layered Reactions: Try adding the ingredients in different sequences to vary the reaction
Important Safety Tips:
-
Always supervise children during this experiment
-
Use caution when carving the pumpkin – adults should handle sharp tools
-
Ensure the jar lid is secure but be aware that pressure can build up
-
Work on a protected surface as the reaction may cause some bubbling overflow
-
Use non-toxic, washable glow materials for easy cleanup
-
Do not ingest any materials – despite using kitchen ingredients, they are not for consumption
Educational Applications and Discussion Points
This experiment provides numerous learning opportunities:
For Younger Children (Ages 4-7):
-
Observe cause and effect relationships
-
Learn about colors and light
-
Practice fine motor skills during the crafting phase
-
Discuss Halloween traditions and safety
For Older Children (Ages 8-12):
-
Understand basic chemical reactions
-
Learn about gas formation and pressure
-
Explore properties of light and phosphorescence
-
Practice following sequential instructions
-
Develop hypothesis and observation skills
Discussion Questions to Enhance Learning:
-
“What do you think will happen when we add the vinegar to the baking soda?”
-
“Why do you think the liquid glows without any electricity?”
-
“How does the gas help create the bubbling effect?”
-
“What would happen if we used more/less baking soda?”
-
“Why do you think we need to seal the jar tightly?”
Troubleshooting Common Issues
-
Weak Glow: Ensure the glow paint is properly charged with bright light before use
-
Slow Reaction: Use fresh baking soda and vinegar at room temperature
-
Leaking Jar: Check that the lid seals properly and isn’t cracked
-
Clogged Openings: Make sure the carved features are large enough for liquid to flow through
-
Short-Lived Effect: The reaction duration can be extended by using more reactants
Conclusion: A Perfect Blend of Magic and Science
The Baking Soda Glowing Pumpkin in a Jar is more than just a seasonal craft—it’s a captivating scientific demonstration that brings chemistry to life in the most visually striking way. By combining simple household materials with a bit of creative carving, you can create a mesmerizing Halloween display that teaches fundamental scientific concepts while capturing the magical spirit of the season.
This activity demonstrates that some of the most wonderful creations come from understanding and harnessing basic scientific principles. The glowing, bubbling pumpkin serves as a perfect reminder that science isn’t just found in laboratories—it’s all around us, waiting to be discovered in our everyday materials and seasonal traditions.
As you watch your creation glow and fizz throughout the Halloween season, remember that you’re not just looking at a decoration—you’re witnessing the beautiful intersection of art and science, where chemical reactions become holiday magic and learning becomes an unforgettable experience.