
Introduction to Baking Soda Galaxy Ornaments
Crafting is a wonderful way to express creativity, especially when it comes to home decoration. If you’re a busy mom or professional looking for a fun and easy project, baking soda galaxy ornaments are the perfect solution! These unique ornaments not only add a touch of whimsy to your home but also make for thoughtful gifts. With just a few simple ingredients, you can create beautiful galaxy-themed decorations that will impress your family and friends. Let’s dive into the world of DIY galaxy ornaments!
Why You’ll Love This Baking Soda Galaxy Ornaments
Baking soda galaxy ornaments are a fantastic way to unleash your creativity without breaking the bank. They are affordable, easy to make, and can be customized to fit any decor style. Whether you want to create a serene blue galaxy or a vibrant rainbow effect, the possibilities are endless. Plus, this project is perfect for all skill levels, making it a great activity to do with your kids or friends!
Materials Needed for Baking Soda Galaxy Ornaments
To get started on your baking soda galaxy ornaments, gather the following materials:
- 1 cup baking soda: The main ingredient that gives the ornaments their structure.
- 1/2 cup cornstarch: Helps to bind the mixture and create a smooth texture.
- 1/2 cup water: Needed to combine the dry ingredients into a dough.
- Food coloring (various colors): For creating the galaxy effect.
- Glitter (optional): Adds a sparkling touch to your ornaments.
- String or ribbon for hanging: To display your beautiful creations.
For a printable full list of materials, see below.
Tools Required for Baking Soda Galaxy Ornaments
Before you start crafting, make sure you have the following tools on hand:
- Mixing bowl: For combining your ingredients.
- Stirring spoon: To mix the dough thoroughly.
- Cookie cutters or molds: To shape your ornaments into fun designs.
- Baking sheet: For placing the ornaments while they dry.
- Parchment paper: To line the baking sheet and prevent sticking.
How to Make Baking Soda Galaxy Ornaments
Now that you have your materials and tools ready, let’s get into the fun part—making your baking soda galaxy ornaments! I remember the first time I tried this project; I was amazed at how simple it was to create something so beautiful. It felt like I was crafting little pieces of the universe right in my kitchen!
Here’s a step-by-step guide to help you along the way:
- Prepare the Dough: In a mixing bowl, combine 1 cup of baking soda, 1/2 cup of cornstarch, and 1/2 cup of water. Stir until you form a smooth dough. I love the texture of the dough; it’s soft and pliable, making it easy to work with.
- Add Color: Divide the dough into smaller portions and add different food coloring to each portion. Mix well to create various galaxy colors. This is where the magic happens! I often find myself getting lost in the vibrant hues, reminiscent of a starry night.
- Add Sparkle: If desired, mix in some glitter to give your ornaments a sparkling galaxy effect. Trust me, a little glitter goes a long way in making your ornaments shine!
- Shape the Ornaments: Use cookie cutters or molds to shape the dough into your desired ornament designs. I love using star and moon shapes, but feel free to get creative!
- Prepare for Drying: Place the shaped ornaments on a baking sheet lined with parchment paper. This step is crucial to prevent sticking, and it makes cleanup a breeze.
- Dry the Ornaments: Allow the ornaments to dry for 24-48 hours until they are hard. Patience is key here, but the wait is worth it!
- Add Hanging String: Once dry, attach string or ribbon to the ornaments for hanging. I love using colorful ribbons to add an extra pop!
And there you have it! Your very own baking soda galaxy ornaments, ready to adorn your home or be gifted to loved ones. I can’t wait to see how your creations turn out!
Why You’ll Love This Baking Soda Galaxy Ornaments
Baking soda galaxy ornaments are a fantastic way to unleash your creativity without breaking the bank. I remember the first time I made these ornaments; I was amazed at how simple yet rewarding the process was. They are not only affordable but also incredibly easy to make, which is a huge plus for busy moms like me!
One of the best parts about this project is the customization. You can create a serene blue galaxy or a vibrant rainbow effect, depending on your mood or the season. I often find myself experimenting with different color combinations, and it’s so much fun to see how each batch turns out uniquely. It’s like painting the night sky, but with dough!
This project is perfect for all skill levels, making it a great activity to do with your kids or friends. I love inviting my children to join in; it turns into a delightful bonding experience. We laugh, share ideas, and create beautiful memories together. Plus, it’s a wonderful way to teach them about colors and creativity!
Whether you’re looking to decorate your home or create thoughtful gifts, these baking soda galaxy ornaments are sure to impress. They add a whimsical touch to any space, and I can’t tell you how many compliments I’ve received from friends and family. So gather your materials, and let’s get crafting!
Materials Needed for Baking Soda Galaxy Ornaments
To get started on your baking soda galaxy ornaments, gather the following materials:
- 1 cup baking soda: The main ingredient that gives the ornaments their structure. I love how this simple ingredient transforms into something magical!
- 1/2 cup cornstarch: Helps to bind the mixture and create a smooth texture. It’s amazing how just a little bit can make such a difference.
- 1/2 cup water: Needed to combine the dry ingredients into a dough. I always find it satisfying to see the ingredients come together into a cohesive mixture.
- Food coloring (various colors): For creating the galaxy effect. This is where you can really let your creativity shine! I often use a mix of blues, purples, and pinks to mimic the night sky.
- Glitter (optional): Adds a sparkling touch to your ornaments. Trust me, a sprinkle of glitter can elevate your creations to a whole new level!
- String or ribbon for hanging: To display your beautiful creations. I love using colorful ribbons that complement the colors of the ornaments.
For a printable full list of materials, see below.
Tools Required for Baking Soda Galaxy Ornaments
Before you start crafting, make sure you have the following tools on hand:
- Mixing bowl: For combining your ingredients. I always choose a bowl that’s large enough to give me room to mix without making a mess!
- Stirring spoon: To mix the dough thoroughly. A sturdy spoon is essential; I often use a wooden one because it feels great in my hand and holds up well against the dough.
- Cookie cutters or molds: To shape your ornaments into fun designs. I love using star and moon shapes, but you can get creative with any shapes that inspire you!
- Baking sheet: For placing the ornaments while they dry. A good quality baking sheet is a must; I prefer one with a non-stick surface to make cleanup easier.
- Parchment paper: To line the baking sheet and prevent sticking. This little trick saves so much time and hassle, and I can’t recommend it enough!
Having the right tools makes all the difference in your crafting experience. I remember the first time I attempted this project without parchment paper, and let’s just say, it was a sticky situation! So, gather your tools, and let’s get ready to create some beautiful galaxy ornaments!
How to Make Baking Soda Galaxy Ornaments
Now that you have your materials and tools ready, let’s get into the fun part—making your baking soda galaxy ornaments! I remember the first time I tried this project; I was amazed at how simple it was to create something so beautiful. It felt like I was crafting little pieces of the universe right in my kitchen!
Here’s a step-by-step guide to help you along the way:
- Prepare the Dough: In a mixing bowl, combine 1 cup of baking soda, 1/2 cup of cornstarch, and 1/2 cup of water. Stir until you form a smooth dough. I love the texture of the dough; it’s soft and pliable, making it easy to work with.
- Add Color: Divide the dough into smaller portions and add different food coloring to each portion. Mix well to create various galaxy colors. This is where the magic happens! I often find myself getting lost in the vibrant hues, reminiscent of a starry night.
- Add Sparkle: If desired, mix in some glitter to give your ornaments a sparkling galaxy effect. Trust me, a little glitter goes a long way in making your ornaments shine!
- Shape the Ornaments: Use cookie cutters or molds to shape the dough into your desired ornament designs. I love using star and moon shapes, but feel free to get creative!
- Prepare for Drying: Place the shaped ornaments on a baking sheet lined with parchment paper. This step is crucial to prevent sticking, and it makes cleanup a breeze.
- Dry the Ornaments: Allow the ornaments to dry for 24-48 hours until they are hard. Patience is key here, but the wait is worth it!
- Add Hanging String: Once dry, attach string or ribbon to the ornaments for hanging. I love using colorful ribbons to add an extra pop!
And there you have it! Your very own baking soda galaxy ornaments, ready to adorn your home or be gifted to loved ones. I can’t wait to see how your creations turn out!
Tips for Best Results
As I’ve dived deeper into crafting baking soda galaxy ornaments, I’ve picked up a few tips that can really enhance your experience and the final product. Here are some of my favorites:
- Experiment with Color: Don’t be afraid to mix and match different food coloring combinations! I often find that layering colors creates a more vibrant galaxy effect. For instance, blending blues with purples can give you that deep space look, while adding a touch of pink can mimic a beautiful nebula. The more you play with colors, the more unique your ornaments will be!
- Make Hanging Easy: Before your ornaments dry, use a straw to poke a hole for hanging. This little trick has saved me from many headaches! I remember the first time I forgot to do this, and I had to improvise later. Trust me, it’s much easier to do it while the dough is still soft!
- Add a Scent: For an extra special touch, consider adding a few drops of essential oils to the dough. I love using lavender or citrus scents, which not only make the ornaments smell delightful but also add a calming atmosphere to your home. Just a few drops can make a big difference!
These tips have helped me create even more beautiful and personalized baking soda galaxy ornaments. I hope they inspire you to get creative and enjoy the process! Remember, crafting is all about having fun and expressing yourself, so don’t hesitate to try new things!
Project Variations
Get creative with your baking soda galaxy ornaments! One of the things I love most about crafting is the endless possibilities for personalization. Here are some fun variations to try that can take your galaxy ornaments to the next level:
- Style Variations: Use different shapes like stars, moons, or planets. I often find that using cookie cutters in various celestial designs adds a whimsical touch to my decorations. You could even create a whole solar system theme!
- Color Changes: Create a monochromatic look with shades of blue or purple. This can give your ornaments a sophisticated and modern feel. I once made a batch using only different shades of blue, and they looked stunning hanging together!
- Seasonal Adaptations: Add holiday-themed shapes and colors for festive decorations. For instance, you could make Christmas trees in green and red or hearts for Valentine’s Day. I love how versatile these ornaments can be, making them perfect for any occasion!
These variations not only allow you to express your creativity but also make your baking soda galaxy ornaments unique to your style. I encourage you to experiment and have fun with it! The joy of crafting comes from the process, so let your imagination run wild!
Decoration and Usage Ideas
Once your baking soda galaxy ornaments are complete, the fun doesn’t stop there! I love finding creative ways to showcase these beautiful creations around my home. Here are some delightful ideas on how to use them:
- Hang Them on Your Christmas Tree: These ornaments make for stunning holiday decorations. I remember the first year I hung my galaxy ornaments on the tree; they sparkled beautifully under the lights, creating a magical atmosphere!
- Use Them as Gift Tags: Add a personal touch to your presents by using these ornaments as gift tags. I often write the recipient’s name on the back, and it makes for a unique and thoughtful addition to any gift.
- Decorate Your Home: Hang them in windows or from ceiling hooks to create a whimsical display. I love the way they catch the light and add a pop of color to my living space. It’s like having a little piece of the galaxy indoors!
- Create a Mobile: String several ornaments together to make a beautiful mobile. This is a fun project I did with my kids, and it turned out to be a lovely centerpiece for our dining table. Watching it sway gently in the breeze adds a serene touch to our home.
These ideas not only allow you to enjoy your baking soda galaxy ornaments but also share them with others. I find that every time I use them in my decor, they spark joy and conversation. So, get creative and let your imagination guide you in showcasing your beautiful galaxy creations!
FAQs about Baking Soda Galaxy Ornaments
As I’ve shared my love for baking soda galaxy ornaments, I often get questions from fellow crafters eager to dive into this fun project. Here are some of the most common FAQs I’ve encountered, along with my personal insights:
Q: How long do the ornaments last?
A: When stored properly, these ornaments can last for years. I’ve had some hanging in my home for over two years, and they still look beautiful! Just make sure to keep them in a cool, dry place to prevent any moisture damage.
Q: Can I use other types of coloring?
A: Yes, you can use natural dyes or paint for a different effect. I’ve experimented with beet juice and turmeric for a more organic approach, and the results were stunning! It’s a great way to customize your ornaments while keeping them eco-friendly.
Q: Are these ornaments safe for children?
A: Yes, but supervision is recommended, especially with small parts and food coloring. I always make sure to craft alongside my kids, guiding them through the process. It’s a wonderful bonding experience, and I love seeing their creativity shine!
These FAQs should help ease any concerns you might have as you embark on your baking soda galaxy ornament journey. Remember, crafting is all about having fun and exploring your creativity, so don’t hesitate to ask questions and share your experiences!
Final Thoughts
Creating baking soda galaxy ornaments is not just a fun craft; it’s a way to bring a little magic into your home. I can’t tell you how many times I’ve looked at my finished ornaments and felt a sense of pride and joy. Each piece is a reflection of my creativity and a reminder of the time spent crafting with loved ones.
Whether you’re decorating for the holidays or simply adding a personal touch to your space, these ornaments are sure to delight. I love hanging them in my windows, where they catch the light and create a beautiful display. They also make wonderful gifts that show you care, especially when you personalize them with colors and shapes that resonate with the recipient.
So gather your materials, invite your kids or friends, and let your creativity shine! I encourage you to embrace the process, even if things don’t go perfectly. I’ve had my fair share of crafting mishaps, but those moments often lead to the most memorable experiences. Remember, the best part of crafting is the joy it brings, so enjoy every moment of this delightful project!
Happy crafting, and may your galaxy ornaments fill your home with wonder and warmth!
Print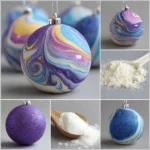
Baking Soda Galaxy Ornaments: Craft Your Own Unique Decor!
Description
Create beautiful and unique galaxy ornaments using baking soda, perfect for decorating your home or giving as gifts.
Instructions
- In a mixing bowl, combine baking soda, cornstarch, and water to form a dough.
- Divide the dough into smaller portions and add different food coloring to each portion to create various galaxy colors.
- Mix in glitter if desired for a sparkling effect.
- Use cookie cutters or molds to shape the dough into ornaments.
- Place the shaped ornaments on a baking sheet lined with parchment paper.
- Allow the ornaments to dry for 24-48 hours until hard.
- Once dry, attach string or ribbon for hanging.
Keywords: Baking Soda Galaxy Ornaments, DIY Galaxy Ornaments, Craft Project, Home Decor


