Introduction to Baking Soda Galaxy Ornaments
Welcome to the enchanting world of Baking Soda Galaxy Ornaments! If you’re looking for a fun and creative way to add a cosmic touch to your home décor, you’ve come to the right place. This DIY project is not only simple but also incredibly rewarding, especially when you see the joy on your kids’ faces as they craft their own little pieces of the universe. With just a few ingredients, you can create stunning ornaments that sparkle and shine, making it a perfect family-friendly craft for all ages. Let’s embark on this cosmic adventure together!
Why You’ll Love This Baking Soda Galaxy Ornaments
Creating Baking Soda Galaxy Ornaments is a delightful experience that brings families together. Not only are these ornaments easy and affordable to make, but they also spark creativity in both kids and adults. I love how this project allows for relaxation and fun, transforming a simple afternoon into a cosmic adventure. Plus, the joy of hanging your unique creations around the house is truly heartwarming!
Materials and Tools Needed for Baking Soda Galaxy Ornaments
To create your own Baking Soda Galaxy Ornaments, you’ll need a few simple materials that are easy to find and budget-friendly. Here’s what you’ll need:
- Baking soda: This is the star ingredient that gives your ornaments their unique texture.
- Cornstarch: It helps bind the mixture together, making it easier to shape.
- Water: Essential for mixing the ingredients into a dough.
- Food coloring: Use various colors to create vibrant galaxy effects—let your imagination run wild!
- Glitter (optional): For that extra sparkle, adding glitter can make your ornaments shine like stars.
- Cookie cutters: Choose fun shapes like stars and moons to bring your cosmic theme to life.
- A straw: This handy tool is perfect for making holes for hanging your ornaments.
- Oven or air-drying space: You’ll need one or the other to dry your creations.
- String or ribbon: This is what you’ll use to hang your beautiful galaxy ornaments.
These materials are not only easy to gather but also safe for kids, making this a fantastic family-friendly craft. Plus, you can often find eco-friendly alternatives, like natural food dyes or biodegradable glitter, to make your project even more sustainable!
How to Make Baking Soda Galaxy Ornaments
Creating your own Baking Soda Galaxy Ornaments is not just a craft; it’s an adventure into the cosmos right from your kitchen! I remember the first time I made these with my kids. The excitement in their eyes as we mixed the ingredients was priceless. So, let’s dive into the steps to craft these stunning cosmic decorations!
Step 1: Prepare the Dough
Start by grabbing a saucepan and combining your baking soda, cornstarch, and water. Over medium heat, stir the mixture until it transforms into a dough-like consistency. It’s like watching a magical potion bubble and thicken! Just be sure to keep an eye on it, as it can go from perfect to overcooked in a flash.
Step 2: Cool and Knead
Once your dough is ready, remove it from the heat and let it cool for a few minutes. This step is crucial! Kneading the dough while it’s still warm but not hot will give you a smoother texture. Trust me, the soft shimmer of the dough feels magical in your hands, and it’s a great way to bond with your little ones as they help knead away!
Step 3: Color Your Dough
Now comes the fun part! Divide your dough into smaller portions and add a few drops of food coloring to each. Mix until you achieve vibrant colors that remind you of a galaxy. I love experimenting with different combinations—think deep blues, purples, and sparkly silvers! The kids will enjoy this part, too, as they watch the colors swirl together.
Step 4: Shape Your Ornaments
Roll out your colored dough to about 1/4 inch thick. This is where your cookie cutters come into play! Use star, moon, or any shape that inspires you. As you cut out the shapes, the excitement builds—each one is a little piece of the universe waiting to shine!
Step 5: Make Hanging Holes
Before you bake or air-dry your ornaments, grab a straw and make a hole at the top of each shape. This is where your string or ribbon will go later. It’s a simple step, but it’s essential for hanging your beautiful creations. Plus, it’s a great way to practice fine motor skills with the kids!
Step 6: Drying Process
Now, you have two options: you can either bake your ornaments at 200°F (93°C) for 2-3 hours or let them air dry for 24-48 hours. If you’re short on time, baking is the way to go! Just remember to keep the kitchen well-ventilated if you choose to bake. The anticipation of seeing your ornaments dry is half the fun!
Step 7: Add Sparkle
Once your ornaments are dry, it’s time to add some sparkle! If you want to take your galaxy theme to the next level, sprinkle some glitter on top. You can do this by gently brushing on a bit of glue and then adding the glitter. The way the light catches the glitter will make your ornaments twinkle like stars!
Step 8: Hang Your Ornaments
Finally, thread some string or ribbon through the holes you made earlier. Now, find the perfect spot to display your galaxy ornaments! Whether it’s on a tree, in a window, or as part of your home décor, these cosmic creations will surely bring a smile to anyone who sees them.
And there you have it—your very own Baking Soda Galaxy Ornaments! This project is not only a fantastic way to create safe Halloween decorations but also a wonderful opportunity to bond with your family. I can’t wait to see how your cosmic creations turn out!
Tips for Best Results
- For a smoother dough, ensure you mix thoroughly and avoid lumps.
- If your ornaments crack while drying, try adding a bit more water to the dough next time.
- Supervise younger children closely, especially when using the oven or small items like straws.
- Experiment with layering colors for a more dynamic galaxy effect.
- Consider using natural dyes for a more eco-friendly approach!
Theme and Design Variations
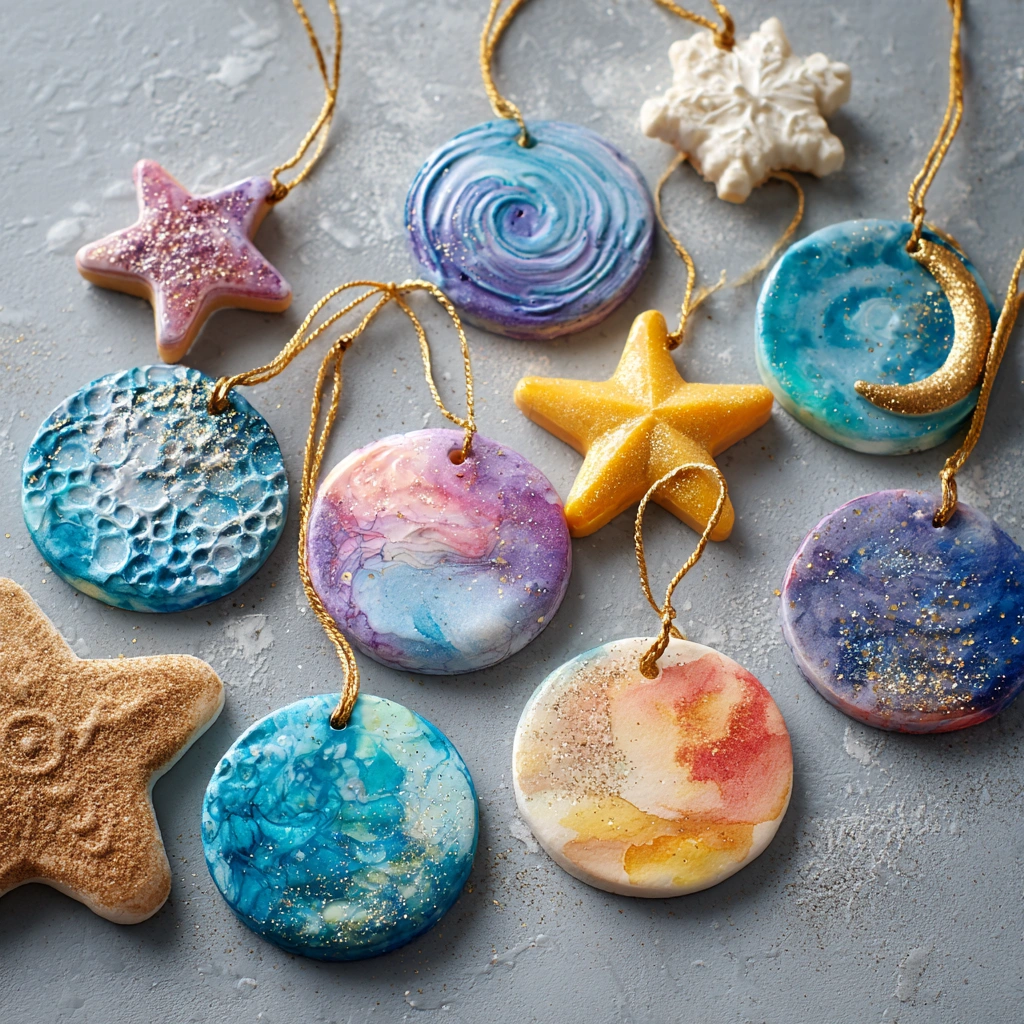
- Classic Galaxy: Use deep blues, purples, and blacks to mimic the night sky, adding silver glitter for a starry effect.
- Pastel Planets: Create soft pinks, mint greens, and lavender shades for a whimsical, dreamy look.
- Seasonal Themes: For Halloween, incorporate orange and black with spooky shapes like bats and pumpkins.
- Kid-Friendly Versions: Let kids choose their favorite colors and shapes, encouraging their creativity and personal touch.
- Glow-in-the-Dark: Add glow-in-the-dark paint to your dough for a magical nighttime display!
Display and Use Ideas
Now that you’ve crafted your stunning Baking Soda Galaxy Ornaments, it’s time to showcase them! Here are some creative ways to display or use your cosmic creations:
- Hang them on your holiday tree for a unique twist on traditional ornaments.
- Use them as window decorations to catch the light and create a magical glow.
- Gift them to friends or family as personalized cosmic keepsakes.
- Incorporate them into classroom decorations for a fun space-themed project.
- Display them in a decorative bowl as a centerpiece for your coffee table.
FAQs about Baking Soda Galaxy Ornaments
1. Can I use other types of flour instead of baking soda and cornstarch?
While baking soda and cornstarch are key for the texture of these Baking Soda Galaxy Ornaments, you can experiment with other flours. However, the results may vary, and the dough might not hold its shape as well.
2. How long do these ornaments last?
When properly dried and stored, your galaxy ornaments can last for years! Just keep them in a cool, dry place to prevent moisture damage.
3. Can I make these ornaments with younger children?
Absolutely! Baking Soda Galaxy Ornaments are great for kids aged 5 and up. Just be sure to supervise them closely, especially during the kneading and baking steps.
4. What if my ornaments crack while drying?
If your ornaments crack, don’t worry! You can try adding a bit more water to your dough next time or ensure they dry slowly at room temperature to prevent cracking.
5. How can I make my galaxy ornaments smell nice?
For a delightful scent, consider adding a few drops of essential oils to your dough. Scents like lavender or citrus can add a lovely touch to your cosmic creations!
Final Thoughts
Creating your own Baking Soda Galaxy Ornaments is not just a craft; it’s a journey filled with laughter, creativity, and a sprinkle of magic! The joy of seeing your unique cosmic creations come to life is truly rewarding. I encourage you to gather your family, unleash your imagination, and dive into this fun project. Don’t forget to share your results with me—I can’t wait to see the beautiful galaxy ornaments you create! Let’s light up our homes with these stunning decorations and make this Halloween a little more cosmic!
Print
Baking Soda Galaxy Ornaments: Craft Your Own Cosmic Décor Today!
Description
Create stunning galaxy ornaments using baking soda and cornstarch for a unique cosmic touch to your home décor.
Instructions
- In a saucepan, mix baking soda, cornstarch, and water over medium heat until it forms a dough-like consistency.
- Remove from heat and let it cool slightly before kneading the dough.
- Divide the dough into smaller portions and add different food coloring to each, mixing until you achieve your desired colors.
- Roll out the colored dough to about 1/4 inch thick and use cookie cutters to cut out shapes.
- Use a straw to make a hole at the top of each ornament for hanging.
- Place the ornaments on a baking sheet and either bake at 200°F (93°C) for 2-3 hours or let them air dry for 24-48 hours.
- Once dry, you can add glitter for extra sparkle if desired.
- Thread string or ribbon through the holes and hang your galaxy ornaments!
- Category: Crafts
Keywords: Baking Soda Galaxy Ornaments, DIY Galaxy Crafts, Cosmic Decor, Kids Crafts