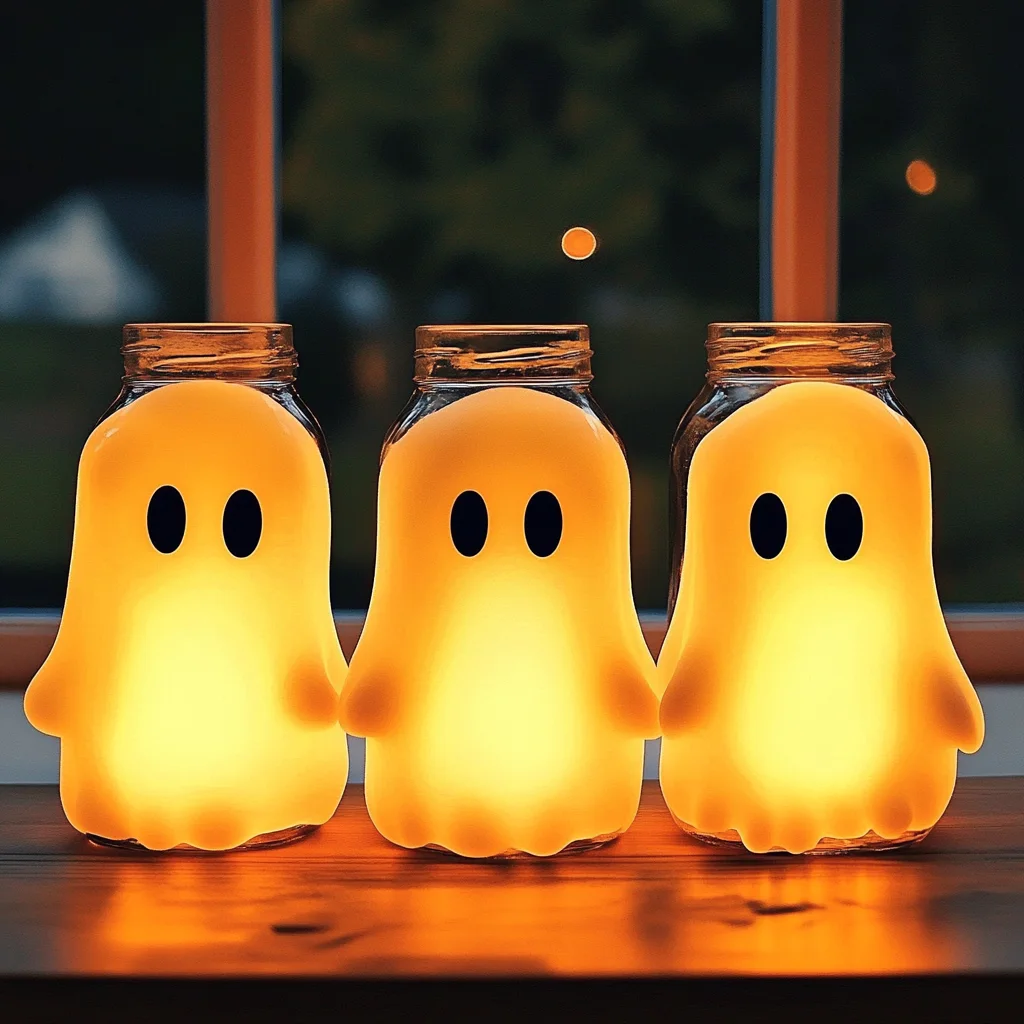
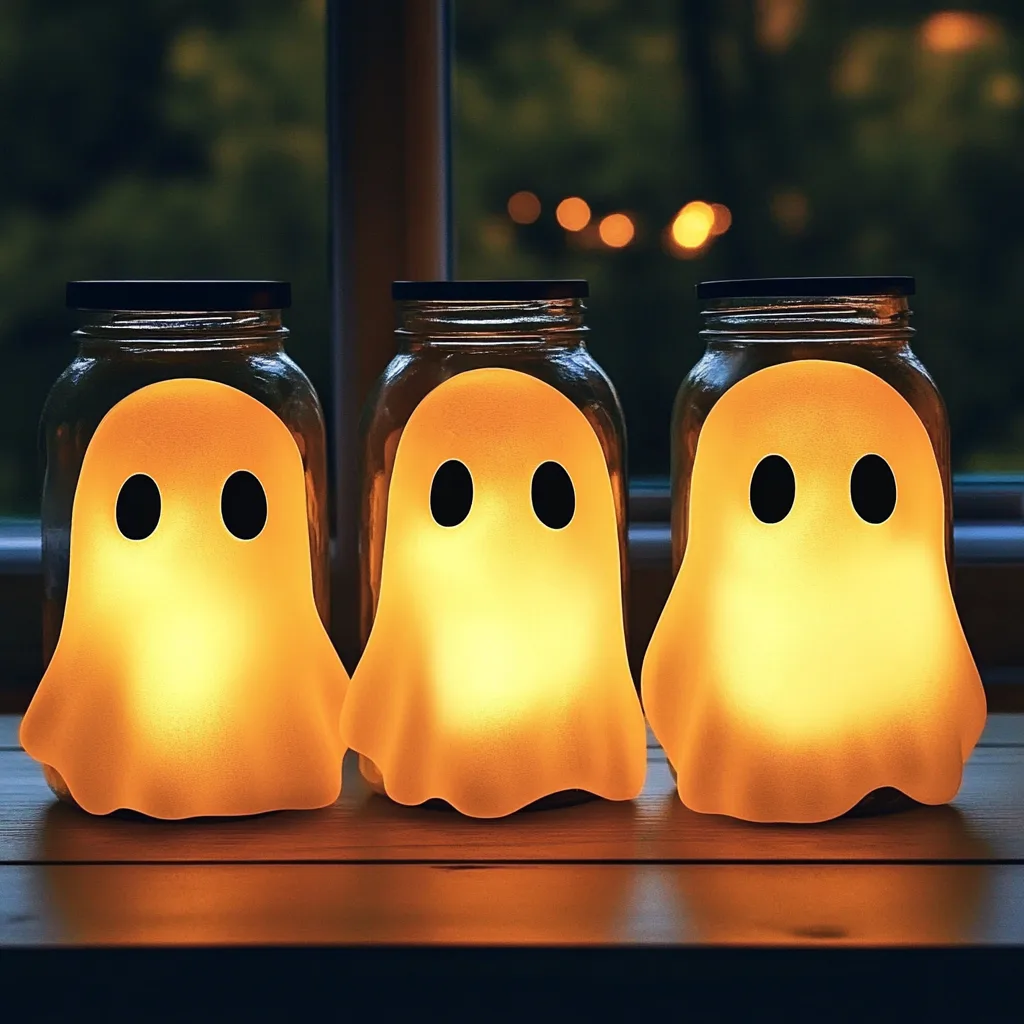
Halloween is a season when creativity truly comes alive. Homes transform into eerie spectacles, porches are lined with pumpkins, and windows glow with mysterious lights. It is a time when we lean into the spooky and the whimsical, creating an atmosphere that excites both children and adults. Among the many DIY decorations you can make, one of the most charming and surprisingly simple crafts is the Glow-in-the-Dark Ghost Jar.
These glowing jars combine the classic image of a ghost with the soft illumination of glow paint and LED lights. The result is a haunting yet delightful decoration that can be placed indoors or outdoors. The beauty of this project lies in its simplicity and versatility—you can make just one ghost jar as an accent piece, or craft a whole collection for a larger display.
This article will provide you with a step-by-step guide, as well as background information, creative variations, tips for success, and plenty of ideas to spark your imagination. By the time you finish, you will have all the knowledge you need to craft these glowing little phantoms and elevate your Halloween décor.
Why You’ll Love This Craft
There are thousands of Halloween crafts, but Glow-in-the-Dark Ghost Jars stand out for a few reasons. Here’s why this project deserves a spot on your to-do list:
-
Beginner Friendly: No advanced crafting skills are required. The steps are straightforward and manageable even for complete beginners.
-
Budget-Friendly: Most of the supplies can be purchased from dollar stores, craft shops, or repurposed from items already in your home.
-
Kid-Friendly: Children love participating in this project. The process of shaping ghosts, painting them, and seeing them glow afterward makes it a family favorite.
-
Reusable Decoration: Once made, these jars can be stored carefully and reused for future Halloweens.
-
Customizable: You can design your ghosts to look spooky, cute, funny, or mysterious. Add ribbons, webbing, or other accents to fit your personal Halloween style.
-
Safe and Practical: Since LED lights or fairy lights are used instead of real flames, these jars are safe to place anywhere in your home.
This balance of creativity, affordability, and practicality makes Glow-in-the-Dark Ghost Jars an ideal Halloween project.
Supplies You Will Need
To get started, gather the following items. Feel free to adjust the materials based on availability and personal preference.
-
Clear jars: Mason jars, milk bottles, or recycled glass jars work perfectly. Choose different shapes and sizes for variety.
-
White modeling clay or air-dry clay: This will form the base of your ghost figures.
-
Glow-in-the-dark paint: Acrylic glow paints are widely available in craft stores. The brighter the glow, the better the effect.
-
Paintbrushes: Small brushes will give you control when painting the ghosts.
-
LED tealight candles or fairy lights: These create the glowing effect without the risk of fire.
-
Googly eyes, beads, or black paint: Used to give your ghosts expressive faces.
-
Hot glue gun or craft glue: To secure decorations in place.
-
Optional accents: Ribbon, lace, twine, or cobweb material for decorating the jar’s exterior.
Step-by-Step Instructions
Step 1: Prepare Your Jars
Begin by thoroughly cleaning your jars. Remove all labels, glue, and residue so the glass is crystal clear. Any smudges or dirt will interfere with the ghost’s glow effect. Washing jars in warm, soapy water and letting them dry completely is the best approach.
Step 2: Shape the Ghosts
Using white clay or air-dry clay, form ghost figures. The most common design is a teardrop shape with a rounded top and flowing, tentacle-like bottom edges. The charm of this step is in its creativity—your ghosts don’t have to look identical. Some may be tall and thin, while others may be short and plump. Imperfections often make them more endearing.
Alternative method: If you do not want to use clay, you can drape cheesecloth or cotton batting over small foam balls to mimic the classic “sheet ghost” look.
Step 3: Add Faces
Bring your ghostly figures to life by giving them faces. Googly eyes glued to the clay are an easy option, but you can also paint on eyes and mouths. Experiment with expressions: one ghost could look surprised, another could look mischievous, and another could smile sweetly.
Step 4: Apply Glow Paint
Now comes the magic. Coat your ghosts with glow-in-the-dark paint. Apply multiple layers—two to three coats is recommended—so the glow effect is strong. Allow each coat to dry before applying the next.
For best results, charge the paint under a bright light (such as a lamp or sunlight) before testing the glow in darkness.
Step 5: Position Ghosts Inside the Jars
Carefully place your dried ghost figures into the jars. Arrange them upright so they appear to float within the glass. Depending on the jar’s size, you may fit one large ghost or a cluster of smaller ones.
Step 6: Add Lighting
Insert an LED tealight candle or fairy lights at the bottom of the jar. When switched on, the light will illuminate your ghost and enhance the glow effect from the paint.
Step 7: Decorate the Exterior
For a finishing touch, seal the jar with its lid or leave it open. Add ribbons, lace, twine, or cobweb decorations around the jar’s neck to increase the Halloween charm.
Creative Variations
One of the best things about this craft is the freedom to personalize it. Here are some creative variations you might try:
-
Colorful Ghosts: Instead of sticking to white, experiment with neon paints. Green, orange, or purple ghosts add a more playful twist.
-
Themed Characters: Create bats, pumpkins, or black cats instead of ghosts. These can still glow in the dark for a spooky effect.
-
Spider Web Effect: Stretch cotton or spider-web décor inside the jar to make it appear as if your ghost is trapped.
-
Potion Jar Style: Add a few drops of neon glitter glue or colored liquid at the base of the jar to mimic bubbling potion.
-
Mini Graveyard Scene: Sculpt gravestones or skeletons out of clay and arrange them alongside your ghost inside the jar.
-
Floating Ghost Illusion: Suspend a small ghost shape with transparent fishing wire inside the jar to make it look as though it is levitating.
Tips for Success
To ensure your ghost jars look their best and last through the season, keep these tips in mind:
-
Avoid real candles: Heat from real flames can damage the jar or ghost figures and pose a fire risk. Always use LED lighting.
-
Multiple coats of glow paint are key: A single coat will look weak. Three coats will give you a bold, long-lasting glow.
-
Make a set: Ghost jars are most effective when displayed in groups. Try making three or more for a dramatic effect.
-
Experiment with jar sizes: Different jar shapes will make your display more visually interesting.
-
Store carefully: After Halloween, wrap jars in tissue paper or bubble wrap and store in a cool, dry place. This ensures they last for years.
How to Display Glow-in-the-Dark Ghost Jars
These jars are versatile and can be displayed in many ways. Here are a few ideas to inspire you:
-
Porch Lanterns: Line your porch or driveway with ghost jars to create an inviting glow for trick-or-treaters.
-
Window Sill Glow: Place jars in your windows so the glow can be seen from outside.
-
Table Centerpiece: Arrange a cluster of jars in the center of your dining or coffee table for a Halloween dinner or party.
-
Bookshelf Accent: Use smaller jars as decorative accents on shelves.
-
Bedroom Nightlights: Kids may enjoy having one glowing ghost jar on their nightstand as a seasonal nightlight.
Frequently Asked Questions
1. How long do the jars glow?
Glow paint usually lasts for several hours after being charged with light. If you want continuous glow, keep LED lights on inside the jars.
2. Can these be reused each year?
Yes. As long as they are stored properly, ghost jars will last for years. Clay figures can be fragile, so wrap them securely.
3. Do I need expensive glow paint?
Not at all. Budget-friendly craft-store paints work fine. The trick is applying multiple layers and charging them under bright light.
4. What if I do not have clay?
You can use cotton balls, tissue paper, or cheesecloth instead. Simply drape the material over a base shape and paint with glow paint.
5. Are they safe for children’s rooms?
Yes, provided you use LED lights. Avoid candles or heat sources.
Conclusion
Glow-in-the-Dark Ghost Jars are the perfect combination of spooky and cute. With just a handful of supplies and a little creativity, you can transform ordinary jars into glowing lanterns that capture the magic of Halloween. They are budget-friendly, family-friendly, and endlessly customizable, making them one of the best crafts for the season.
Whether you choose to line your porch with these glowing spirits, place them in windows to delight trick-or-treaters, or use them as table decorations for a Halloween party, these jars are guaranteed to draw attention and spark conversation.
So gather your jars, shape your ghosts, and let your home be filled with the haunting glow of these charming phantoms. This Halloween, let your creativity shine in the form of eerie, glowing decorations that can be enjoyed by everyone who sees them.