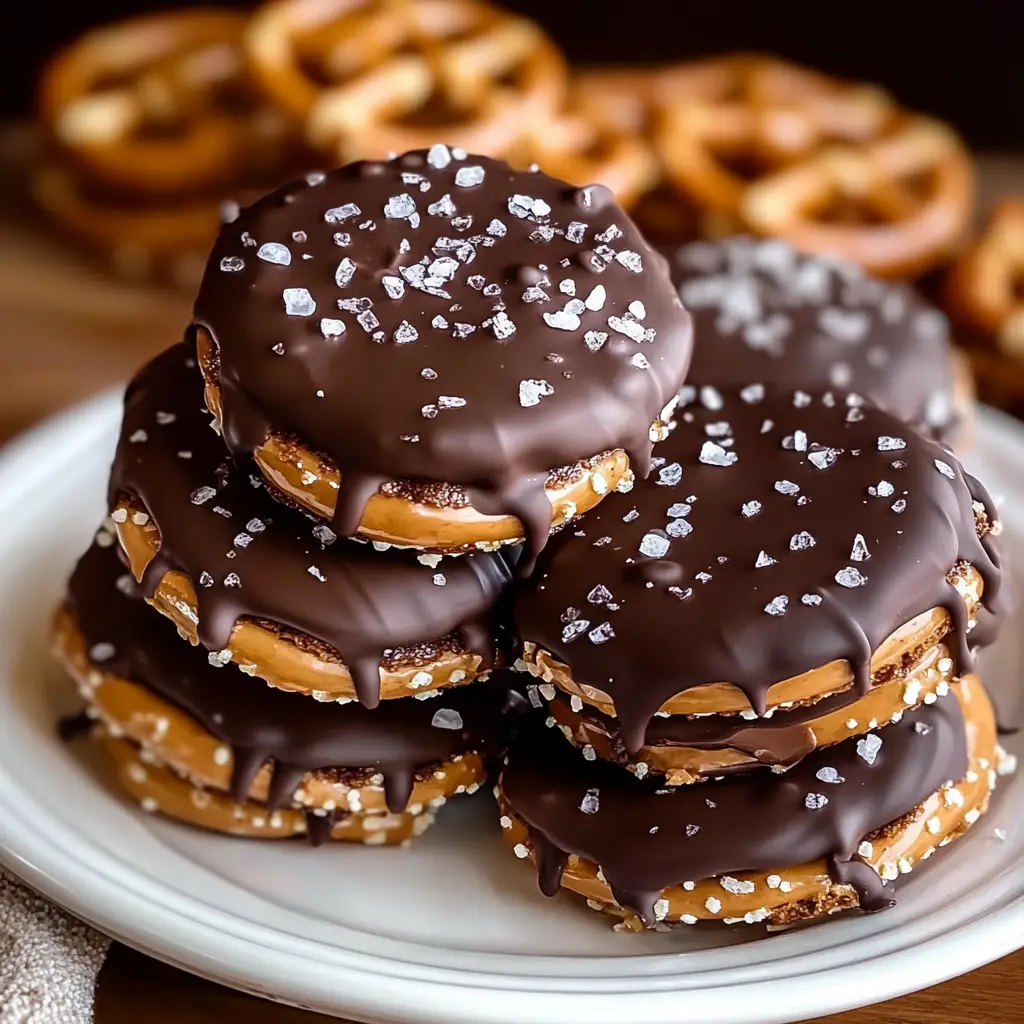
Sometimes the best desserts are the simplest ones. No need to turn on the oven, measure out complicated ingredients, or spend hours decorating something elaborate—just a few pantry staples, a touch of creativity, and a little chilling time can lead to something extraordinary. That’s exactly the case with No-Bake Peanut Butter Pretzel Clusters, a delightful sweet-and-salty treat that delivers crunch, creaminess, and chocolate in every bite.
If you’re a fan of desserts that require minimal effort but deliver maximum flavor, this recipe will quickly become a household favorite. It combines the irresistible creaminess of peanut butter, the crunch of pretzels, the sweetness of powdered sugar, and the richness of melted chocolate—all tied together with a final sprinkle of flaky sea salt for a gourmet touch. Best of all, you don’t need an oven, which makes this recipe perfect for hot summer days, quick party prep, or late-night cravings.
In this article, we’ll walk through everything you need to know about making No-Bake Peanut Butter Pretzel Clusters, including why you’ll love them, a detailed step-by-step preparation guide, variations to suit your taste, storage tips, nutritional details, and answers to common questions.
Why You’ll Love This Recipe
There are countless reasons why No-Bake Peanut Butter Pretzel Clusters deserve a spot in your snack rotation. Here are just a few highlights:
-
No Oven Required: Whether you’re in a dorm, working with limited kitchen equipment, or simply don’t want to heat up your kitchen, this recipe is quick and oven-free.
-
Sweet & Salty Perfection: The combination of salty pretzels and creamy peanut butter with sweet chocolate and powdered sugar hits all the right notes.
-
Quick Prep: In just 15 minutes, your clusters will be ready to chill, and within an hour, they’re ready to eat.
-
Kid-Friendly: This is a fun recipe to make with kids. They can help mix, scoop, drizzle, and decorate without much mess.
-
Customizable: Swap the peanut butter for almond butter, add different toppings, or experiment with dark vs. white chocolate—these clusters are incredibly versatile.
-
Great for Gifting: Pack a batch in a pretty box or jar, and you’ve got a thoughtful homemade gift for the holidays, birthdays, or special occasions.
Ingredients
For a batch of 20–24 clusters, you’ll need:
-
2 cups pretzel sticks, broken into smaller pieces
-
1 cup creamy peanut butter (room temperature for easy mixing)
-
½ cup powdered sugar
-
½ cup chocolate chips (milk, dark, or semi-sweet, depending on your preference)
-
1 tablespoon coconut oil (optional, helps smooth out the melted chocolate)
-
Sea salt, for sprinkling (optional, but highly recommended)

Step-by-Step Preparation
Let’s dive into the process of making these clusters. You’ll be surprised at how easy it is!
Step 1: Prepare the Peanut Butter Mixture
In a large mixing bowl, combine the creamy peanut butter and powdered sugar. Stir until the mixture is smooth and fully combined. This base mixture should be thick but manageable, almost like cookie dough.
Step 2: Add the Pretzels
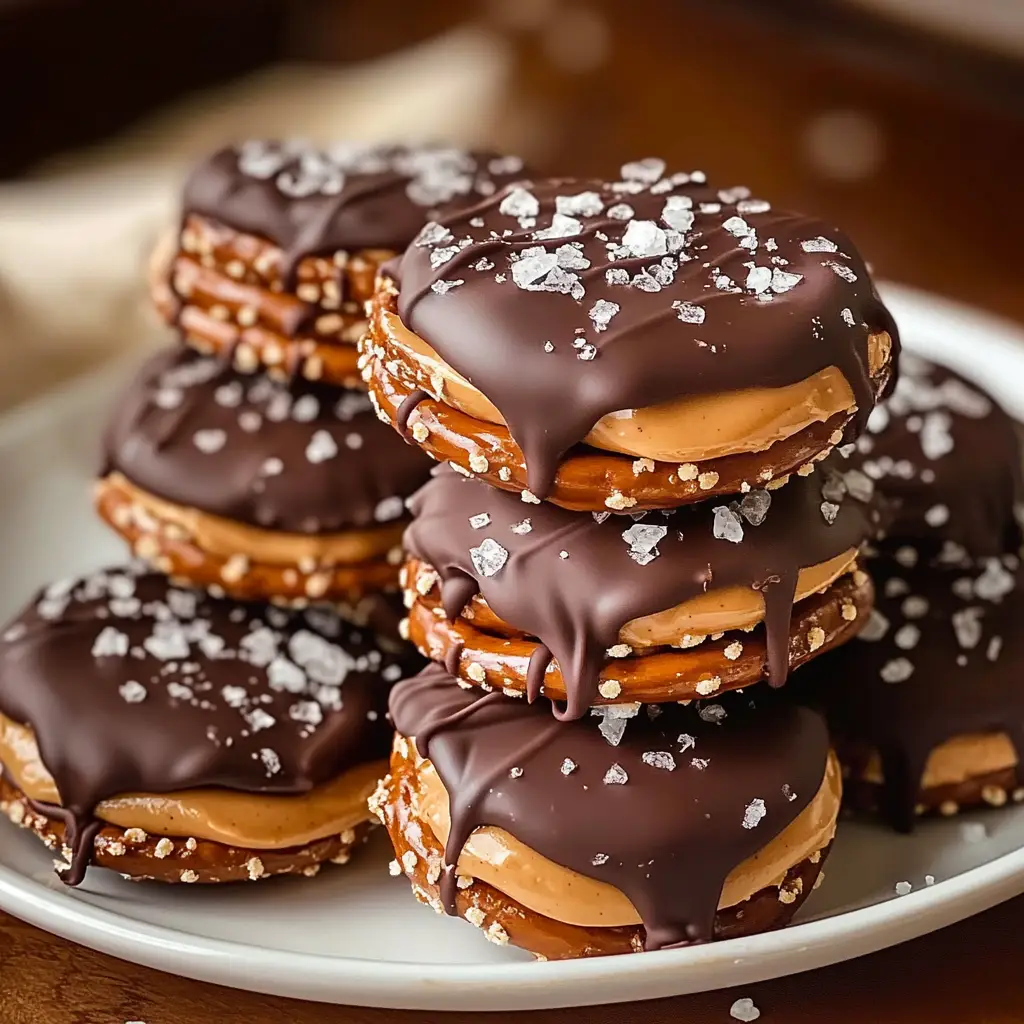
Break the pretzel sticks into smaller bite-sized pieces. Add them to the peanut butter mixture and stir until every piece is coated. The pretzels add crunch and structure, preventing the clusters from being too soft.
Step 3: Form the Clusters
Line a baking sheet with parchment paper. Using a spoon or small cookie scoop, drop heaping spoonfuls of the mixture onto the sheet, forming clusters. Aim for consistency so each cluster is about the same size (this helps with even chilling).
Step 4: Melt the Chocolate
In a microwave-safe bowl, add the chocolate chips and coconut oil (if using). Microwave in 20–30 second intervals, stirring between each, until smooth and silky. Coconut oil isn’t essential but it makes the chocolate shinier and easier to drizzle.
Step 5: Drizzle or Dip
You can either drizzle the melted chocolate over the clusters for a decorative look or dip the bottoms of each cluster into the chocolate for an extra-rich base. Both methods work beautifully, so choose whichever suits your style (or do half and half!).
Step 6: Add a Finishing Touch
While the chocolate is still wet, sprinkle a pinch of sea salt over the clusters. The salt balances the sweetness and adds a professional, bakery-style flair.
Step 7: Chill to Set
Place the tray in the refrigerator for 30–45 minutes, or until the clusters are firm and set. Once chilled, they’re ready to eat.
Variations
One of the best parts about this recipe is how adaptable it is. Here are some fun variations:
-
Nut Butter Swap: Use almond butter, cashew butter, or sunflower seed butter for a different flavor or to make it nut-free.
-
Chocolate Choices: Try white chocolate drizzle for a sweeter cluster or dark chocolate for a richer, slightly bitter contrast.
-
Mix-ins: Stir in mini marshmallows, chopped nuts, or dried fruit with the pretzels for extra texture and variety.
-
Holiday Twist: Add festive sprinkles, crushed peppermint, or colored drizzle for seasonal flair.
-
Healthy Version: Use natural peanut butter with no added sugar, dark chocolate, and skip the powdered sugar for a less sweet but still satisfying treat.
Cooking Note
Since this is a no-bake dessert, it’s all about chilling rather than cooking. The key is ensuring your clusters are the right size—too big, and they may not set evenly; too small, and they can fall apart. Aim for golf-ball-sized scoops for the best texture and appearance.
Serving Suggestions
These clusters can be enjoyed in a variety of ways:
-
Snack Time: Keep a container in the fridge for a quick grab-and-go snack.
-
Party Platter: Arrange them on a tray with fruit, nuts, and cheese for a sweet-and-savory spread.
-
Dessert Table: Add them to a dessert buffet for potlucks, birthdays, or family gatherings.
-
Gifts: Wrap in cellophane bags tied with ribbon or pack in mason jars for an affordable, thoughtful homemade gift.
Tips for Success
-
Make sure the peanut butter is at room temperature for easier mixing.
-
Don’t skip lining your tray with parchment paper—this prevents sticking.
-
Use a cookie scoop for evenly sized clusters.
-
Work quickly when drizzling chocolate so it doesn’t harden before you’re done.
-
Store clusters in the fridge to maintain freshness and prevent melting.
Prep Time, Chill Time, and Total Time
-
Prep Time: 15 minutes
-
Chill Time: 30 minutes
-
Total Time: 45 minutes
Nutritional Information (per cluster, approx. 20–24 servings)
-
Calories: 150
-
Protein: 3 g
-
Sodium: 90 mg
Frequently Asked Questions
Q: Can I use chunky peanut butter instead of creamy?
A: Yes! Chunky peanut butter will add even more texture and crunch to your clusters.
Q: Do I have to use coconut oil in the chocolate?
A: No, it’s optional. Coconut oil helps smooth and thin the chocolate, but you can omit it if preferred.
Q: How long do these last?
A: Stored in an airtight container in the fridge, they’ll stay fresh for up to 1 week.
Q: Can I freeze them?
A: Yes! Freeze in a sealed container for up to 2 months. Just let them thaw in the fridge before serving.
Q: Are these gluten-free?
A: If you use gluten-free pretzels, then yes!
Conclusion
No-Bake Peanut Butter Pretzel Clusters prove that you don’t need complicated techniques or fancy ingredients to make a dessert that feels indulgent and special. With their salty crunch, creamy peanut butter base, sweet chocolate drizzle, and touch of sea salt, these clusters offer a little bit of everything in one bite. They’re quick to prepare, endlessly customizable, and perfect for sharing—or keeping all to yourself.
Whether you’re prepping snacks for the week, whipping up a last-minute dessert, or making homemade gifts, these clusters will always come through. Once you try them, you’ll find yourself reaching for this recipe again and again.
Print
No-Bake Peanut Butter Pretzel Clusters
- Total Time: 45 minutes
Ingredients
For a batch of 20–24 clusters, you’ll need:
-
2 cups pretzel sticks, broken into smaller pieces
-
1 cup creamy peanut butter (room temperature for easy mixing)
-
½ cup powdered sugar
-
½ cup chocolate chips (milk, dark, or semi-sweet, depending on your preference)
-
1 tablespoon coconut oil (optional, helps smooth out the melted chocolate)
-
Sea salt, for sprinkling (optional, but highly recommended)
Instructions
Let’s dive into the process of making these clusters. You’ll be surprised at how easy it is!
Step 1: Prepare the Peanut Butter Mixture
In a large mixing bowl, combine the creamy peanut butter and powdered sugar. Stir until the mixture is smooth and fully combined. This base mixture should be thick but manageable, almost like cookie dough.
Step 2: Add the Pretzels
Break the pretzel sticks into smaller bite-sized pieces. Add them to the peanut butter mixture and stir until every piece is coated. The pretzels add crunch and structure, preventing the clusters from being too soft.
Step 3: Form the Clusters
Line a baking sheet with parchment paper. Using a spoon or small cookie scoop, drop heaping spoonfuls of the mixture onto the sheet, forming clusters. Aim for consistency so each cluster is about the same size (this helps with even chilling).
Step 4: Melt the Chocolate
In a microwave-safe bowl, add the chocolate chips and coconut oil (if using). Microwave in 20–30 second intervals, stirring between each, until smooth and silky. Coconut oil isn’t essential but it makes the chocolate shinier and easier to drizzle.
Step 5: Drizzle or Dip
You can either drizzle the melted chocolate over the clusters for a decorative look or dip the bottoms of each cluster into the chocolate for an extra-rich base. Both methods work beautifully, so choose whichever suits your style (or do half and half!).
Step 6: Add a Finishing Touch
While the chocolate is still wet, sprinkle a pinch of sea salt over the clusters. The salt balances the sweetness and adds a professional, bakery-style flair.
Step 7: Chill to Set
Place the tray in the refrigerator for 30–45 minutes, or until the clusters are firm and set. Once chilled, they’re ready to eat.
Notes
Since this is a no-bake dessert, it’s all about chilling rather than cooking. The key is ensuring your clusters are the right size—too big, and they may not set evenly; too small, and they can fall apart. Aim for golf-ball-sized scoops for the best texture and appearance.
- Prep Time: 15 minutes
- Cook Time: 30 minutes
Nutrition
- Calories: 150
- Sodium: 90 mg
- Protein: 3g


