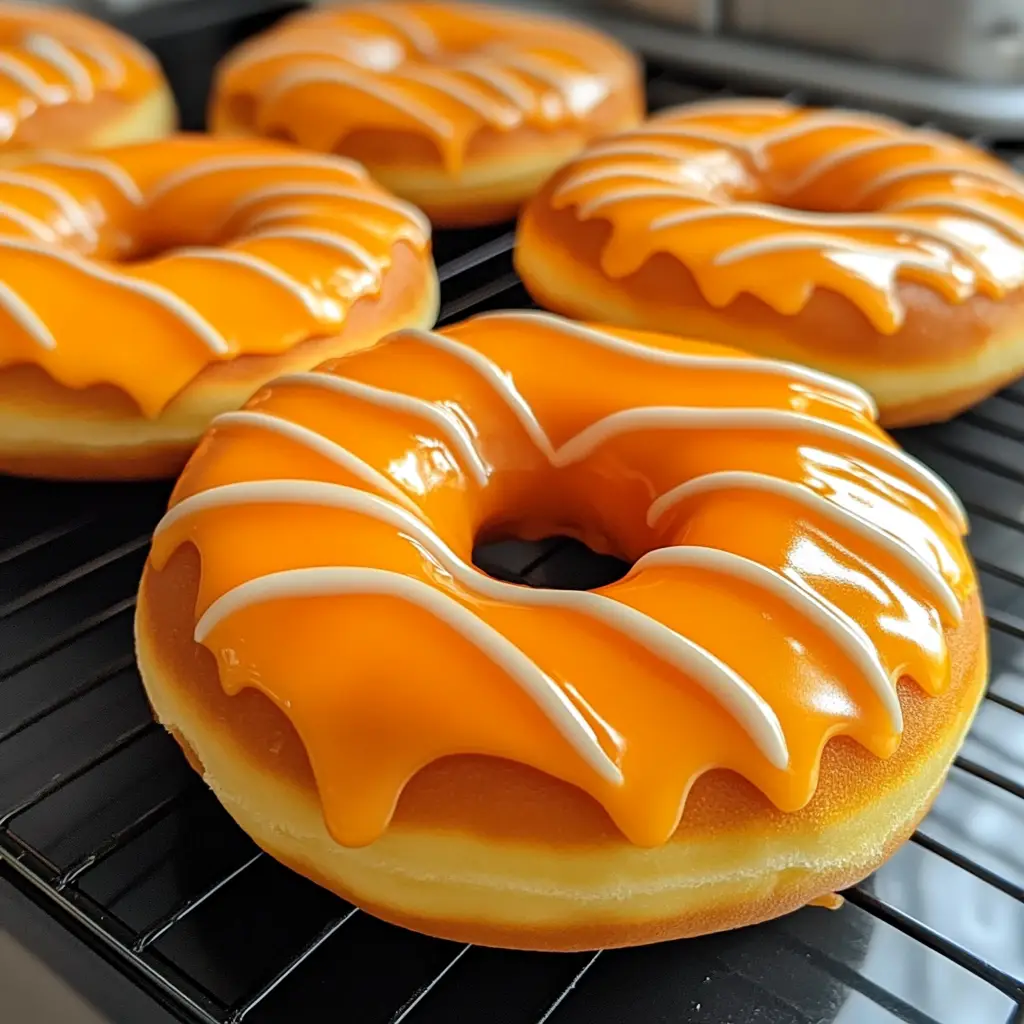
Introduction to Orange Glazed Donuts Recipe
There’s something magical about the aroma of freshly baked donuts wafting through the kitchen. It takes me back to my childhood, where Saturday mornings were reserved for sweet treats and family bonding. One of my all-time favorites has to be the orange glazed donuts. The bright, zesty flavor of orange combined with the soft, fluffy texture of the donut creates a delightful experience that dances on your taste buds.
Every time I whip up a batch of these donuts, I can’t help but smile. The vibrant orange glaze glistens like sunshine, making them not just a treat for the palate but also a feast for the eyes. I remember the first time I made them; I was experimenting with flavors, and the idea of using orange came to me like a burst of citrusy inspiration. The result? A donut that was not only delicious but also brought a little sunshine to my day.
What I love most about this Orange Glazed Donuts Recipe is its simplicity. You don’t need to be a professional baker to create these delightful treats. With just a handful of ingredients and a bit of love, you can impress your family and friends. Whether it’s for a special occasion or just a cozy weekend breakfast, these donuts are sure to brighten anyone’s day.
So, grab your apron and let’s dive into this delicious adventure together! I promise you, once you take that first bite, you’ll be hooked. Let’s make some magic happen in the kitchen!
Ingredients for Orange Glazed Donuts Recipe
Before we embark on our donut-making journey, let’s gather all the ingredients we’ll need. I always find that having everything prepped and ready makes the process smoother and more enjoyable. Here’s what you’ll need for these delightful orange glazed donuts.
Main Ingredients
- 1 cup all-purpose flour
- 1/2 cup granulated sugar
- 1/2 teaspoon baking powder
- 1/4 teaspoon baking soda
- 1/4 teaspoon salt
- 1/2 teaspoon ground cinnamon (optional, but adds a lovely warmth)
- 1/2 cup buttermilk (or milk with a splash of vinegar as a substitute)
- 1 large egg
- 1/4 cup unsalted butter, melted
- Zest of 1 large orange (this is where the magic happens!)
- 1 teaspoon vanilla extract
When it comes to ingredients, I always recommend using the freshest options available. Freshly grated orange zest makes a world of difference in flavor. If you can, try to source organic oranges; they tend to have a more vibrant taste and are free from harmful pesticides.
Optional Add-ons
- 1/4 cup chopped nuts (like walnuts or pecans for a delightful crunch)
- 1/4 cup mini chocolate chips (for a sweet twist)
- Extra orange zest for garnish
- Sprinkles for a fun, festive touch
These optional add-ons can elevate your donuts to a whole new level. I love adding nuts for texture or chocolate chips for a sweet surprise. Feel free to get creative and make this recipe your own!
How to Prepare Orange Glazed Donuts Recipe
Now that we have all our ingredients ready, it’s time to roll up our sleeves and get baking! I find that the process of making these Orange Glazed Baked Donuts is just as enjoyable as eating them. Each step is like a little adventure, and I can’t wait to share it with you. Let’s dive into the step-by-step instructions!
Step 1: Preheat the Oven and Prepare the Donut Pan
First things first, preheat your oven to 350°F (175°C). This is crucial because a hot oven ensures that your donuts rise beautifully. While the oven warms up, grease your donut pan with a little cooking spray or melted butter. This will help the donuts pop out easily once they’re baked.
Tips for Step 1
- Make sure your oven is fully preheated before placing the donuts inside. This helps them bake evenly.
- If you don’t have a donut pan, you can use a muffin tin, but the shape will be different.
Step 2: Mix the Dry Ingredients
In a large mixing bowl, whisk together the flour, sugar, baking powder, baking soda, salt, and cinnamon (if using). I love the way the ingredients come together, creating a fluffy cloud of dry goodness. Make sure there are no lumps; a smooth mixture is key to fluffy donuts!
Tips for Step 2
- Use a sifter if you have one; it helps to aerate the flour and makes for lighter donuts.
- Feel free to substitute whole wheat flour for a healthier option, but keep in mind it may change the texture slightly.
Step 3: Combine Wet Ingredients
In another bowl, whisk together the buttermilk, egg, melted butter, orange zest, and vanilla extract. The vibrant orange zest adds a lovely fragrance that fills the kitchen. I always take a moment to inhale that citrusy aroma; it’s pure bliss!
Tips for Step 3
- Make sure your butter isn’t too hot; otherwise, it can cook the egg when mixed.
- If you don’t have buttermilk, mixing regular milk with a splash of vinegar works just fine!
Step 4: Combine Wet and Dry Ingredients
Now, it’s time to bring the two mixtures together! Pour the wet ingredients into the dry ingredients and gently fold them together. Be careful not to overmix; a few lumps are perfectly fine. This is where the magic begins, and I can already feel the excitement building!
Tips for Step 4
- Use a spatula or wooden spoon for folding; it’s gentler on the batter.
- Overmixing can lead to dense donuts, so mix just until combined.
Step 5: Fill the Donut Pan
Using a piping bag or a spoon, fill each donut cavity about halfway. This allows room for the donuts to rise without overflowing. I love using a piping bag because it makes the process so much cleaner and easier!
Tips for Step 5
- If you don’t have a piping bag, a zip-top bag with a corner snipped off works just as well.
- Don’t worry if they aren’t perfectly shaped; they’ll still taste amazing!
Step 6: Bake the Donuts
Place the donut pan in the preheated oven and bake for about 10-12 minutes. You’ll know they’re done when they spring back lightly when touched. The smell will be heavenly, and you might find it hard to resist peeking in!
Tips for Step 6
- Keep an eye on them towards the end of baking; ovens can vary in temperature.
- Let them cool in the pan for a few minutes before transferring them to a wire rack.
Step 7: Prepare the Orange Glaze
While the donuts are cooling, let’s whip up that delicious orange glaze! In a small bowl, mix together powdered sugar, orange juice, and a bit of zest until smooth. The glaze should be thick but pourable. I love the way it glistens, just like a little treasure!
Tips for Step 7
- Adjust the consistency by adding more sugar for thickness or more juice for a thinner glaze.
- For an extra kick, add a splash of orange liqueur if you’re feeling adventurous!
Step 8: Glaze the Donuts
Once the donuts are cool, it’s time to glaze! Dip the tops of each donut into the glaze, allowing the excess to drip off. Place them back on the wire rack to let the glaze set. Watching the glaze cascade down the sides is one of my favorite parts!
Tips for Step 8
- For a fun twist, sprinkle some chopped nuts or sprinkles on top of the glaze before it sets.
- Let the glaze harden for a few minutes before serving for the best texture.
Equipment Needed for Orange Glazed Donuts Recipe
Before we dive into the delightful world of baking, let’s make sure we have the right tools at our fingertips. Having the right equipment can make all the difference in your donut-making adventure. Here’s what you’ll need:
- Donut Pan: This is essential for shaping your donuts. If you don’t have one, a muffin tin can work in a pinch, but your donuts will be more like muffins.
- Mixing Bowls: I recommend having at least two—one for dry ingredients and one for wet. It keeps things organized and makes mixing easier.
- Whisk: A good whisk is perfect for blending your ingredients smoothly. It’s like a magic wand for your batter!
- Spatula or Wooden Spoon: These are great for folding the batter without overmixing. I always keep one handy for all my baking adventures.
- Piping Bag or Zip-top Bag: This is optional, but it makes filling the donut pan so much cleaner. If you don’t have a piping bag, just snip a corner off a zip-top bag, and you’re good to go!
- Cooling Rack: After baking, a cooling rack helps your donuts cool evenly. If you don’t have one, a plate will work, but they might not cool as quickly.
With these tools in hand, you’re all set to create some scrumptious Orange Glazed Baked Donuts. Let’s get ready to bake up some joy!
Variations of Orange Glazed Donuts Recipe
While I absolutely adore the classic Orange Glazed Baked Donuts, there’s something exciting about mixing things up a bit! Variations can add a new twist to this beloved recipe, making it even more fun to bake and share. Here are a few delightful ideas that I’ve tried and loved:
- Chocolate Orange Donuts: Add a tablespoon of cocoa powder to the dry ingredients for a rich chocolate flavor. The combination of chocolate and orange is simply divine!
- Blueberry Orange Donuts: Fold in a half cup of fresh or frozen blueberries into the batter. The burst of juicy blueberries pairs beautifully with the zesty orange glaze.
- Spiced Orange Donuts: Enhance the flavor by adding a pinch of nutmeg or ginger to the dry ingredients. This adds a warm, cozy touch that’s perfect for chilly mornings.
- Maple Orange Glaze: Swap out the orange juice in the glaze for pure maple syrup. This creates a unique flavor that’s both sweet and tangy.
- Vegan Orange Donuts: Substitute the egg with a flax egg (1 tablespoon of ground flaxseed mixed with 2.5 tablespoons of water) and use plant-based milk and butter. You won’t miss the dairy at all!
These variations not only keep things interesting but also allow you to cater to different tastes and dietary preferences. I love experimenting with these ideas, and I encourage you to get creative in your kitchen. Who knows? You might just discover your new favorite version of these delightful donuts!
Cooking Notes for Orange Glazed Donuts Recipe
As I’ve baked these Orange Glazed Baked Donuts time and time again, I’ve picked up a few handy cooking notes that can help you achieve the best results. Here are some tips that I always keep in mind:
- Don’t Overmix: When combining the wet and dry ingredients, remember that a few lumps are okay. Overmixing can lead to dense donuts, and we want them light and fluffy!
- Check for Doneness: Every oven is different, so keep an eye on your donuts as they bake. A toothpick inserted into the center should come out clean when they’re ready.
- Cool Completely: Allow the donuts to cool in the pan for a few minutes before transferring them to a wire rack. This helps them set properly and prevents them from becoming soggy.
- Glaze While Warm: For the best glaze adherence, dip the donuts while they’re still slightly warm. This allows the glaze to soak in just a bit, creating a deliciously sticky finish.
- Store Properly: If you have leftovers (which is rare!), store them in an airtight container at room temperature for up to two days. You can also freeze them for longer storage; just thaw and re-glaze when you’re ready to enjoy!
These little notes can make a big difference in your baking experience. I always find that a little preparation and attention to detail go a long way in creating the perfect batch of donuts. Happy baking!
Serving Suggestions for Orange Glazed Donuts Recipe
Now that we’ve created these delightful Orange Glazed Baked Donuts, it’s time to think about how to serve them! Presentation can elevate the experience, and I love to get a little creative when it comes to serving. Here are some of my favorite ideas:
- Breakfast Platter: Serve the donuts alongside fresh fruit, like berries or sliced oranges, for a colorful and refreshing breakfast spread. It adds a nice balance to the sweetness of the donuts.
- Coffee Pairing: These donuts pair beautifully with a hot cup of coffee or tea. The citrus notes in the glaze complement the rich flavors of your favorite brew.
- Brunch Buffet: If you’re hosting a brunch, arrange the donuts on a tiered cake stand. It creates an eye-catching centerpiece that guests will love!
- Ice Cream Treat: For a fun dessert twist, serve a warm donut with a scoop of vanilla ice cream on top. Drizzle with extra orange glaze for a decadent treat!
- Gift Box: Package a few donuts in a decorative box or tin to share with friends or neighbors. It’s a sweet gesture that’s sure to brighten someone’s day!
These serving suggestions not only enhance the enjoyment of your Orange Glazed Baked Donuts but also make for memorable moments with family and friends. So, whether it’s a cozy breakfast at home or a festive gathering, these donuts are sure to steal the show!
Tips for Perfecting Orange Glazed Donuts Recipe
As I’ve baked these Orange Glazed Baked Donuts countless times, I’ve gathered a treasure trove of tips that can help you achieve donut perfection. Here are my top suggestions to ensure your donuts turn out fluffy, flavorful, and utterly delightful:
- Use Fresh Ingredients: Freshly grated orange zest and high-quality ingredients make a world of difference. The zest is the star of the show, so don’t skimp on it!
- Room Temperature Ingredients: Make sure your eggs and buttermilk are at room temperature. This helps create a smoother batter and ensures even baking.
- Don’t Overbake: Keep a close eye on your donuts as they bake. Overbaking can lead to dry donuts, and nobody wants that! A toothpick test is your best friend here.
- Experiment with Flavors: Don’t hesitate to play around with spices or add-ins. A pinch of nutmeg or a splash of almond extract can elevate the flavor profile beautifully.
- Glaze While Warm: For the best glaze coverage, dip the donuts while they’re still warm. This allows the glaze to adhere better and soak in that delicious orange flavor.
With these tips in your back pocket, you’re well on your way to creating the most scrumptious Orange Glazed Baked Donuts that will have everyone coming back for seconds. Happy baking!
Breakdown of Time for Orange Glazed Donuts Recipe
As a passionate home cook, I know that time management is key in the kitchen. When it comes to making these delightful Orange Glazed Baked Donuts, it’s helpful to have a clear idea of how long each step will take. Here’s a quick breakdown of the time you’ll need:
- Prep Time: Approximately 15 minutes. This includes gathering your ingredients, mixing the dry and wet components, and preparing the donut pan.
- Cooking Time: About 10-12 minutes. This is the time your donuts will spend baking in the oven, filling your kitchen with that irresistible aroma.
- Total Time: Roughly 30 minutes. This includes both prep and cooking time, plus a few minutes for cooling before glazing.
With this timeline in mind, you can easily fit these scrumptious donuts into your morning routine or weekend baking plans. I love how quick and simple they are to make, allowing you to enjoy a homemade treat in no time!
Nutritional Information for Orange Glazed Donuts Recipe
As a passionate home cook, I believe that enjoying delicious treats like these Orange Glazed Baked Donuts can be part of a balanced lifestyle. While they are certainly a sweet indulgence, it’s good to know what you’re savoring. Here’s a general breakdown of the nutritional information for one donut, assuming the recipe yields about 12 donuts:
- Calories: Approximately 150-180 calories
- Protein: 2-3 grams
- Fat: 6-8 grams
- Carbohydrates: 22-25 grams
- Sugar: 8-10 grams
- Fiber: Less than 1 gram
Keep in mind that these values can vary based on the specific ingredients you use and any optional add-ins you choose to include. For instance, adding nuts or chocolate chips will increase the calorie count and nutritional content. I always encourage enjoying these donuts in moderation, especially since they’re best shared with loved ones!
So, whether you’re treating yourself or sharing with friends, these Orange Glazed Baked Donuts are a delightful way to brighten your day. Happy baking and enjoy every bite!
Frequently Asked Questions about Orange Glazed Donuts Recipe
As I’ve shared my love for these Orange Glazed Baked Donuts, I often get questions from fellow home cooks eager to try their hand at this delightful recipe. Here are some of the most common questions I’ve encountered, along with my answers to help you on your baking journey!
Can I use a different type of flour?
Absolutely! While all-purpose flour is my go-to, you can experiment with whole wheat flour for a healthier option. Just keep in mind that it may change the texture slightly, making the donuts denser. Gluten-free flour blends can also work, but be sure to check the package for specific instructions.
How do I store leftover donuts?
If you happen to have any leftovers (which is rare in my house!), store them in an airtight container at room temperature for up to two days. You can also freeze them for longer storage. Just thaw and re-glaze when you’re ready to enjoy!
Can I make these donuts ahead of time?
Yes! You can prepare the batter the night before and store it in the fridge. Just give it a gentle stir before filling the donut pan. However, I recommend glazing them just before serving for the best texture and flavor.
What can I substitute for buttermilk?
If you don’t have buttermilk on hand, no worries! You can easily make a substitute by mixing regular milk with a splash of vinegar or lemon juice. Let it sit for about 5 minutes, and you’ll have a perfect buttermilk replacement!
Can I add other flavors to the glaze?
Definitely! While the orange glaze is a star, you can mix it up by adding a splash of vanilla extract or even a hint of almond extract for a unique twist. You could also try using different citrus juices, like lemon or lime, for a refreshing change.
These FAQs should help clear up any uncertainties you might have as you embark on your donut-making adventure. Remember, baking is all about having fun and experimenting, so don’t hesitate to make this recipe your own. Happy baking!
Conclusion on Orange Glazed Donuts Recipe
As I wrap up this delightful journey of creating Orange Glazed Baked Donuts, I can’t help but reflect on the joy these treats bring. They are not just a simple recipe; they are a celebration of flavors, memories, and the warmth of home cooking. The bright, zesty orange glaze adds a burst of sunshine to each bite, making them perfect for any occasion.
What I love most about this recipe is its accessibility. With just a handful of ingredients and straightforward steps, anyone can whip up a batch of these scrumptious donuts. Whether you’re a seasoned baker or a novice in the kitchen, these donuts are sure to impress. Plus, they offer endless opportunities for creativity with variations and add-ons!
So, whether you’re treating yourself on a cozy morning or sharing them with loved ones at a gathering, these Orange Glazed Baked Donuts are bound to bring smiles and satisfaction. I encourage you to give this recipe a try and experience the magic for yourself. Happy baking, and may your kitchen always be filled with the sweet aroma of freshly baked donuts!