Introduction to Chocolate Coconut Caramel Tart
Ah, the sweet symphony of flavors that is the Chocolate Coconut Caramel Tart! Every time I think about this delightful dessert, my heart skips a beat. It’s like a warm hug on a chilly day, wrapping you in layers of rich chocolate, creamy caramel, and the tropical essence of coconut. I remember the first time I made this tart; it was a rainy afternoon, and the scent of melting chocolate filled my kitchen, creating an atmosphere of pure bliss.
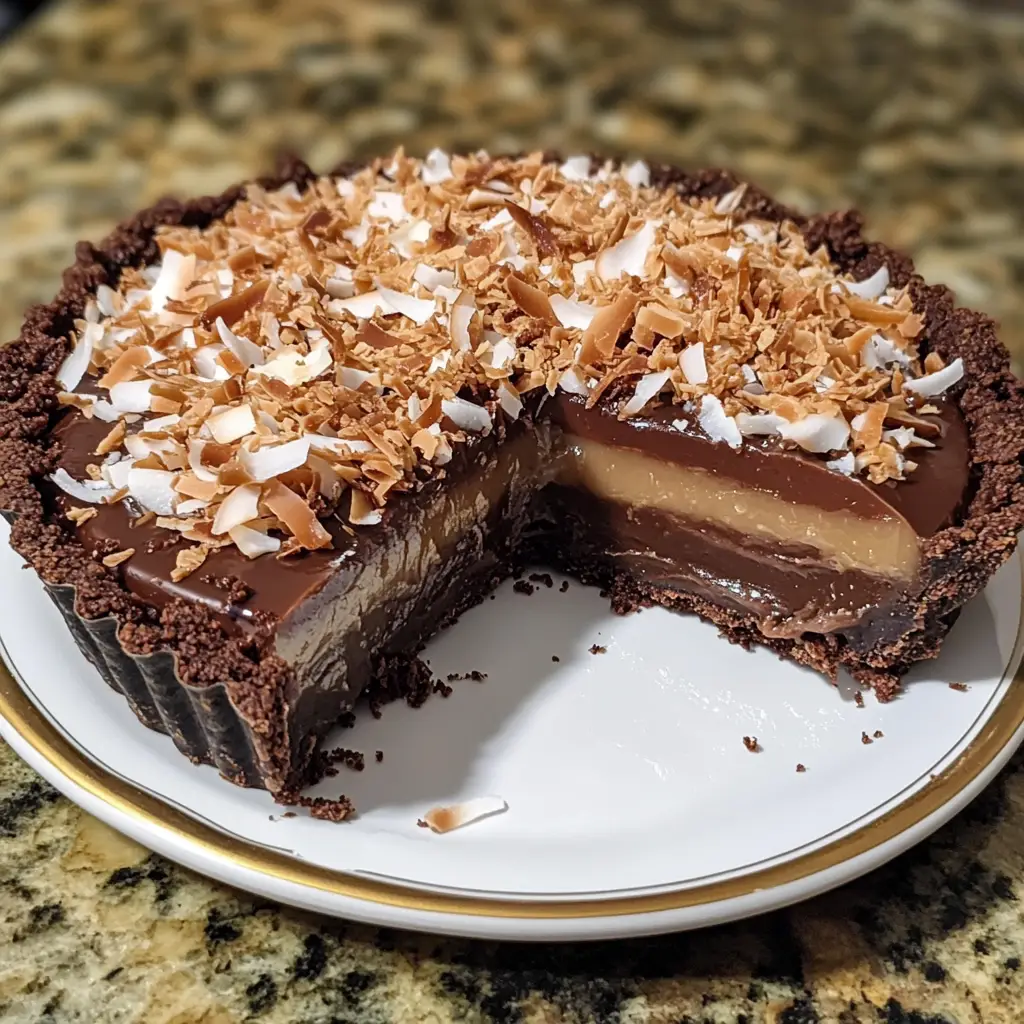
This tart is not just a dessert; it’s an experience. The way the chocolate ganache glides over the luscious caramel, topped with a sprinkle of toasted coconut, is nothing short of magical. I often find myself daydreaming about it during long workdays, counting down the hours until I can whip it up again. It’s perfect for special occasions or simply to treat yourself after a long week.
What I love most about this recipe is its versatility. You can easily adapt it to suit your taste or dietary needs. Whether you’re a chocolate lover, a coconut enthusiast, or someone who simply enjoys a good dessert, this tart has something for everyone. Plus, it’s a fantastic conversation starter at gatherings. I can’t tell you how many compliments I’ve received when I’ve served it to friends and family!
So, grab your apron and let’s embark on this delicious journey together. I promise you, once you take that first bite, you’ll be hooked. Let’s dive into the ingredients and get started on creating this heavenly Chocolate Coconut Caramel Tart!
Ingredients for Chocolate Coconut Caramel Tart
Before we dive into the delightful process of making the Chocolate Coconut Caramel Tart, let’s gather our ingredients. Having everything ready is like setting the stage for a beautiful performance. Each ingredient plays a crucial role in creating that perfect harmony of flavors. Here’s what you’ll need:
Main Ingredients
- For the Tart Crust:
- 1 ½ cups all-purpose flour
- ½ cup unsweetened cocoa powder
- ½ cup powdered sugar
- ½ cup unsalted butter, softened
- 1 large egg yolk
- 1-2 tablespoons cold water (as needed)
- For the Caramel Layer:
- 1 cup granulated sugar
- 6 tablespoons unsalted butter
- ½ cup heavy cream
- 1 teaspoon sea salt
- For the Chocolate Ganache:
- 8 ounces dark chocolate, chopped (I recommend using at least 70% cocoa for a rich flavor)
- 1 cup heavy cream
- For Topping:
- ½ cup toasted coconut flakes
Optional Add-ons
- Flavor Enhancements:
- 1 teaspoon vanilla extract (for the tart crust)
- 1 tablespoon rum or coconut extract (for the caramel layer)
- Garnishes:
- Fresh mint leaves (for a pop of color)
- Chocolate shavings (for an extra touch of elegance)
When selecting your ingredients, I always recommend going for high-quality chocolate and fresh coconut. The better the ingredients, the more delicious your tart will be. Trust me, it makes a world of difference! Now that we have our ingredients ready, let’s move on to the fun part—preparing this scrumptious tart!
How to Prepare Chocolate Coconut Caramel Tart
Now that we have our ingredients lined up like eager performers, it’s time to bring them to life! Making the Chocolate Coconut Caramel Tart is a delightful journey, and I can’t wait to share each step with you. Let’s get started!
Step 1: Prepare the Tart Crust
First things first, we need to create a sturdy and delicious tart crust. This is the foundation of our tart, and it sets the stage for all the wonderful flavors to come.
- In a large mixing bowl, combine the all-purpose flour, cocoa powder, and powdered sugar. Whisk them together until they’re well blended.
- Add the softened butter to the dry ingredients. Using your fingers or a pastry cutter, mix until the mixture resembles coarse crumbs.
- Stir in the egg yolk and add cold water, one tablespoon at a time, until the dough comes together. Be careful not to overwork it!
- Press the dough into a tart pan evenly, making sure to cover the bottom and sides. Prick the bottom with a fork to prevent bubbling.
- Chill the crust in the refrigerator for about 30 minutes before baking.
Tips for Step 1
Chilling the crust is crucial! It helps maintain its shape while baking. If you want a more intense chocolate flavor, consider adding a pinch of espresso powder to the dry ingredients. It enhances the chocolate without being overpowering.
Step 2: Make the Caramel Layer
Next up is the caramel layer, which adds that luscious sweetness we all crave. Making caramel can be a bit tricky, but I promise it’s worth it!
- In a medium saucepan over medium heat, combine the granulated sugar and a splash of water. Stir gently until the sugar dissolves.
- Once the sugar is dissolved, stop stirring and let it cook until it turns a deep amber color. This usually takes about 5-7 minutes.
- Remove the saucepan from heat and carefully whisk in the butter until melted.
- Slowly pour in the heavy cream while whisking continuously. Be cautious, as the mixture will bubble up!
- Stir in the sea salt and let the caramel cool slightly before pouring it into the cooled tart crust.
Tips for Step 2
Patience is key when making caramel. If it starts to smoke, it’s too hot! If you’re nervous about making caramel, you can use store-bought caramel sauce as a shortcut.
Step 3: Prepare the Chocolate Ganache
Now, let’s create the rich chocolate ganache that will crown our tart. This step is like adding the final brush strokes to a masterpiece!
- In a heatproof bowl, place the chopped dark chocolate.
- In a small saucepan, heat the heavy cream over medium heat until it just begins to simmer.
- Pour the hot cream over the chocolate and let it sit for a minute. Then, stir until smooth and glossy.
Tips for Step 3
Using a good quality chocolate makes all the difference in flavor. If you want a sweeter ganache, you can add a tablespoon of sugar while stirring.
Step 4: Assemble the Tart
It’s time to bring all the elements together! This is where the magic happens.
- Once the caramel layer has set slightly, pour the chocolate ganache over the caramel, spreading it evenly.
- Sprinkle the toasted coconut flakes on top, creating a beautiful and inviting finish.
Tips for Step 4
For a more dramatic presentation, you can create swirls with a toothpick by gently dragging it through the ganache and caramel layers. It’s a fun way to add a personal touch!
Step 5: Chill and Serve
Finally, we need to let our tart chill and set. This is the hardest part, but trust me, it’s worth the wait!
- Cover the tart with plastic wrap and refrigerate for at least 2 hours, or until fully set.
- When you’re ready to serve, slice the tart with a warm knife for clean cuts. Enjoy every bite!
Tips for Step 5
To warm your knife, simply dip it in hot water and wipe it dry. This little trick makes slicing through the ganache a breeze!
And there you have it! Each step brings us closer to that heavenly Chocolate Coconut Caramel Tart. I can already smell the sweet aroma wafting through my kitchen. Let’s keep the momentum going and gather the equipment we’ll need for this delightful creation!
Equipment Needed for Chocolate Coconut Caramel Tart
Before we dive into the kitchen, let’s make sure we have all the right tools at our fingertips. Having the right equipment can make the process smoother and more enjoyable. Here’s what you’ll need to create your Chocolate Coconut Caramel Tart:
- Tart Pan: A 9-inch tart pan with a removable bottom is ideal. If you don’t have one, a regular pie dish will work too, but the presentation might be a bit different.
- Mixing Bowls: A couple of medium and large mixing bowls will help you combine ingredients easily.
- Whisk: A good whisk is essential for mixing the caramel and ganache smoothly.
- Spatula: A silicone spatula is perfect for scraping down the sides of bowls and spreading the ganache evenly.
- Measuring Cups and Spoons: Accurate measurements are key to baking success, so don’t skip these!
- Medium Saucepan: You’ll need this for making the caramel and heating the cream for the ganache.
- Heatproof Bowl: This is where you’ll combine the hot cream with the chocolate for the ganache. A glass or metal bowl works best.
- Fork: A simple fork will help you prick the tart crust to prevent bubbling.
- Plastic Wrap: To cover the tart while it chills in the fridge.
If you find yourself missing any of these tools, don’t worry! You can often improvise with what you have at home. For example, a regular mixing bowl can substitute for a heatproof bowl if you’re careful with the heat. The most important thing is to have fun and enjoy the process of creating this delicious tart!
Variations of Chocolate Coconut Caramel Tart
As a passionate home cook, I love experimenting with recipes to create new flavors and textures. The Chocolate Coconut Caramel Tart is no exception! Here are a few delightful variations that can add a twist to this classic dessert:
- Nutty Delight: Add a layer of chopped nuts, like pecans or almonds, between the caramel and chocolate ganache. The crunch adds a wonderful contrast to the creamy layers.
- Fruit Fusion: Top the tart with fresh berries, like raspberries or strawberries, for a burst of freshness. The tartness of the fruit beautifully balances the sweetness of the caramel.
- Minty Fresh: Incorporate a few drops of peppermint extract into the chocolate ganache for a refreshing mint chocolate flavor. It’s like a cool breeze on a warm day!
- Spiced Up: Add a pinch of cinnamon or a dash of cayenne pepper to the caramel for a warm, spicy kick. It’s a fun way to surprise your taste buds!
These variations not only keep things exciting but also allow you to tailor the tart to your personal preferences or seasonal ingredients. I encourage you to get creative and make this recipe your own. After all, cooking is all about joy and exploration!
Cooking Notes for Chocolate Coconut Caramel Tart
As I’ve journeyed through the delightful process of making the Chocolate Coconut Caramel Tart, I’ve gathered a few cooking notes that can help you achieve the best results. These little nuggets of wisdom can make a big difference in your tart-making adventure!
- Ingredient Temperature: Make sure your butter is softened but not melted. This helps create a flaky crust. Similarly, using room temperature eggs can help the dough come together more easily.
- Caramel Consistency: If your caramel seems too thick, you can add a splash of water or cream to loosen it up. Just be careful not to overheat it, as it can become too hard when cooled.
- Chilling Time: Don’t rush the chilling process! Allowing the tart to chill for the recommended time ensures that the layers set properly and makes slicing easier.
- Storage: If you have leftovers (which is rare!), store the tart in the refrigerator, covered with plastic wrap. It can last for up to three days, but I doubt it will last that long!
- Serving Temperature: For the best flavor, let the tart sit at room temperature for about 10-15 minutes before serving. This allows the ganache to soften slightly, making each bite even more heavenly.
These cooking notes are like little secrets I’ve learned along the way. They help ensure that every time I make this tart, it turns out just as delicious as the last. So, keep these tips in mind as you embark on your own Chocolate Coconut Caramel Tart adventure!
Serving Suggestions for Chocolate Coconut Caramel Tart
Now that our Chocolate Coconut Caramel Tart is beautifully set and ready to be enjoyed, let’s talk about how to serve it for maximum delight! Presentation is key, and I love to make each serving feel special. Here are some of my favorite serving suggestions:
- Plate with Style: Serve slices on elegant dessert plates. A simple white plate allows the rich colors of the tart to shine through, making it look even more appetizing.
- Garnish with Freshness: Add a sprig of fresh mint on top of each slice. The vibrant green not only adds a pop of color but also a refreshing aroma that complements the chocolate and coconut.
- Drizzle of Sauce: For an extra touch of indulgence, drizzle some warm chocolate sauce or caramel sauce over the slice before serving. It’s like a cherry on top of an already fabulous dessert!
- Pair with Ice Cream: A scoop of vanilla or coconut ice cream on the side is a match made in heaven. The creaminess of the ice cream balances the richness of the tart beautifully.
- Accompany with Coffee: Serve the tart with a cup of freshly brewed coffee or a rich espresso. The bitterness of the coffee enhances the sweetness of the tart, creating a delightful contrast.
These serving suggestions not only elevate the experience but also make your guests feel pampered. I can’t tell you how many times I’ve seen eyes light up when I present this tart at gatherings. So, get creative and enjoy every moment of sharing this delicious treat with others!
Tips for Perfecting Chocolate Coconut Caramel Tart
As I’ve crafted my Chocolate Coconut Caramel Tart over the years, I’ve picked up a few tips that can truly elevate your baking game. These little gems of wisdom can help you achieve that perfect balance of flavors and textures. Here’s what I’ve learned:
- Use Quality Ingredients: Always opt for high-quality chocolate and fresh coconut. The better the ingredients, the more delicious your tart will be. It’s like using a fine paintbrush for a masterpiece!
- Mind the Temperature: Ensure your butter is softened but not melted for the crust. This helps create that flaky texture we all love. Room temperature eggs also blend better into the dough.
- Don’t Rush the Caramel: Take your time when making the caramel. If it’s not the right color, it won’t have the right flavor. Patience is key here, just like waiting for a flower to bloom!
- Chill, Chill, Chill: Allow the tart to chill for the full recommended time. This ensures that the layers set properly and makes slicing a breeze. Trust me, the wait is worth it!
- Experiment with Flavors: Don’t be afraid to add your own twist! Whether it’s a hint of spice or a splash of extract, personalizing the tart can make it uniquely yours.
These tips are like little treasures I’ve gathered from my own kitchen adventures. They help ensure that every time I make this tart, it turns out just as delightful as the last. So, keep these in mind as you embark on your own Chocolate Coconut Caramel Tart journey!
Breakdown of Time for Chocolate Coconut Caramel Tart
As a passionate home cook, I know that time management is key when creating a delicious dessert like the Chocolate Coconut Caramel Tart. Here’s a quick breakdown of the time you’ll need to dedicate to each part of the process. This way, you can plan your baking adventure without any surprises!
- Prep Time: Approximately 30 minutes. This includes gathering your ingredients, preparing the tart crust, and making the caramel layer.
- Cooking Time: About 20 minutes. This covers the baking of the tart crust and the time it takes to make the caramel and chocolate ganache.
- Chilling Time: At least 2 hours. This is crucial for allowing the layers to set properly, so don’t skip this step!
- Total Time: Roughly 2 hours and 50 minutes. This includes all prep, cooking, and chilling time. It may seem like a bit of a wait, but trust me, the end result is worth every minute!
By keeping this timeline in mind, you can ensure that your baking experience is smooth and enjoyable. Plus, it gives you a chance to savor the anticipation of that first heavenly bite of your Chocolate Coconut Caramel Tart!
Nutritional Information for Chocolate Coconut Caramel Tart
As I indulge in the rich flavors of the Chocolate Coconut Caramel Tart, I often find myself curious about its nutritional profile. While this dessert is a delightful treat, it’s good to be aware of what we’re enjoying. Here’s a general breakdown of the nutritional information per slice (assuming the tart is cut into 12 slices):
- Calories: Approximately 320 calories
- Fat: 20 grams (of which saturated fat is about 12 grams)
- Carbohydrates: 35 grams
- Fiber: 2 grams
- Sugar: 18 grams
- Protein: 3 grams
Keep in mind that these values can vary based on the specific ingredients you use and the size of your slices. While this tart is certainly a treat, it’s best enjoyed in moderation. I like to savor each bite, allowing the flavors to dance on my palate. After all, life is all about balance, and a little indulgence now and then is what makes cooking and sharing food so special!
Frequently Asked Questions about Chocolate Coconut Caramel Tart
As I’ve shared my love for the Chocolate Coconut Caramel Tart, I’ve often encountered a few common questions from fellow home cooks and dessert enthusiasts. I’m excited to address these queries, as they can help you navigate your own tart-making journey with confidence. Here are some of the most frequently asked questions:
Can I make the tart ahead of time?
Absolutely! In fact, I often make this tart a day in advance. It allows the flavors to meld beautifully. Just be sure to cover it well with plastic wrap and store it in the refrigerator. When you’re ready to serve, let it sit at room temperature for a bit to soften the ganache.
What can I substitute for heavy cream?
If you’re looking for a lighter option, you can use coconut cream for the ganache. It adds a lovely coconut flavor that complements the tart perfectly. Alternatively, you can use half-and-half, but the ganache may not be as rich and creamy.
How do I store leftovers?
Leftovers? If you have any, lucky you! Store the tart in the refrigerator, covered with plastic wrap. It should stay fresh for up to three days. Just remember to let it sit out for a few minutes before serving to enhance the flavors.
Can I freeze the Chocolate Coconut Caramel Tart?
Yes, you can freeze the tart! Just make sure it’s well-wrapped in plastic wrap and then in aluminum foil. It can be frozen for up to a month. When you’re ready to enjoy it, thaw it in the refrigerator overnight before serving.
What if I don’t have a tart pan?
No worries! A regular pie dish works just fine. The tart may not have the same elegant shape, but it will still taste delicious. Just be sure to adjust the baking time slightly, as a deeper dish may require a bit more time to cook through.
These questions reflect the curiosity and creativity that come with baking. I love sharing my experiences and tips, and I hope these answers help you feel more confident in making your own Chocolate Coconut Caramel Tart. Remember, every kitchen adventure is a chance to learn and grow, so embrace the process and enjoy every delicious moment!
Conclusion on Chocolate Coconut Caramel Tart
As I reflect on my journey with the Chocolate Coconut Caramel Tart, I can’t help but smile at the joy it brings. This dessert is more than just a treat; it’s a celebration of flavors and textures that dance together in perfect harmony. The rich chocolate, luscious caramel, and the delightful crunch of toasted coconut create a symphony that tantalizes the taste buds.
What I love most about this tart is its versatility. Whether you’re hosting a dinner party, celebrating a special occasion, or simply indulging in a sweet moment at home, this tart fits the bill. It’s a conversation starter, a crowd-pleaser, and a delightful way to show love through food. Plus, with the tips and variations I’ve shared, you can easily make it your own!
So, I encourage you to gather your ingredients, roll up your sleeves, and embark on this delicious adventure. I promise that with each bite, you’ll experience the magic of the Chocolate Coconut Caramel Tart. Happy baking, and may your kitchen be filled with sweet aromas and joyful moments!