Introduction to Famous Cheese Dip Recipe
Ah, cheese dip! Just the thought of it makes my mouth water. I remember the first time I tasted a warm, gooey cheese dip at a friend’s party. It was like a warm hug on a chilly day, wrapping me in comfort and joy. Ever since that moment, I’ve been on a quest to create the perfect cheese dip recipe that would make everyone feel the same way.
Cheese dip is more than just a snack; it’s a celebration of flavors and textures. Whether it’s game day, a cozy movie night, or a festive gathering, this dip has a way of bringing people together. I love how it can be the star of the show or a delightful sidekick to your favorite chips and veggies. The best part? It’s incredibly easy to make, and you can customize it to suit your taste buds!
In this article, I’ll share my famous cheese dip recipe that has become a staple in my kitchen. I’ll guide you through each step, from gathering the ingredients to serving it up hot and bubbly. Along the way, I’ll sprinkle in some personal anecdotes and tips that I’ve picked up from my culinary adventures. So, grab your apron, and let’s dive into the cheesy goodness!
Ingredients for Famous Cheese Dip Recipe
Now that we’re all excited about making this delicious cheese dip, let’s talk about the ingredients. I believe that the quality of your ingredients can make or break a dish. So, I always try to use the freshest and best ingredients I can find. Here’s what you’ll need to whip up this cheesy delight!
Main Ingredients
- 8 oz cream cheese: This is the base of our dip, giving it that creamy texture. I prefer using full-fat cream cheese for the richest flavor.
- 1 cup shredded cheddar cheese: Sharp cheddar works wonders here, adding a bold flavor. You can also mix in some mild cheddar for a balanced taste.
- 1 cup shredded Monterey Jack cheese: This cheese melts beautifully and adds a lovely creaminess to the dip.
- 1/2 cup sour cream: This adds a tangy kick that complements the cheese perfectly.
- 1/4 cup diced green chilies: These add a subtle heat and a burst of flavor. I love using canned green chilies for convenience.
- 1 tsp garlic powder: A little garlic goes a long way in enhancing the overall taste.
- 1/2 tsp onion powder: This adds depth to the flavor profile without overpowering the cheese.
- Salt and pepper to taste: Always season to your liking!
Optional Add-ons
If you want to take your cheese dip to the next level, consider these optional add-ons:
- Cooked and crumbled bacon: Who doesn’t love bacon? It adds a smoky crunch that’s simply irresistible.
- Chopped jalapeños: For those who like it spicy, fresh or pickled jalapeños can add a delightful kick.
- Fresh herbs: Chopped cilantro or green onions can brighten up the dip and add a fresh touch.
- Hot sauce: A few dashes can elevate the flavor and add some heat.
Feel free to mix and match these ingredients based on your preferences. The beauty of this famous cheese dip recipe is its versatility. You can make it your own, and I can’t wait to see what delicious combinations you come up with!
How to Prepare Famous Cheese Dip Recipe
Now that we have our ingredients ready, it’s time to get cooking! I find that the process of making cheese dip is just as enjoyable as eating it. The aroma of melting cheese fills the kitchen, and I can already imagine the smiles on my friends’ faces as they dig in. Let’s walk through the steps together!
Step 1: Gather Your Ingredients
Before we start cooking, it’s essential to have everything in one place. I like to lay out all my ingredients on the counter. This way, I can easily grab what I need without scrambling around.
Tips for Ingredient Quality
- Always check the expiration dates on dairy products. Fresh ingredients make a world of difference!
- If possible, buy cheese from a local deli or specialty store. The flavor is often richer and more authentic.
- For the best texture, let your cream cheese sit at room temperature for about 30 minutes before using it. This makes it easier to blend.
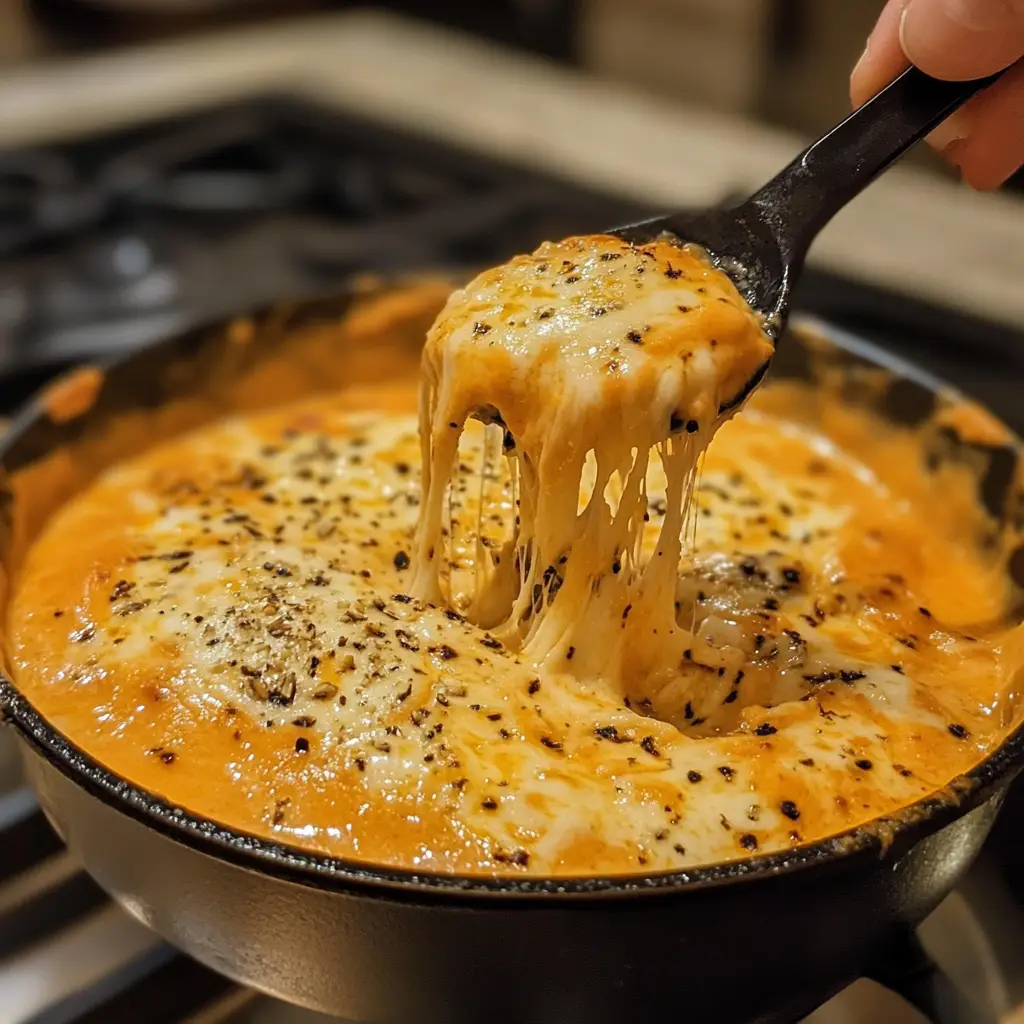
Step 2: Melt the Cheese
Now comes the fun part! I usually use a medium saucepan over low heat to melt the cheese. This gentle heat helps prevent the cheese from burning or becoming grainy.
Tips for Achieving the Perfect Melt
- Stir the cheese constantly as it melts. This ensures even melting and keeps it creamy.
- If you notice the cheese is getting too thick, add a splash of milk or cream to loosen it up.
- Be patient! Rushing this step can lead to a lumpy dip, and nobody wants that.
Step 3: Combine Ingredients
Once the cheese is melted and smooth, it’s time to mix in the rest of the ingredients. I like to add them one at a time, stirring well after each addition. This helps the flavors meld beautifully.
Tips for Mixing
- Use a spatula or wooden spoon for mixing. They’re gentle on the cheese and help maintain that creamy texture.
- Taste as you go! Adjust the seasoning with salt and pepper to suit your palate.
- If you’re adding any optional ingredients, like bacon or jalapeños, fold them in gently to keep the dip fluffy.
Step 4: Serve and Enjoy
Finally, it’s time to serve up this cheesy goodness! I love to transfer the dip to a warm serving bowl. It keeps the dip nice and toasty while everyone gathers around.
Tips for Serving
- Pair your cheese dip with a variety of dippers like tortilla chips, fresh veggies, or even soft pretzels. The options are endless!
- For a fun presentation, sprinkle some chopped herbs or extra cheese on top before serving.
- Don’t forget to keep a few napkins handy—things can get a little messy, but that’s part of the fun!
And there you have it! A simple yet delicious way to prepare my famous cheese dip. I can already hear the cheers from my friends as they dive into this cheesy delight!
Equipment Needed for Famous Cheese Dip Recipe
Before we dive into the cheesy goodness, let’s make sure we have the right tools at our disposal. Having the right equipment can make the cooking process smoother and more enjoyable. Here’s what you’ll need to whip up my famous cheese dip:
- Medium saucepan: This is where the magic happens! A medium saucepan is perfect for melting the cheese evenly. If you don’t have one, a large skillet can work too.
- Wooden spoon or spatula: I love using a wooden spoon for mixing. It’s gentle on the cheese and helps keep everything creamy. A silicone spatula is also a great alternative!
- Measuring cups and spoons: Accurate measurements are key to achieving the perfect flavor. If you don’t have measuring tools, you can use a regular cup or spoon, but keep in mind that the results may vary.
- Mixing bowl: A medium-sized mixing bowl is handy for combining all the ingredients before adding them to the saucepan. If you’re in a pinch, you can use the saucepan itself!
- Serving bowl: Once your dip is ready, transfer it to a warm serving bowl to keep it toasty. Any bowl will do, but a nice ceramic or glass bowl adds a touch of elegance.
With these simple tools, you’ll be well on your way to creating a delicious cheese dip that will have everyone coming back for more. Remember, it’s not just about the ingredients; it’s also about the love and care you put into the cooking process. Happy dipping!
Variations of Famous Cheese Dip Recipe
As much as I adore the classic version of my famous cheese dip, I can’t help but experiment with different flavors and ingredients. Each variation brings a unique twist that keeps things exciting! Here are a few of my favorite adaptations that you might want to try:
- Buffalo Chicken Cheese Dip: Add shredded cooked chicken and a splash of buffalo sauce for a spicy kick. This version is perfect for game day and pairs wonderfully with celery sticks!
- Spinach and Artichoke Cheese Dip: Mix in some chopped spinach and artichoke hearts for a creamy, veggie-packed dip. It’s a great way to sneak in some greens while still enjoying that cheesy goodness.
- Southwestern Cheese Dip: Incorporate black beans, corn, and diced tomatoes with green chilies for a zesty, southwestern flair. Top it off with some fresh cilantro for a burst of flavor.
- Smoky Chipotle Cheese Dip: Add chipotle peppers in adobo sauce for a smoky, spicy flavor. This dip is sure to impress anyone who loves a little heat!
Feel free to mix and match these variations based on your cravings. The beauty of this famous cheese dip recipe is its adaptability. Each twist tells a different story, and I can’t wait for you to discover your favorite version!
Cooking Notes for Famous Cheese Dip Recipe
As I’ve learned through my culinary adventures, a few cooking notes can make all the difference in achieving the perfect cheese dip. Here are some tips that I always keep in mind when whipping up this cheesy delight:
- Temperature Matters: Make sure your cream cheese is at room temperature before you start. This helps it blend smoothly with the other ingredients, creating that luscious texture we all crave.
- Don’t Rush the Melt: Patience is key! Melting cheese over low heat allows it to become creamy without clumping. If you’re in a hurry, you might end up with a dip that’s more like cheese glue!
- Adjust to Taste: Everyone’s palate is different. Don’t hesitate to tweak the seasonings or add more of your favorite ingredients. Taste as you go, and make it your own!
- Storage Tips: If you have leftovers (which is rare in my house!), store them in an airtight container in the fridge. Reheat gently on the stove or in the microwave, adding a splash of milk to restore creaminess.
These little notes have helped me perfect my famous cheese dip recipe over the years. Remember, cooking is all about experimenting and finding what works best for you. Enjoy the process, and let your creativity shine!
Serving Suggestions for Famous Cheese Dip Recipe
Now that we have our famous cheese dip ready, it’s time to think about how to serve it! Presentation can elevate the experience, and I love to get creative with my serving ideas. Here are some of my favorite ways to serve this cheesy delight:
- Tortilla Chips: The classic choice! I love using a mix of regular and flavored tortilla chips for a fun twist. The crunch pairs perfectly with the creamy dip.
- Fresh Veggies: Carrot sticks, celery, and bell pepper strips add a refreshing crunch. They’re a great way to balance the richness of the cheese dip.
- Soft Pretzels: Warm, soft pretzels are a delightful option. They’re perfect for dipping and add a touch of indulgence to the spread.
- Crackers: A variety of crackers can add different textures and flavors. I love using whole grain or herb-flavored crackers for an extra kick.
- Mini Baguette Slices: Toasted baguette slices are a fantastic way to scoop up the dip. They add a lovely crunch and a touch of elegance to your serving platter.
Don’t forget to set out some napkins and maybe even a few extra toppings, like chopped herbs or a drizzle of hot sauce, for guests to customize their dip experience. The joy of sharing this famous cheese dip is all about bringing people together, and I can’t wait for you to enjoy it with your loved ones!
Tips for Making the Best Famous Cheese Dip Recipe
As a passionate home cook, I’ve learned a few tricks along the way that can elevate your famous cheese dip from good to absolutely unforgettable. Here are my top tips to ensure your dip is the star of the show:
- Use Fresh Ingredients: Freshness is key! Opt for freshly shredded cheese instead of pre-packaged. It melts better and has a richer flavor.
- Experiment with Cheese: Don’t be afraid to mix different types of cheese. A blend of sharp cheddar, creamy gouda, or even pepper jack can create a delightful flavor profile.
- Control the Heat: If you’re adding spices or hot ingredients, start small. You can always add more, but it’s hard to tone down the heat once it’s in!
- Keep it Warm: If you’re serving the dip at a gathering, consider using a slow cooker on low heat. This keeps the dip warm and gooey throughout the event.
- Garnish for Flair: A sprinkle of fresh herbs or a drizzle of hot sauce on top not only adds flavor but also makes for a beautiful presentation.
With these tips in your back pocket, you’ll be well on your way to creating a cheese dip that will have everyone asking for the recipe. Remember, cooking is about having fun and sharing joy, so enjoy the process and let your creativity shine!
Breakdown of Time for Famous Cheese Dip Recipe
When it comes to making my famous cheese dip, I love how quick and easy it is! Timing is everything in the kitchen, and knowing how long each step takes can help you plan your gathering perfectly. Here’s a simple breakdown of the time involved:
- Prep Time: 10 minutes. This includes gathering your ingredients, measuring them out, and getting everything ready to go. I like to take my time here, enjoying the process of setting up.
- Cooking Time: 15 minutes. Melting the cheese and combining all the ingredients takes just a little patience. Keep an eye on it, and stir often for that creamy texture!
- Total Time: 25 minutes. In less than half an hour, you can have a delicious cheese dip ready to serve. It’s perfect for those last-minute gatherings or cozy nights in!
With this quick timeline, you can whip up my famous cheese dip in no time. It’s a fantastic way to impress your friends and family without spending hours in the kitchen. So, let’s get cooking and enjoy every cheesy bite!
Nutritional Information for Famous Cheese Dip Recipe
As a passionate home cook, I always keep an eye on the nutritional aspects of my dishes, even when indulging in something as delightful as cheese dip. While this famous cheese dip is a treat, it’s good to know what you’re enjoying. Here’s a general breakdown of the nutritional information per serving (about 1/4 cup):
- Calories: Approximately 200 calories
- Protein: 8 grams
- Fat: 16 grams
- Carbohydrates: 6 grams
- Sodium: 350 mg
- Fiber: 0 grams
Keep in mind that these values can vary based on the specific brands and types of ingredients you use. If you’re looking to lighten things up a bit, consider using reduced-fat cheese or sour cream. You can also serve the dip with fresh veggies instead of chips for a healthier crunch. Remember, it’s all about balance and enjoying the flavors while being mindful of your choices!
Frequently Asked Questions about Famous Cheese Dip Recipe
As I’ve shared my famous cheese dip recipe with friends and family, I’ve noticed a few common questions pop up. It’s always fun to dive deeper into the world of cheese dip! Here are some of the most frequently asked questions, along with my answers to help you on your cheesy journey:
Can I make this cheese dip ahead of time?
Absolutely! You can prepare the dip a day in advance. Just follow the recipe, let it cool, and store it in an airtight container in the fridge. When you’re ready to serve, simply reheat it gently on the stove or in the microwave, adding a splash of milk if needed to restore its creamy texture.
What can I use instead of cream cheese?
If you’re looking for a substitute, you can try using Greek yogurt or a dairy-free cream cheese alternative. Keep in mind that the flavor and texture may vary slightly, but it can still be delicious!
How do I store leftovers?
Leftovers can be stored in an airtight container in the fridge for up to three days. When reheating, do so slowly over low heat to maintain that creamy consistency. If it thickens up, just stir in a little milk or cream to loosen it up.
Can I freeze cheese dip?
While you can freeze cheese dip, the texture may change once thawed. If you decide to freeze it, make sure to store it in a freezer-safe container. When you’re ready to enjoy it again, thaw it in the fridge overnight and reheat gently.
What are some good dippers for cheese dip?
The options are endless! I love serving my cheese dip with tortilla chips, fresh veggies like carrots and celery, soft pretzels, or even toasted baguette slices. You can get creative and mix it up based on your preferences!
Can I make this cheese dip spicy?
Definitely! If you love a little heat, consider adding diced jalapeños, a splash of hot sauce, or even some crushed red pepper flakes. Start with a small amount and adjust to your taste. It’s all about finding that perfect balance!
These FAQs should help you navigate the world of my famous cheese dip recipe with ease. Remember, cooking is all about experimenting and having fun, so don’t hesitate to make it your own. Enjoy every cheesy moment!
Conclusion on Famous Cheese Dip Recipe
As we wrap up our cheesy adventure, I hope you feel inspired to dive into making my famous cheese dip recipe. This delightful dip is not just a treat for the taste buds; it’s a way to bring friends and family together, creating memories over shared laughter and delicious bites. The creamy texture, bold flavors, and endless customization options make it a versatile dish for any occasion.
Whether you’re hosting a game day party, enjoying a cozy movie night, or simply craving a comforting snack, this cheese dip is sure to be a hit. Plus, with the tips and variations I’ve shared, you can easily make it your own. So, gather your ingredients, put on your apron, and let the cheesy goodness flow! I can’t wait for you to experience the joy of this famous cheese dip recipe in your own kitchen. Happy dipping!