Introduction to 5-Minute Kitchen Science Experiments
In today’s fast-paced world, finding engaging activities for kids can be a challenge, especially for busy moms and professionals. However, science doesn’t have to be complicated or time-consuming! With just a few common kitchen ingredients, you can create exciting and educational experiences that spark curiosity and creativity. These 5-minute kitchen science experiments are perfect for hands-on learning, allowing children to explore scientific concepts while having fun. Let’s dive into the world of kitchen science and discover how easy it is to turn your home into a mini-laboratory!
Why You’ll Love This 5-Minute Kitchen Science Experiments
These 5-minute kitchen science experiments are not only quick and easy to set up, but they also provide a fantastic opportunity for children to learn through play. They are affordable, using ingredients you likely already have at home, and they require minimal preparation. Plus, these experiments can be done in just a few minutes, making them perfect for busy schedules. Engaging in these activities will foster a love for science in your children while creating lasting memories together.
Materials Needed for 5-Minute Kitchen Science Experiments
To get started with your 5-minute kitchen science experiments, gather the following materials:
- Vinegar – 1 cup (for chemical reactions)
- Baking soda – 1 tablespoon (for fizzing effects)
- Food coloring – a few drops (for visual appeal)
- Milk – 1 cup (for swirling colors)
- Dish soap – 1 tablespoon (to create interesting effects)
- Salt – 1 teaspoon (to observe reactions)
- Water – 1 cup (for various experiments)
For a printable full list of materials, see below.
Tools Required for 5-Minute Kitchen Science Experiments
You will need the following tools to conduct your experiments:
- Mixing bowls – for combining ingredients
- Spoons – for stirring and mixing
- Measuring cups – to ensure accurate measurements
- Measuring spoons – for precise ingredient amounts
- Dropper (optional) – for adding food coloring or other liquids
How to Make 5-Minute Kitchen Science Experiments
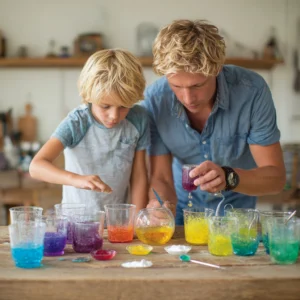
Now that you have your materials and tools ready, let’s jump into the fun part—conducting the 5-minute kitchen science experiments! I remember the first time I tried these with my kids; their eyes lit up with excitement as they watched the reactions unfold. Here’s how to get started:
- Fizzy Reaction: Combine 1 cup of vinegar and 1 tablespoon of baking soda in a bowl. Watch as the mixture fizzes and bubbles! It’s like a mini volcano right in your kitchen.
- Colorful Fizz: Add a few drops of food coloring to the fizzy mixture for a vibrant effect. The colors swirl and dance, creating a beautiful spectacle that’s sure to captivate your little ones.
- Swirling Colors: In another bowl, mix 1 cup of milk with 1 tablespoon of dish soap. This is where the magic happens! Watch as the colors swirl and create beautiful patterns, almost like a work of art.
- Salt Experiment: Sprinkle 1 teaspoon of salt into the milk mixture and observe how it affects the swirling colors. It’s fascinating to see how the salt interacts with the soap and milk!
- Mini Volcano: In a separate bowl, mix water with baking soda and vinegar to create a mini volcano effect. Enjoy the eruption! This is always a crowd-pleaser and a great way to end your science session.
These experiments are not only quick but also incredibly rewarding. I love how they encourage my kids to ask questions and think critically about what they see. Plus, they’re perfect for those busy afternoons when you need a quick activity to keep the little ones engaged!
Why You’ll Love This 5-Minute Kitchen Science Experiments
As a busy mom, I know how precious time can be, especially when it comes to finding activities that engage my kids. That’s why I absolutely adore these 5-minute kitchen science experiments. They are not only quick and easy to set up, but they also provide a fantastic opportunity for children to learn through play. I remember the first time I gathered my kids around the kitchen table, armed with just a few common ingredients. Their excitement was palpable!
These experiments are incredibly affordable, using ingredients you likely already have at home. I love that I can whip up a fun learning experience without a trip to the store. Plus, they require minimal preparation—just gather your materials and tools, and you’re ready to go! This is a lifesaver for those hectic afternoons when I need something engaging to keep my little ones occupied.
What I find most rewarding is how these experiments can be completed in just a few minutes. This makes them perfect for busy schedules, allowing us to squeeze in a little science between homework and dinner prep. I often set a timer, and it turns into a fun race against the clock! Engaging in these activities not only fosters a love for science in my children but also creates lasting memories together. I cherish those moments of laughter and discovery as we explore the wonders of science right in our own kitchen.
So, if you’re looking for a way to spark curiosity and creativity in your kids, these 5-minute kitchen science experiments are the perfect solution. Trust me, you’ll love the joy and excitement they bring to your home!
Materials Needed for 5-Minute Kitchen Science Experiments
To get started with your 5-minute kitchen science experiments, gather the following materials:
- Vinegar – 1 cup (for chemical reactions)
- Baking soda – 1 tablespoon (for fizzing effects)
- Food coloring – a few drops (for visual appeal)
- Milk – 1 cup (for swirling colors)
- Dish soap – 1 tablespoon (to create interesting effects)
- Salt – 1 teaspoon (to observe reactions)
- Water – 1 cup (for various experiments)
These ingredients are not only easy to find but also budget-friendly, making them perfect for busy moms like us. I remember the first time I gathered these items; it felt like I was preparing for a mini science fair right in my kitchen! The best part? Most of these ingredients are staples in our homes, so you won’t have to make a special trip to the store.
For a printable full list of materials, see below. This way, you can easily check off what you have and what you need before diving into the fun!
Tools Required for 5-Minute Kitchen Science Experiments
You will need the following tools to conduct your 5-minute kitchen science experiments:
- Mixing bowls – for combining ingredients. I love using clear bowls so we can see the reactions happening inside!
- Spoons – for stirring and mixing. A sturdy spoon is essential, especially when you’re combining those fizzy ingredients.
- Measuring cups – to ensure accurate measurements. Trust me, measuring out the right amounts makes a big difference in the outcome of your experiments.
- Measuring spoons – for precise ingredient amounts. I always keep a set handy in my kitchen for all our crafting and cooking adventures.
- Dropper (optional) – for adding food coloring or other liquids. This tool adds a fun element, especially when you want to create those vibrant color effects!
Gathering these tools is part of the fun! I remember the first time I set everything up; it felt like we were preparing for a science show right in our kitchen. Having the right tools not only makes the process smoother but also adds to the excitement of the experiments. So, let’s get ready to explore the wonders of science together!
How to Make 5-Minute Kitchen Science Experiments
Now that you have your materials and tools ready, let’s jump into the fun part—conducting the 5-minute kitchen science experiments! I remember the first time I tried these with my kids; their eyes lit up with excitement as they watched the reactions unfold. Here’s how to get started:
- Fizzy Reaction: Combine 1 cup of vinegar and 1 tablespoon of baking soda in a bowl. Watch as the mixture fizzes and bubbles! It’s like a mini volcano right in your kitchen. The sound and motion are sure to elicit giggles and gasps from your little ones.
- Colorful Fizz: Add a few drops of food coloring to the fizzy mixture for a vibrant effect. Observe how the colors mix and change, creating a mesmerizing display. It’s a beautiful reminder of how science can be both educational and visually stunning!
- Swirling Colors: In another bowl, mix 1 cup of milk with 1 tablespoon of dish soap. This is where the magic happens! Watch as the colors swirl and create beautiful patterns, almost like a work of art. I love how this experiment encourages creativity while teaching kids about chemical reactions.
- Salt Experiment: Sprinkle 1 teaspoon of salt into the milk mixture and observe how it affects the swirling colors. It’s fascinating to see how the salt interacts with the soap and milk! This step always sparks curiosity and questions from my kids, which I absolutely love.
- Mini Volcano: In a separate bowl, mix water with baking soda and vinegar to create a mini volcano effect. Enjoy the eruption! This is always a crowd-pleaser and a great way to end your science session. The excitement in the room is palpable as they watch the “lava” flow!
These experiments are not only quick but also incredibly rewarding. I love how they encourage my kids to ask questions and think critically about what they see. Plus, they’re perfect for those busy afternoons when you need a quick activity to keep the little ones engaged!
Tips for Best Results
As I’ve dived into the world of 5-minute kitchen science experiments, I’ve learned a few tips that can make the experience even more enjoyable and educational for both you and your kids. Here are some of my favorite suggestions:
- Use clear containers: This is a game-changer! Using clear bowls allows everyone to see the reactions happening inside. I remember the first time we used a glass bowl for our fizzy reaction; the kids were mesmerized by the bubbling and fizzing, and it made the whole experience feel like a real science experiment.
- Encourage predictions: Before starting each experiment, ask your kids what they think will happen. This not only builds excitement but also encourages critical thinking. I love hearing their wild guesses—it often leads to some great discussions about science concepts!
- Document the results: Create a fun science journal where your kids can draw pictures or take photos of their experiments. This not only helps them remember what they did but also fosters a sense of accomplishment. I cherish looking back at our science journal filled with colorful drawings and notes about our experiments.
- Have paper towels handy: Trust me, things can get a little messy! Having paper towels nearby makes cleanup a breeze. I always keep a roll on the table, ready for any spills or splashes. It’s all part of the fun, but a quick cleanup ensures we can jump right into the next experiment without any hassle!
These tips have truly enhanced our kitchen science experiments experience. I hope they help you and your kids enjoy the wonders of science just as much as we do!
Project Variations
One of the best parts about 5-minute kitchen science experiments is that they can be easily adapted to keep things fresh and exciting! Here are some fun project variations that I’ve tried with my kids, and I think you’ll love them too:
- Color Changes: Get creative by experimenting with different food coloring combinations. I remember one afternoon when we mixed blue and yellow to create a vibrant green. The kids were thrilled to see how simple color mixing could create something entirely new! This variation not only adds a splash of creativity but also teaches kids about color theory in a fun way.
- Seasonal Adaptations: Make your experiments festive by using holiday-themed colors. For instance, during Christmas, we used red and green food coloring to create a holiday spirit in our science activities. It was a delightful way to combine learning with seasonal fun, and my kids loved showing off their colorful creations to family and friends!
- Different Liquids: Why not try using different types of milk, like almond or soy, to see how they react differently? I was surprised at how the results varied with each type of milk. This variation not only adds an element of surprise but also opens up discussions about the properties of different liquids and how they interact with other ingredients.
These project variations have added so much joy and learning to our kitchen science experiments. I encourage you to try them out and see what unique discoveries your family can make together! The possibilities are endless, and the best part is that you’re creating lasting memories while exploring the wonders of science.
Decoration and Usage Ideas
Once you’ve completed your 5-minute kitchen science experiments, the fun doesn’t have to stop there! I love finding creative ways to showcase our experiments and share the joy of science with others. Here are some delightful decoration and usage ideas that I’ve tried and enjoyed:
- Create a science display board: After conducting our experiments, we often gather the results and create a colorful display board. I let my kids draw pictures of each experiment and write down their observations. It’s a fantastic way to celebrate their hard work and curiosity! Plus, it makes for a great conversation starter when family and friends come over.
- Use colorful mixtures as centerpieces: The vibrant colors from our experiments can easily be transformed into fun centerpieces for a kids’ party. I remember one birthday party where we used our swirling milk colors in clear jars as table decorations. The kids were fascinated, and it added a unique touch to the celebration!
- Share findings with family and friends: Don’t keep the excitement to yourself! I love sharing our science adventures with family and friends. Whether it’s through a quick phone call, a social media post, or inviting them over for a science day, inspiring others to try their own experiments can create a ripple effect of curiosity and learning.
These decoration and usage ideas not only enhance the experience of your kitchen science experiments but also foster a sense of community and creativity. I encourage you to try them out and see how they can add an extra layer of fun to your science adventures!
FAQs about 5-Minute Kitchen Science Experiments
Q: Are these experiments safe for kids?
A: Yes, all materials used are safe and non-toxic. I always make sure to supervise my children during the experiments to ensure they’re safe and having fun. It’s a great way to bond while exploring science together!
Q: How long do these experiments take?
A: Each experiment takes about 5 minutes to set up and complete, making them perfect for busy schedules. I love how we can squeeze in a little science between homework and dinner prep. It’s a fantastic way to keep the kids engaged without taking up too much time!
Q: Can I do these experiments with younger children?
A: Absolutely! I’ve done these experiments with my younger kids, and they’ve loved every minute of it. Just ensure that younger children are supervised and assisted during the experiments. It’s amazing to see their faces light up with curiosity and excitement as they watch the reactions unfold!
Final Thoughts
Engaging in 5-minute kitchen science experiments is a wonderful way to bond with your children while fostering their love for learning. I can’t tell you how many precious moments I’ve shared with my kids as we explored the wonders of science right in our kitchen. These simple yet effective activities not only teach scientific concepts but also encourage creativity and critical thinking.
As a busy mom, I appreciate how these experiments fit seamlessly into our hectic schedules. They’re quick to set up and provide instant gratification with their exciting results. I remember one afternoon when we had just a few minutes before dinner, and we decided to whip up a quick fizzy reaction. The laughter and joy that filled our kitchen were priceless!
So gather your materials, roll up your sleeves, and dive into the exciting world of kitchen science! Don’t be afraid to make mistakes along the way; they often lead to the best learning experiences. Remember, the best part of these experiments is the joy of discovery and the memories you create together. I cherish those moments of wonder and excitement, and I know you will too. Happy experimenting!
Print
5-Minute Kitchen Science Experiments for Fun Learning!
Description
This project involves conducting simple and fun science experiments using common kitchen ingredients, perfect for engaging kids in learning about science in a hands-on way.
Instructions
- Combine vinegar and baking soda in a bowl to create a fizzy reaction.
- Add a few drops of food coloring to the mixture for a colorful effect.
- In another bowl, mix milk and dish soap to observe the swirling colors.
- Sprinkle salt into the milk mixture to see how it affects the colors.
- Mix water with baking soda and vinegar in a separate bowl for a mini volcano effect.
Keywords: kitchen science experiments, fun learning, kids activities, educational projects